26.2.14

Competitive? Moi?

'Miss says we have to tell all you parents to keep your hands behind your backs!'

Like that's going to happen.

It's competition time again; the St David's Day Eisteddfod - a Festival of music, poetry, baking and model making, held in schools across Wales. Absolutely guaranteed to bring out a steely competitive edge in many a parent.

Even ones you least suspect.

Is that me? Probably. I'm really not inclined to be competitive about most stuff, but give me a craft challenge and I'm suddenly possessed by a Blue Peter-like zeal to produce something simply glorious. Just can't stop myself.

We all tend to do more than we should, don't we? Frankly I think anyone who insists they haven't helped their child with his or her cardboard creation is a big fibber. And I'm putting my hand up here, because I've taken 'helping' to the nth degree.

Now, you know how much I like making things out of rubbish - and at home I'll quite happily let the kids get on with creating whatever they fancy: no interfering…but when it's school bound, that's a game changer. As much as I'd like to be relaxed about it, I just can't let them take in any old tat.

So this happens.

I know.


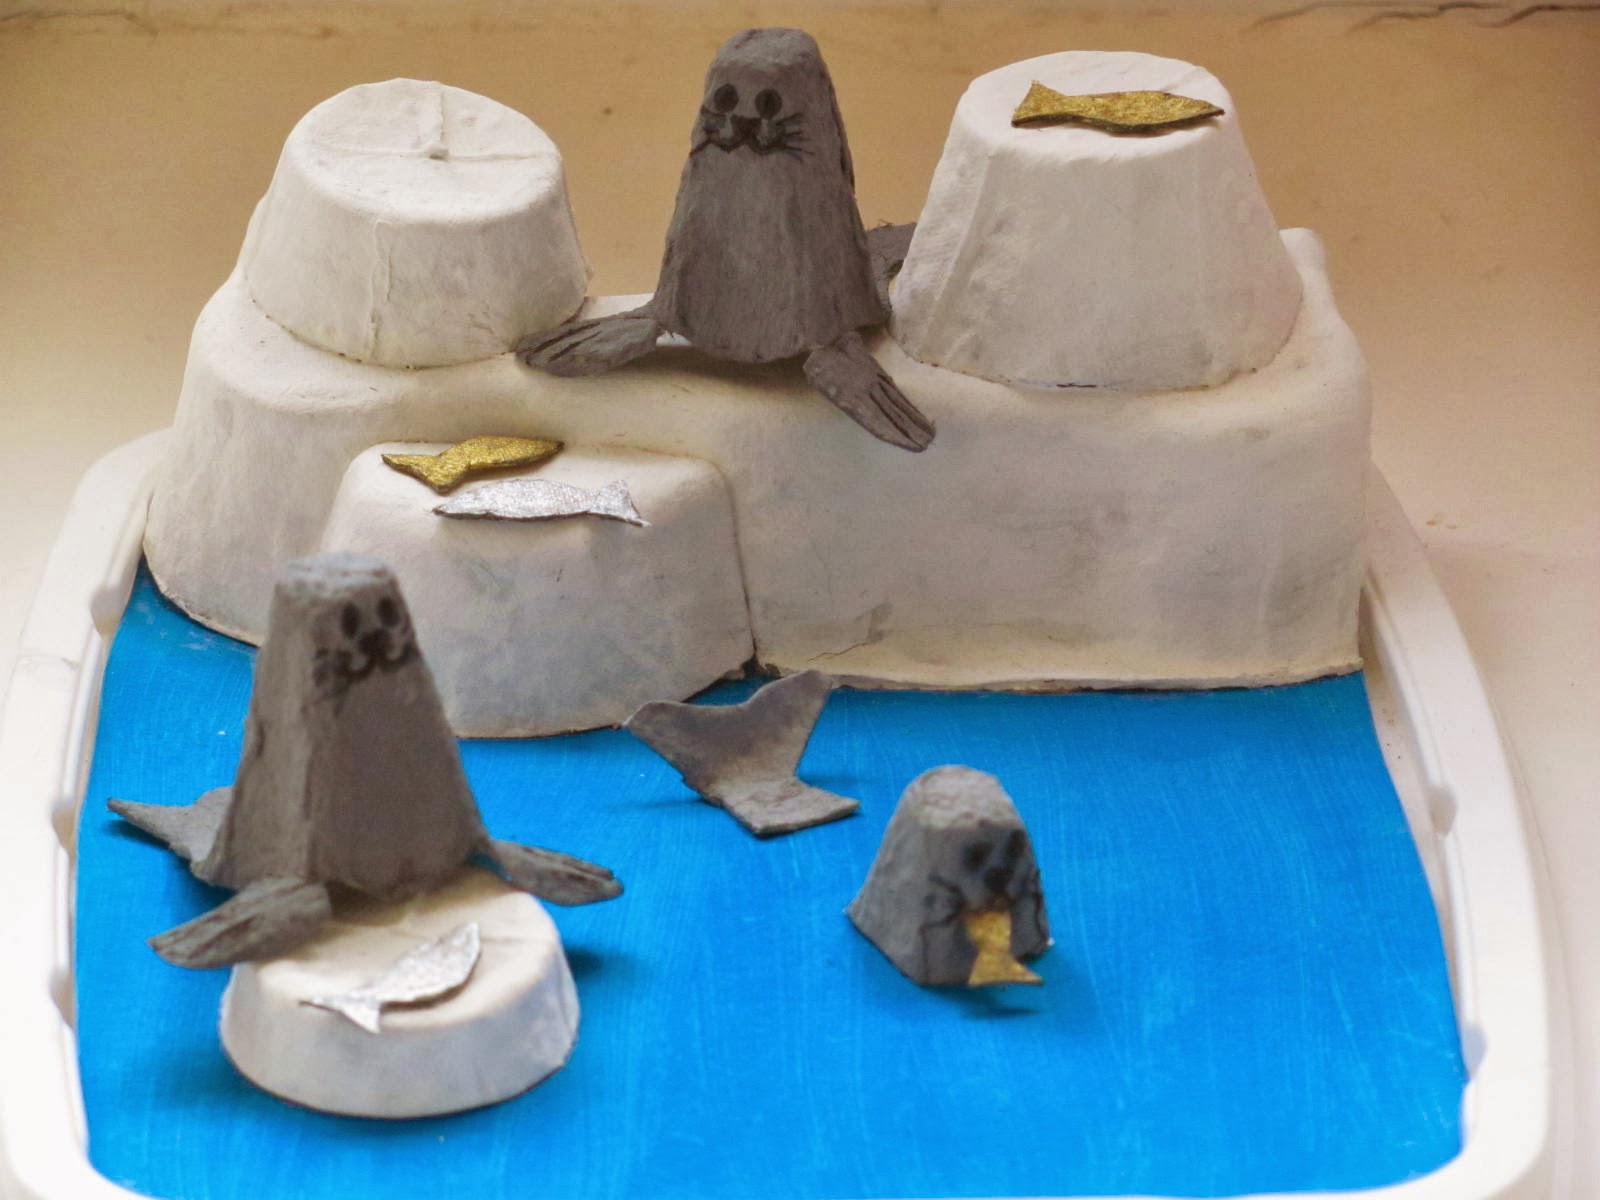
It was my son's idea to make a model of the Statue of Liberty…and that's about all he did, bless him. Basically I got completely carried away. Out came the empty yogurt and marg pots and the tin foil, and then I thought, what about some papier mache? Honestly I had the best time.

Our model didn't even get placed.

It so obviously wasn't made by a 7 year old. I was far too embarrassed to say a thing.

Did I learn my lesson? Don't be mad. What I learnt was to tone it down a bit.

Fast forward to this year's competition, and my 9 year old had to make a Dragon. Attached to the letter about the Festival categories was a slip all parents had to sign, declaring no help had been given beyond a little guidance.

Oh dear.

New school, new rules. Suddenly it all seemed terribly official, which presented a bit of a dilemma, seeing as on the whole I'm quite law-abiding. It's different somehow when you actually have to sign something.


So, to get round feeling like a complete fraud and a cheat, who's bound to get caught and hauled before the Headmistress, I made another dragon alongside my son for him to copy - not saying there wasn't the odd helpful snip here and there, but, on the whole it was his own work.


I really needn't have worried, because on the way into school today I saw one mum carrying a beautiful clay dragon. I'm quite sure it had been glazed and fired. And my son told me his best friend's dragon had legs that moved and a CAVE.

Think I'm going to have to up my game again…

(By the way, if anyone's interested in instructions for an egg box dragon, just let me know!)


22.2.14

Egg box seals that ain't Arf! easy...

The Zoo hasn't made an appearance for a while, but it's on my mind; pinging around in there - more about that in a moment - first though, a new arrival!

Arf!

Sammy the seal, plus food..

It's all about the cut with Sammy - no glue needed - just an egg box, a good pair of scissors, paint and a black felt tip.

Cut out as much of a middle cone as you can, right down to the bottom. I've drawn a circle round the cone in this box so you can see what I mean.


Draw a line half way up one side, then use the cone edges to help you draw the flippers, like this.


Next, angle the line from the flippers gently downwards on the sides of the cone..


..don't make the angle too sharp - and bring the two lines together at the back to form the body and tail.


Cut out your seal. Now, because egg box cardboard is prone to ripping, make a little snip at the top of the flippers at the front - keep these cuts quite small so you don't lose a flipper - then carefully bend the them, and the tail.


Round off the pointy corners left on the flippers after snipping - just helps make your seal look better.


Next, paint and draw a face, like this one, drawn on an unpainted seal so it's nice and clear.


We made a few fish from bits of leftover egg box card too,


and then the seals commandeered the penguins' pool ….


Maybe you remember a few weeks ago I showed you an upside-down shoe box? Well, this is what's inside.


The plan is to use my box of animals to promote Roll up to the Zoo as a possible book idea. Thankfully a friend is helping with the promo stuff, because I'm rubbish at that.


It might all come to nothing, but as my 6 year old says (as she enthusiastically enters yet another Milkshake! drawing competition), you've got to be in it to win it.

'Swings and roundabouts, Mummy!'

So weird hearing your own words coming back at you.

*Update Oct/2018* And it was worth it!

Plenty of projects to try in my craft books, 'Make Your Own Zoo' and 'Make Your Own Farm Animals'


11.2.14

Easy egg box roses

This is a little Valentine's or Mother's day gift that won't fade away - really simple to make too.


All you'll need for half a dozen roses is: an egg box, some pipe cleaners, red tissue paper, a yogurt pot, small piece of wrapping paper, PVA/craft glue, scissors and a ball of plasticine (modelling clay).

First, cut the six cups out of the egg box - they don't have to be straight and even, in fact a wavy edge is best as it's more petal-like.


Paint them...and possibly your hands, red.


Once they're dry, cut pipe cleaners into 10cm/4" pieces(green is great, but any colour will do) - then make a hole, push the pipe cleaner through and fold the top part over.
(Keep as flat as you can as this makes it easier to glue in the flower middle)


Cut a sheet of red tissue paper into three (about 20cm/8" by 12cm/5") and then start folding, so you end up with a strip roughly 2cm/0.75" wide.


Once you've done that, roll it up tight.


Let the tissue paper centre naturally unfurl so it fits neatly in an egg cup, and glue in place.


Optional: Fold some green tissue paper a few times, draw a leaf shape on top, cut out and glue to the stems.


Stick some paper or a ribbon onto your pot (or both!) to cover the writing.

If you're using paper, cut a strip to go round the pot plus a bit extra, then snip the strip into smaller pieces - this makes it much easier to glue evenly.

Best to leave the plasticine (modelling clay) somewhere warmish so it's not hard as rock when you try to push the stems in.


The added bonus is this gives the pot some weight, so you should end up with quite a sturdy little posy…

egg box roses

22.1.14

The Gallery - Something beautiful


...yes, I know, another sunrise - a few years of blogging and I'm getting pretty predictable! Give me a photo prompt like 'something beautiful' and I can't help thinking Sky. Again.

Thing is, if I see one like this I just want to try to catch it. To catch that beautiful, magical, fleeting moment. Always lifts my spirits, unless I've forgotten to bring the blinking camera.

It is another school run photo; another, 'Hurry up mum, we're going to be LATE!' photo. Definitely one of the benefits of being up and on the road so early, though not sure the kids would agree…


Many more beautiful things over at The Gallery

17.1.14

Keeping notes

The 6 year old is going through a bit of a note writing stage. Always furtively scribbling away - and no one's allowed to look - then little letters and cards just appear, by our bed, on the table, or in my knitting bag - all kinds of places.

They are terribly sweet and funny….and numerous. I've kept the best ones, but I'm afraid the rest have been 'filed away'. I've learnt to be careful though, after all hell broke loose when she found a few I'd filed in the recycling pile…

This one's a keeper.


10.1.14

Room with a View 2013


12 months and hundreds of photos later, and here it is: my patchwork landscapes or landscapes patchwork? And it's good seeing all the months side by side - a reflection of the ever changing view from our window over the year.

If I do anything like this again, I'd be more disciplined about how and when I take the photos: I'd stick to the same time of day and the same frame - having said that, the most out of sync one of the horses by the hedge in March is my favourite. Think I got better with the framing as the months went on.

I'm glad I did it - we're blessed with the view, still, you know how it is with things right in front of you every day: you kind of end up looking but not seeing. And I did see last year: how the light catches and lifts the landscape; how the shadows shift; how the rain can make it all fade to grey. Good to stop for a minute and properly take it all in.

Need to do more of that really.


21.12.13

Knitivity


This is my longest ongoing knitting project and probably my favourite. Every year a few more figures arrive at the stable, and I'm almost there - just two shepherds and an ox to go.

A while back I thought I'd lost the donkey, so knitted another one, only to find the original in my daughter's My Little Pony House… and I'd forgotten how many sheep I'd made - a few have wandered out of shot (need another shepherd) - last year I found some fluffy white and brown yarn in a charity shop and got a bit carried away.

I used 'Knitivity' by Fiona Goble. Such a great book. The patterns are easy to follow and the knitting really isn't tricky. Probably the most time-consuming part is the robes, and you do need lots of different colours, which was never going to be a problem for me with my wool hoarding habit..

It's such a lovely thing to have - every year I forget quite how lovely, until we take the figures out of the box and set them on the hall table. Hopefully they'll be making an appearance for years to come.

I've a few old family Christmas decorations that are very dear to me - and who knows, maybe far into the future some small person will be asking his mum why Great Granny knitted so many sheep..