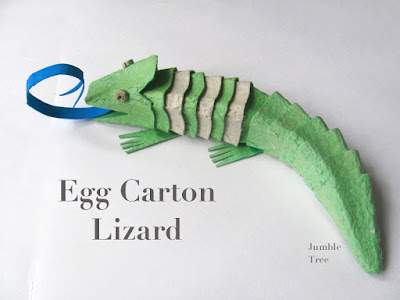
This craft is all about cutting and stacking, the only tricky part is you do need a lot of egg cartons!!
You will need:
3 x Large (dozen) egg cartons or
6/7 Regular (half a dozen) egg cartons
Pencil
Scissors
Craft glue
Paint (optional)
Toilet paper tube
Hole punch (optional)
1. Our Lizard is made from 14 of the middle cones you find in egg cartons.
If you can get hold a few of the larger cartons, you'll get 5 cones per box, rather than the usual two.
Of course you could always make one with less, and spread the cones out more, or add in extra cones (if you have them) for a really long tail!
You can either paint your lizard at the end, or leave as it is.
If you decide not to paint, then think about using different coloured egg cartons.
For our non-painted lizard we used mostly green, with a few white cones for contrast.
2. Cut the cones out roughly, in a strip, then separate them by snipping a part. We cut out 14 altogether.
LEAVE ONE OF THESE ROUGHLY CUT OUT CONES TO THE SIDE FOR LATER (FOR THE HEAD).
3. Then cut around the bottom of the 13 remaining cones, just above the bumpy cardboard joins - so the edges are even. (I've used a pencil to mark just above the card join on this cone below, to show where to cut).
4. Aim to make them look the same size (but don't worry if they're not exactly alike! And you can always tidy them up if you feel you need to, at the stacking stage)
Put one of these trimmed cones aside too (for the end of the tail) so you're now left with 12.
Then chop about 1cm off the top of 12 remaining cones, by squeezing the cone flat between your fingers and snipping across the top. The cut will look a bit wonky when you squeeze the cone back into shape, but that's fine, as you won't see this part when you put your lizard together.
5. Now the fun part, the stacking! We stacked 6 cones together for the body and alternated between green and white.
Brush glue around the inside edges of the first cone, then push the next one in, but don't push it in too far, you want to have spaces between the ridges (and this stretches out the body too). Brush glue around the inside edge of the second cone and add the third, and so on. Keep the spaces looking even (and you could experiment with the order of your cones, to get a good fit).
6. The next cone is going to go in the opposite way round (so you can attach the tail), but it's too big as it is, so you need to shorten it by cutting about 1cm/1/2in. or so, off the bottom edge, then glue inside the end of your stacked cones.
7. To make the tail less bulky than the body, cut about 1cm off the bottom of the remaining 5 cones too.
(You should still have 2 cones left aside, for the head and bottom of the tail)
8. Glue these 5 pieces to the body, but space them wider apart than the ones on the body - this will allow you to extend the tail and to curve it slightly as you do. Brush glue inside the pieces you're adding to the body, mainly on the bottom and the inside of the curve, where the cones are more in contact with each other.
9. For the end of the tail, take the trimmed cone (from step 4) you've been saving, and cut it in half lengthways, before gluing in place.
10. For the feet, cut a 3cm/1in. strip that widens at one end. Use this as a template to draw around, and cut out four. Either leave as it is, or snip out little zigzags to define the toes. Put them to one side while you make the head.
11. For the head, take the last remaining cone you cut out roughly at the very beginning, and hold it so you're looking at one of the flat sides. This will be the top of your lizard's head.
Snip out the two corners either side to make two small triangles. (See pics below)
12. Then cut away the sides and the bottom of the cone - so they're a little shorter than the top of your lizard's head.
13. Now, shorten the pointy end of the cone by no more than 1cm, by squeezing the cone flat between your fingers like before, and cutting across. This time though you will need to trim the wonky edge, to straighten it.
14. Next, make the open mouth by snipping out long triangles (roughly halfway along the head), on both sides.
Check the head looks right on the body, but don't glue it on yet - if it's looking a bit big, shorten the head at the back.
15. For the eyes, cut a thin piece of egg carton card about 8cm/3in. long and snip half. It's good to use a contrasting colour to the head if you can, especially if you aren't going to paint the lizard.
Brush glue along the length of the thin strips and roll tight. Squeeze and hold so each swirl sticks together. If this is too fiddly, use a hole punch to punch out card circles and maybe stick a few on top of each other. Or use googly eyes, or just draw them on with a pen.
Glue the head to the body - with a good layer of glue inside the bottom edge of the head where there's more contact between the head and body.
Glue the eyes on the ridges either side of the head.
Glue the feet under the bod, angled forward.
16. For the tongue, paint the end of a toilet paper tube (or kitchen paper tube) your choice of colour - make sure you paint the inside too - and when it's dry, squeeze the tube flat and cut off the top cm or so. Snip this ring open, and cut a long thin 'V' shape at one end.
17. Glue the other end inside the lizard's mouth.
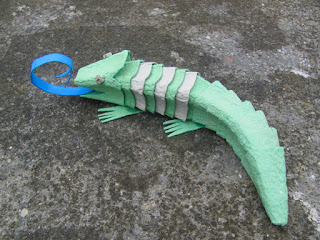
And he's off! Exploring the garden...
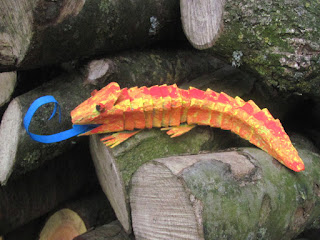
...with his exotic, fiery cousin..


