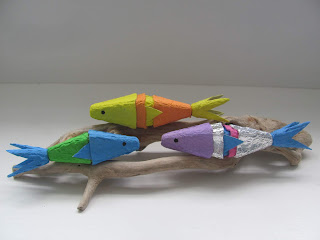
Fish made from egg cartons. Two of my favourite things! I have fish plates, tiles, pictures, crafts all over the house - a fish mobile I made from copper wire, beads and shells years ago is still doing the rounds on Pinterest, so there's obviously a lot of other people who like fish too. And I think if you've popped by here before, you'll know I'm pretty keen on egg cartons!
This craft is very similar to the stacking croc and lizard, except easier, because you don't need to hunt for quite so many egg cartons..
You will need:
At least 2 egg cartons
Scissors
Craft glue
Paint
Tin-foil (optional)
Black pen
1. For the smaller fish you will need four egg carton cones. Cut them out roughly first, then more neatly, above the bumpy cardboard join, so you end up with a nice even edge around the bottom.
2. Then shorten three of the cones by about 1 cm/1/2in. - do it by eye, as it really doesn't have to be exact - the important thing is that the three shorter ones are roughly the same height.
3. Paint the cones whatever colour you'd like your fish to be. A good tip for painting cones is to slot one on top of a spare, roughly cut out cone, so you have something to hold onto while you paint, and hands hopefully get less messy!
4. Brush glue inside the larger cone (fish head) and slot one of the smaller cones into it, facing the opposite way.
5. Brush some glue inside another cone and slot it over the top. You could push this right up to the front head cone, or leave a little of the one underneath showing.
6. For the tail, take the remaining cone and cut out triangles on each side, going from corner to corner. (You could paint the inside of this cone too, for a neater finish)
...so it has a kind of bluebell-shaped look...
7. Flatten the top part of the tail with your finger, and the end of the fish where the tail is going to go, and glue together. We found the best way to get the glue to set was to place our fish upright, on its tail, propped up against something, so it didn't fall over. Or you could use stronger glue like UHU, or a glue gun.
8. Use the triangles you've cut out for the fins. Shorten and trim if you need to, and glue just behind the head cone. Dot on eyes with a black pen.
9. For a larger fish, the process is the same but you'll need 6 egg carton cones. This time shorten four, and keep two the original size (for the head).
10. Stack and glue the larger cones together, so you can see a part of the underneath cone, then glue and slot one of the smaller cones inside, facing the other way.
11. Start stacking on the smaller cones - you can push the next one right up towards the head, or leave a little gap. Space the next cone, so you can see the one underneath. Try to keep the spacing even, but it really doesn't need to be perfect.
12. Cut triangles out of the sides of the remaining tail cone, flatten the top and the end of the fish and glue together. For fins, glue two spare triangles just under the front cones. Trim the triangles if you like.
13. For shiny scales, we covered a few of our egg cones with tin foil. Just wrap a piece tightly around the cone, tucking any bits hanging over the end inside.


