11.1.17

Cork lovebirds - Valentine's crafts for kids


I'm not the biggest fan of Valentine's day, but I am partial to a good hearty craft, and unlike most Valentine's stuff, this one won't cost you! 
These little lovebirds are made from corks (saved up over Christmas.. I have many.. ) They are quick and easy to do and can be turned into a useful gift, like a keyring or a fridge magnet. Love a useful craft! You could also write a little Valentine's message on the heart if you want to.

You'll need:
A cork
Coloured paper
Paint
Hole punch
Glue stick
Craft glue
Fine black felt tip or gel pen
Feather (optional)
Mini eye pin (optional)
Keyring (optional)
Small magnet (optional)
Strong all-purpose glue (optional) 

1. Paint the cork any colour you want. 


2. Fold a small piece of coloured paper in half and draw half a heart on the fold. You want it to be roughly half to two thirds the length of the cork - and make it narrow. If it looks too big, fold the heart again and trim until you're happy with the size.


 3. Carefully cut around the shape and open it up.


4. Rub some glue stick on the back of the heart and glue it to the cork with the point almost touching the bottom edge. Cut a strip of different coloured paper for the wings - make the shorter side about the same height as the heart. If you're making a penguin, leave out the wing strip.


5. Line the edge of the strip up with one side of the heart and the base of your bird, and wrap the rest around the cork - cut away any extra paper where it touches the other side of the heart.


6. Rub glue stick on the top half of the strip only and glue in place, so the bottom of the wings stick out slightly.


7. For the eyes, use a hole-punch to punch out some circles - rub a little glue stick where you want the eyes to go on the cork, wet your finger to help pick up the little circles and stick them in place.


 8. Use a fine black pen to add the centres.


9. For the beak, cut out a small triangle from yellow or orange paper (or colour in some plain paper), rub glue stick just below the eyes, wet your finger to help pick up the triangle, and glue in place.


10. Paint feet on the bottom edge with yellow paint and leave to dry.


11. To add a feathery head plume, make a hole on top by screwing in a small screw, nearer to the front of your bird. Take the screw out.


12. Choose a feather, dab a little glue on the pointy tip and push it into the hole.


13. To make your lovebird into a keyring, screw a mini eye pin (seen in step 11) into the top of your cork and attach a keyring. Or, for a fridge magnet, glue a small magnet to the back of your bird. Use strong all-purpose glue like UHU.


I got these little magnets on Ebay - they're a great size, weren't expensive and are seriously strong. Nothing worse than a fridge magnet that doesn't hold stuff!


Linking up with Trash2Treasure 

5.1.17

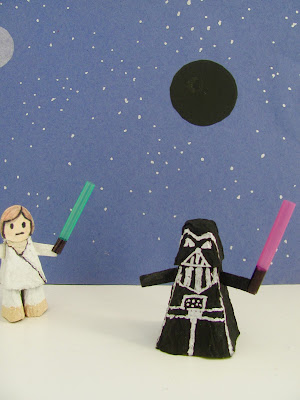
Easy Darth Vader figure - Star Wars craft

Darth Vader kids craft
Come over to the dark side....

Darth Vader is back...
And if you have any young Star Wars fans in your life, then you might want to have a go at making this easy little mini figure.

You'll need:
Egg carton
Craft scissors
Pencil
Ruler
Black paint
Silver metallic pen (fine/medium nib)
PVA/craft glue
Red/pink straw
Black permanent marker (like a sharpie)
Nail scissors (optional) Adult supervision needed

1. Roughly cut out two middle cones from an egg carton so they're easier to work with.


2. On one of them, draw a line all the way around the cone, just above the bumpy card joins at the bottom. Cut along the line and check the cone sits flat and even. This will be the body.


3. For the head, take the second cone, and use a ruler and pencil to measure and mark about 2cm (3/4in.)  from the top on each side. Join the marks with a rough line. Cut out the head - a good way to do this is to cut up two adjacent corners to the line, bend back the card flap and cut it off. It's now easier to cut along the rest of the line.


4. Glue the head onto the body. Cut a strip of card from the egg carton lid for the arms - make it roughly 0.5cm wide(1/4in.) and about 5cm long (2in.)


5. Paint the body and the arm piece black.

TIP: Put the body on a spare egg carton cone while you paint it - much easier and less messy!


6. While that's drying, cut about 4cm (11/2in.) off the end of a straw and use the black marker pen to colour in the handle of the lightsaber.


7. Use the silver marker to add detail to Darth Vader's head and body, using the picture here as a guide.


8. Bend the card strip in half and cut along the crease, then either stick the arms on each side of the body with glue, just below the head - or, make slots either side, just below the head, using the nail scissors (keep them closed, press down and twist - once you've made a hole, cut slots to fit the arms)


9. Make small slits up the handle end of the lighsaber, so you can slot it onto the bottom of Darth Vader's arm, and he's ready for action!


10.12.16

Christmas tree decorations - Christmas crafts


Christmas tree decorations this time, and they're not that different from the sparkly birds.

You'll need:
egg box/carton
pencil
paint
plastic bottle top
sheet of newspaper
fine paintbrush
craft glue
strong all-purpose glue
glitter (optional!)
Sequins and other shiny bits
needle and thread
Nail scissors (to make holes - adult supervision needed)

1. Roughly cut a whole cone from the egg carton


2. Draw a rough pencil line all the way around the cone, just above the bumpy card join at the bottom, and cut along the line. Neaten up the edges so the sides are even and the cone sits flat.


3. Paint the cone green (if it's green already you could leave it). When the paint's dry, use the nail scissors to pierce a hole through the top (if there isn't one there already) - keep the scissors closed, press down and twist from side to side.


4. Thread a needle with a good length of thread - we used gold thread, but use whatever you have - and push the needle up through the cone and through the hole, then back down through the hole, leaving a loop for hanging your tree. Use sticky tape to stick down the two strands of thread inside the tube. Trim the ends of the thread.

5. Brush glue inside the cone and push in a scrunched up piece of newspaper. Don't fill it completely - leave a small space at the top.


6 Put a layer of strong all-purpose glue (like UHU or Bostik) on the newspaper and put some on the rim of your bottle top too. Stick the bottle top onto the newspaper and leave to dry upright.


7. When the glue's dry, brush some craft glue in a spiral, around your tree for the tinsel, then sprinkle over some glitter. Shake off the excess. A good way to save glitter is to do the sprinkling over a paper plate, then bend the plate in the middle to catch the glitter in the fold, and funnel most of it back into a container.


8. Have fun gluing on sequins or any shiny bits you have. You could also scrunch up small balls of coloured tissue paper to make baubles.


9. For the star on top, we used two identical stars from a pack of Christmas confetti, brushed glue on the back of one and stuck it onto the thread, just above the top of the tree. Then we stuck the other star to it, sandwiching the thread between them. Fiddly to get the stars to line up, but looks good when they do.

Next time Christmas fairies!


4.12.16

Christmas tree advent calendar

Advent calendar

Our advent calendar has grown this year... conveniently the little pegs have numbers on them and I bought them thinking they'd save time sewing on numbers (which I know from experience takes me ages), but to be honest sewing up the felt baubles took a while anyway. I've only just finished! Quite pleased to have made a dent in the pile of felt scraps I've been hoarding for years.

I drew around the top of a cup on some felt and sewed two circles together using blanket stitch, leaving an decent sized opening, so it's a sort of bauble pocket. The Christmas tree frame is made from pieces gathered up after pruning the hedge in the back garden, though you could use any straight-ish thin branches. I used some gold wire bought from Tiger to bind them together, with three smaller bits in the middle to strengthen the frame and to give me something to wrap the lights around. Then just attached pieces of wire between each section for hanging the baubles. The star on top is an old Christmas tree decoration.

I like it because it's bright and Christmassy and doesn't look half bad on the wall - the kids like it because there's room for more treats...

Linking up with Darren's My Sunday Photo


17.11.16

My new Animal Fun! board books get chewed over....


My little nephew, road-testing one of my new Animal Fun! board books which have just come out. I'm chuffed to bit with them - a totally unexpected but very lovely spin-off from the craft books.


There are four in the set - the usual suspects - numbers, sounds, touch and feel and what's hiding under the flaps? They're packed full of animals from Make Your Own Zoo, but there's also a bunch of new ones from my next craft book that'll be published in the spring.

I spent many happy hours tootling around, making little settings for the animals - with trees, birds, rocks, lizards, snakes, butterflies, squirrels....totally in my element! Especially for the 'Where do I live' book, which has big flaps to reveal what's hiding behind things.


And had to make a right old party of penguins and piglets for the number book.


Sadly mine are passed this age and stage now, but think the books brought back fond memories for my daughter who took a shine to the 'touch and feel' one.

My nephew seems to be pretty keen on the noisy one - my sister, not so much!


And the most important test of all?


Yes, they taste pretty good too.


22.9.16

Photoshoots, foraging and a food festival


Two trips to London and 8 days of photoshoots later, and at last I feel I'm making proper progress with the second craft book. Of course I'm relieved, but also weirdly deflated, which has left me feeling a bit restless, and possibly, depending on who you talk to, a little grumpy?

Coming up with 35 new craft projects took over the whole of my summer - if I wasn't making something out of cardboard, I was thinking about making something out of cardboard.... or feeling guilty I wasn't. It drove me mad but also gave me a focus, because I didn't have long, just 2 months, and the date for the first photoshoot was burning a hole in my wall calendar. Couldn't really think about much else, which made me feel guilty I wasn't doing enough with the kids. Can't win, can you.

When the London days came and went, I suppose it was a bit like taking the lid off a pressure cooker - and I just wasn't as over the moon with what was left in the pot as I thought. Probably didn't help that I'd had a really good time in London - the days were full-on but rewarding, and I stayed with an old school friend I don't see enough. After work we chatted, went out, ate out - no one else to feed or clean up after. I felt like me. Even took a bit better care of me. Even used my hardly ever touched eye-cream, which seems to be some kind of strange barometer to where I sit on my list of priorities.

There are many wonderful things about being able to work from home, especially with kids, school runs and an often absent husband to deal with - but it is hard to keep motivated sometimes, and it's lonely. Being away just brought all of that into sharp focus again I think.
I miss people and chat and talking ideas though with someone.
So, best not to ring me during the day at the moment, you'll never get me off the phone.

Possibly it's been a bit of an anti-climax and I'm kicking my heels about getting back to my quiet existence in peaceful Herefordshire - but I know it'll pass, it usually does. And it's not as if I have nothing much to do. Still need to write up all the instructions for the craft projects! Which is what I should be doing right now.

And sure, there are adventures of a different kind to be had here too. The day before I caught a very early train to London I went for a 'get thoughts in order' walk near home and did a double take when I spotted this huge puffball by a gate.


It was so big and brilliant white in the sun, I thought for a second it was a sheep taking a nap.
I rushed back to tell my daughter who gets extremely excited about this sort of thing. And it was a perfect giant puffball; very firm and hardly nibbled.

Giant puffball

She was desperate for me to take it home - when we found a much smaller one a few years ago, I fried slices in butter, garlic and bacon and it was a big hit. Lasted for days too, so goodness knows how many meals we could have got out of this one.* But we left it in the end, because I was off first thing, and my husband isn't keen on cooking bog-standard stuff, let alone a mushroom twice as big as his head.


When I got back home I treated myself to a day at the Abergavenny Food Festival. What could be better than delicious and lovingly-made produce as far as the eye can see? Though I do seem to suffer from some kind of food festival meltdown - happened last year as well - there's just too much choice. I become annoyingly indecisive, can't make up my mind at all, and end up eating very little. Instead I seem to spend most of my time checking out what other people are eating and wondering where it came from. I did bring a few things home and they did go down very well, especially the orange and chilli jelly.


I also bought a beautiful knitting book, which was a bit of surprise at a Food Festival.. Delighted with it though. More about that soon.


*Giant puffballs like this are about the only mushrooms I'd happily forage because they're pretty hard to mistake for anything else. More nervous about other ones, after going on an fungi foraging course last autumn (which was excellent) and realising there are a few common wild mushrooms that have an evil almost identical-looking twin. You really need to know your stuff. Think now the pleasure's in the finding rather than the eating for me.