23.5.20

Pretty toilet paper roll butterflies!


I love butterfly crafts, and this is a very straightforward one. A great excuse to use lots of bright colours too!

You will need:
Toilet paper rolls
Paints (we used bottles of poster paints)
Scissors
Pencil
Pipe cleaner

1. Paint your tubes first. To get a really nice mix of bright colours, put two or three blobs of colours that work well together on different plates (ones that don't make sludgy brown when mixed!). 

Like yellow and red, blue and white, or blue and yellow, green and yellow, yellow and pink, or blue, pink and white. White added to any of these colour combos looks great. We had some ready mixed purple too, which looked lovely with the pink and the blue.

This is a great way for kids to experiment with colour mixing, using a simple palette of complementary colours. Give them a big brush to paint with (we often use a pastry brush) - this helps with the mixing and with speed.. and then let them loose!

We painted the inside of the tubes as well, but you really don't need to. Works just as well without.


Mixing up the complementary colours gives a lovely marbly or sort of tie-dye effect. But if you wanted to do stripes of colours instead, or add some dots, that's totally up to you!


2. When the paint is dry, flatten a tube with your hand and press along the creases, so it's easier to draw on.

3. Use a pencil to mark the outline of your butterfly - for the butterfly body, mark about 3cm/1in along the crease, on the left-hand-side. To get the proportions of the top and bottom wings right, we drew this body line a little closer to the bottom of the tube than the top.

(As a guide, our TP roll was about 10cm, the body line starts 4cm from the top of the tube, and finishes roughly 3cm from the bottom of the tube.

Draw a curved line from the top of the body line to the top right-hand corner.

Make a pencil mark halfway down the body line on the LHS.

Draw a straight line from the right-hand edge towards this mark, but leave a gap (of about 2cm).

From the end of this line in the centre of the tube, draw a big curve down to the bottom right-hand corner.

Then, from the bottom of the body line on the LHS, draw another sweeping curve towards the same corner, but for fuller bottom wings, don't take this line right to the corner, stop a little before. See photo below.


4. Cut out your butterfly, cutting through the doubled-over card.  With the middle section, it's easier if you cut along the straight line first, then cut along the curve below, starting at the bottom right-hand corner.


5. Cut away a little sliver of the top wing crease. Cut it at a slight angle. See below.

Don't cut off too much!


6. Open up your butterfly. The natural curve of the tube makes a lovely shape.


7. Bend a pipe-cleaner in half and hook it around the middle of your butterfly.

Twist the two pieces together to fasten, then wrap one tightly around the other, to make a head.


When you're happy, decide how long you want the antennae to be and trim the pipe-cleaners, allowing a little extra if you want to bend over the pointy tips so they're not so sharp. Bend into shape.


8. We made so many butterflies we needed somewhere to put them! So we painted some old cardboard packaging brown (you could leave it its natural colour) and cut out a tree trunk and some branches.

We glued them all onto some brown wrapping paper with pva craft glue. But didn't stick down the very ends of the branches, so they stuck out a bit.

Then attach a paper clip to the pipe-cleaner on the underside of a butterfly and clip this onto the end of a branch.

If you don't want to be able to remove them, you could of course glue the butterflies onto the tree.


11.5.20

Flower Power! Collection of flower crafts for kids

flower crafts for kids

Making flowers out of ordinary stuff you can find at home is one of the most satisfying and joyful crafts to do with kids. And the added bonus is they make great Mother's Day or Valentines gifts!

I've gathered a few of my favourite flower crafts here. I hope you enjoy them as much as we did.

Click on the links for the full tutorials.


We got so carried away with these! Very addictive. The house was covered in colourful paper flowers.  Very handy for collages and making cards.


Just one toilet paper roll needed. We made the flowers with tissue paper... sticking pieces on the stems and then scrunching them up so they looked more flower like.


Then we tried paper hearts, which look like tulips!


This meadow scene is simple too - just some zigzag cuts in a toilet paper roll to make the grass, then add any flowers or wildlife you like. You could add things you spotted on a walk, so your little scene tells a story.


Then there's the classic egg carton flowers. You can't go wrong with them. The cups and the cones from an egg carton are perfect for flower shapes.

Here's our Spring Flower Posy


And a sweet bouquet of roses


Egg carton cups are also great for making poppies.


egg carton poppy wreatn


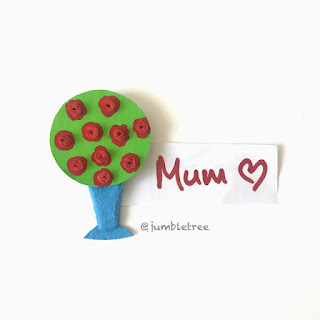
This little bouquet of roses made from cereal box card, paper and an egg carton cone makes a sweet little fridge magnet.


These Tissue Paper Peonies are fun to do and look so pretty.


Printing flowers with stuff you already have at home is a great activity, and perfect for making cards for Mums or loved ones. You can do potato printing, use a toilet paper roll pressed flat to make a petal shape, or you could try some bubble-wrap flowers.


wisteria - bubblewrap art


cow parsley - bubblewrap printing

and last but not least, a tiny bouquet of flowers made from an egg carton cone, just the thing for a doll's house!


8.5.20

Rose Bouquet fridge magnet - Mother's Day Craft


A simple and quick, and hopefully useful Mother's Day gift!

We made this two ways - rolling paper for the flowers and scrunching tissue paper - the second option is easier for littlies to do.

You will need:
Egg carton
Cereal box card (or similar)
Coloured paper (or painted plain paper)
Tissue paper (optional)
Craft glue
Paint
Scissors

1. First paint some cereal box card green and one of the egg cones blue or whatever colour you'd like your vase to be - paint some of the egg box lid too.

Putting the egg cone on a spare cone makes painting a lot easier (and a little less messy!)


2. Find something in the kitchen with a small round base to draw around. We used a spice pot. Cut out your circle.

We cut out two to show the different ways to make the flowers.


3. For the rolled roses, cut a strip of coloured paper (we chose red), about 16cm/6in. long and roughly 8cm/3in. wide. Put a little line of glue at the far end and start rolling, keeping it tight.


4. With good scissors, cut across your roll - this is best done by a grown-up - keep the pieces as thin/small as you can.


5. Paint some red splodges on your green circle, where you'd like the flowers to go.


6. Get on with making the vase while the paint dries, then dot some glue in the middle of each painted flower shape and add your little paper scrolls.


7. For an easier option, fold some tissue paper over a few times and cut out small squares (about 3cm/1in.) ). Then scrunch them up to make your blooms. Glue on the red paint marks, as before.


8. For the vase, cut the egg carton cone in half lengthways.


9. Then, trim away some of the side, so it's more even. Give it a press to push the sides out a little.


10. For the base of the vase, cut a triangle out of the spare egg carton card you've painted. Make the triangle quite flat and wide. Glue under the bottom of the vase. (The one on the right has tissue paper roses)

Glue the top of the vase to the back of your flowers.


11.  To make it into a fridge magnet, you'll probably need to glue some card to the top part of the vase first, so the magnet is at the right level. We used some strong clear glue (like UHU glue) to stick the magnet on. Or you could use a glue gun.