Showing posts with label use what you have. Show all posts

17.6.20

Sleepy Cat - made from toilet paper rolls!


Squashing toilet paper tubes to make different shapes opens up a whole new world of crafting possibilities! If you visit my blog regularly you'll know I'm forever flattening them to make a square shape..

These sleepy cats are no exception, and they're really not as tricky to make as you might think. It's all about the cutting and the folding. They are made in a similar way to our dog (called Scamp) and pig (called Oink!)

You will need

Toilet paper roll (ours was about 10cm long)
Small piece of spare card (from a cereal box or another TP roll)
Pencil
Ruler
Scissors
Craft glue
Paint
Sponge (optional)
Black pen.

1. Flatten the TP roll with your hand, then press firmly along the creases.


2.  Draw two lines across the flattened tube - each one should be about the same distance from the ends, and shorter than the section in the middle (which will be the cat's body)

(For our roll which was roughly 10cm long, we drew lines that were 3cm from each end and the middle part was 4cm. See the picture below).


3. Then lift the tube and line up the two creases, in the middle (see below), and once you're happy, flatten the tube again, pressing along the two new side creases. There should now be four, hopefully evenly spaced crease lines around the tube.


4. While it's still flat, continue the pencil lines across the tube - free-hand is fine, the lines are just there as a guide.


5. Cut down all the creases at both ends to the pencil line.  8 cuts altogether.


6. Fold and press back all the flaps, except for two at opposite ends. These flat pieces will be the bottom part of the cat (the outstretched legs).


7. At one end, cut the top flap off, carefully along the crease. This square-isn piece will be your cats head. Keep it somewhere safe.


8. To define the legs, cut a thin triangle shape in the middle of the flat, unfolded piece of card. Cut right up inside your cat's body. Do this at both ends and round off the paws if you want.


9. Now, at the head end (the one with no top flap), fold one of the side flaps right back against the side of the tube, press firmly along the crease again, then fold this flap in the middle (so, effectively in half) so the top edge of the flap lines up with the bottom part of the flap (the edge of the body), and press firmly along the folds.


10. Do the same on the other side, then push these folded flaps inwards, towards the tube.


11. They should come together well enough, like little doors, to seal off the front of your cat.


They will jut out a bit in the middle (see RHS of photo below), but this is what we want, because this is where the head will be attached later. No need to use any glue at this stage.


12. Do exactly the same to the flaps at the other end, but this time, before you push them inwards, into the tube, cut a slit up the middle of the top flap, right up to the fold (cut a sliver of card out, to make a slightly larger slot - this makes things easier)

As you can see ours isn't exactly in the middle! But it still works, it doesn't need to be perfect. Push this top flap down, to cover the hole, and then press the two side flaps into the slot.

Essentially it's like closing a little box! And it should hold together without glue.


13. Now for the tail - draw on some spare card (we used another tp roll, so both sides were easy to paint)

We made our tail quite curly and quite fiddly to cut out! So do go for a simpler shape if you prefer.

Make the tail extra long at the body end, so you can slot it into the back.

It should stay in position, but take it out again for painting.


14. Take the square of card you cut off earlier for the head, and cut a gentle curve along one side, to form the cat's ears.

15. Time to paint, and we used a sponge, which was fun and really quick! For our marmalade cat we squirted some yellow and a little red poster paint onto a sheet of newspaper (with an extra sheet underneath) and used the sponge to mix the colours and press the paint onto the cardboard pieces.  Using the sponge gives a lovely mottled effect.

Sponge both sides of the tail.

(might notice the newspaper's been recycled from the forget-me-not printing project!)


16. When the paint's dry, slot the tail back in (dab some glue on the end, if you feel it's a bit loose) and use a black pen (gel or thin marker pen) to draw on a face, plus claws on the front paws.

We added some tabby stripes to the face on the left with an orange Sharpie. You could draw stripes on the body too if you wanted.

Put a good blob of glue on the back of the head and attach to the top of the protruding flaps at the front. You could glue it so the head is facing forward, or glue the head angled to one side, as we did.


toilet paper roll cats paper roll crafts for kids

toilet paper roll cat paper roll crafts for kids

And here's my real sleepy cat!!


11.6.20

Bubble wrap flower printing for kids

bubble wrap printing kids art easy printing

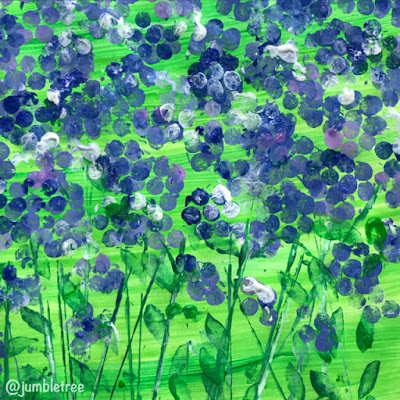
It's fun finding things at home to print with, and bubble wrap has to be one of our favourites. We've used it before, to print cow parsley and wisteria - this time it's forget-me-nots (though it really could be any purply-blue wildflower).

I wanted to do forget-me-nots because they remind me of home. They appear all over our garden, in unexpected places, and always brighten things up.

Forget-me-not, forget-me-not
I'd say that's quite unlikely
since you spread your seeds like common weeds,
at least you're not unsightly..

In fact you bring a zing of spring to any garden nook
which is good news as clouds of blues are everywhere I look!

To make the stamps, cut out a circle of dots (7 dots altogether) and make sure you don't snip or puncture any of them, and glue to the bottom of a cork, or on top of a bottle lid would work too. Use strong glue like UHU or a glue gun if you've got one.

We also made a stamp with four bubble wrap dots, for a bit of variety.

You can of course print on plain paper, but we thought we'd brush on a green wash (using watered down green poster paint and a big brush)

For the flowers we put a good squirt of blue, white and purple paint on a plate.


Mix some of the colours together, but leave some unmixed too. Encourage kids to experiment with all the different colours and shades - dipping into the mixed colour and then dunking into some white or blue. This has a lovely effect, giving the flowers much more life and depth.

Try not to overload the stamps with paint or you'll end up with lots of blobs with no definition at all. To help avoid over-enthusiastic splodges, get kids to try their flower stamp on some newspaper first, which acts like a kind of blotter, before printing on the paper.

You could brush paint on the stamps instead too, but that's not going to be as much fun!


For the stalks, use the side of a coffee stirrer or popsicle stick. We mixed some blue into the green to make it darker, and as before, dipped the side of the stick into the mixed colour, as well as the plain colours, plus a little white too, which helps give the stalks more definition, as if they're catching the light. Get some white on the stick and press it along the side of a printed green line.

This is a simple way of achieving a more advanced effect, and it looks great.


For the leaves, we used half a potato and drew and cut out a simple small leaf shape.


If you want to add yellow centres, dot on some yellow paint using the end of your coffee stirrer, or popsicle stick.


28.5.20

Egg carton foxgloves


It's foxglove time of year again, and I love the way they self-seed and pop up randomly in the garden - in the weirdest places sometimes. They're biennials, so they don't flower their first year, but make up for it (with bells on!) the second year.

Egg carton cones are perfect for the shape of the bell-like flowers - add some paint, a few green pipe cleaners and paper leaves, and you have foxgloves to enjoy all year round!

You will need:

10 egg carton cones (2 x dozen cartons or 5 x half-a-dozen cartons)
Scissors
Paint
4 long Pipe cleaners (ours were about 30cm) + 1 for attaching the leaves
Sheet green paper (or plain painted)


1. Roughly cut the middle cones from the cartons.


2. You need to vary the size of the cones - so two big, two a little smaller, the next two smaller again and so on. So you have five sets of two. But honestly, each set of two doesn't have to be exactly the same! As long as all of them range from big to small that's fine.

(Easiest I think to cut them all out the same first - so cut around each cone, just above the bumpy cardboard join and then put two cones aside, and mark the others with a pencil in sets of two, getting a little closer to the cone top each time)


3. Next, you need to angle your foxglove bells, so you can see inside.

Draw a straight pencil line across one side of a cone, roughly a cm or so above the bottom edge, and then join the ends of this pencil line to the two back corners with a diagonal line.


Cut out. Do the same for all ten.


4. Painting time next, and we used a mix of purple, pink and white, to paint each cone, and then brushed white paint around the edge and dots of white inside. It helped to have a real foxglove bell to look at, but you could also use an online photo.


5. When the painted was dry, we added some green paint on the pointy end, but this is an optional step.


6. You will need four pipe-cleaners for this bit - ours were about 30cm long. Keep one aside and cut the other three into three roughly equal pieces (of about 10cm)

Wind one end of the uncut pipe-cleaner around itself to make a kind of knot (so it doesn't slip through the hole), and thread through one of the smallest cones.

(Our cones already had holes on top, you may have to make holes, nails scissors are good for this, or place the cone on a piece of old modelling clay, with the pointy end on the clay, and push a sharp pencil/pen or knitting needle through the inside of the cone, so it pierces through the top. Take care though, as the card can be thin here, and don't make the holes too big)


7. Do the same with all the other smaller pieces of pipe-cleaner.


8. Now, wind each bell onto the long pipe-cleaner, going from small to large.

First, hold the other smallest cone about 2cm or so below the top flower, and out to one side. When you're happy with the position, wind the short pipe-cleaner tightly around the stem. Then hold one of the next size cones JUST below the one you've done, facing to the other way, and wind the short pipe-cleaner tightly around the long stem again.


9. A few cms below, add the next two (in order of size) in the same way, and repeat, until you have three cones remaining.

You want to get these three to be close to each other.

So, do as you've done before, add the next size a few cms below the two above, and bend it so it's facing the opposite way from the last one you attached.

Then add the next one JUST below it, but make this one face forward. Add the last cone JUST below this one, facing the other other direction, winding the pipe-cleaners as you go.


Here you can see what it looks like underneath the bottom three.


And here, how it looks from behind - see the gaps between each set of cones.


10. You will need to move the cones around now - twist any that have moved, so you can see inside, and angle them downwards. Bend one of the bells just above the bottom row more into the middle, so it's more in line with the middle cone on the bottom row. This makes the foxglove look fuller.

11. It would help if you fold the bottom of the pipe-clear up to meet the ends of the pipe-cleaners attached to the bottom flowers. We didn't do this, but it should help make the stem sturdier.

If you don't want to add leaves, wrap a pipe-cleaner tightly around the stem from near the bottom of the flowers to the end, folding in and winding around the pointy tip. Cut off any pipe-cleaner left over.

12. If you do want leaves, don't add the last pipe-cleaner yet. Fold a piece of green paper in half. (Or a plain paper and paint green after)

Draw a long thin shaped leaf and cut out so you end up with two the same.

Wrap the last pipe-cleaner tightly around the stem, to cover the ends of the pipe-cleaners attached to the bottom flowers. (We didn't have another dark green one, but the different colour helps show up the winding!)


13. Once you're clear of the bottom of the flowers, wrap the very end of one leaf around the stem and then wrap the pipe-cleaner tightly around it, to hold it in place. Just below, do the same with the other leaf.


14. Keep winding until you get to the bottom of the stem.