

Showing posts with label toilet paper roll crafts. Show all posts
Showing posts with label toilet paper roll crafts. Show all posts
28.1.19
Paper roll heart posy
21.3.18
Bunny and Chick Easter egg holders

These make great table decorations for a Easter day spread. You could even write the children's (and adults..) names on them, before filling with treats like mini eggs.
You will need:
Toilet paper tube (or two)
Scissors
Pencil
Ruler
Paint
Glue
Glue stick
Black pen (gel or felt-tip)
Green paper (optional)
Coloured tissue paper
Feathers (optional)
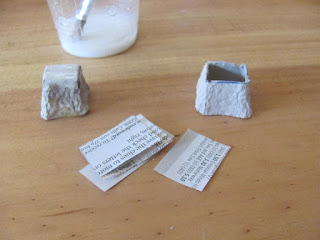
1. Flatten the cardboard tube with your hand - press down along the sides, so you can see the creases.


6. With a pencil, draw half an 'n' shape on the fold, so it goes about halfway up the tube. Leave a space between the pencil shape and the side cuts.

7. Cut around the shape to the pencil line (*mini makers might need help cutting through the double card). Snip through the crease at the top, above the shape (see pic below), so you can bend each side piece down, and fold on the line. Now they're easier to snip off.


When you squeeze the tube back into shape you will have the body for your chick or bunny.
8. For the head, draw around something like a coin or a bottle top on spare card and cut out (if there isn't enough card left, cut open another toilet paper tube and use that.)

9. (Bunny only) Fold some spare card and draw a rabbit ear on top. Cut through the double card * to get two identical ears. For an easier option, use paper instead.


10. Now you have all your pieces, it's painting time. Paint behind the body first - use a nice, bright colour. Then paint the body and the other pieces. Paint a small piece of spare card (or paper) orange, for the chick's beak.


You could paint the foreground, below your chick or bunny green, or make paper grass (in step 12)
We also cut long zig-zags into the back of the tube, to make it look like the rabbit's hiding in some grass.

11. Use a black pen to draw on the faces. For the chick, cut out a small triangle from the piece of painted orange card (or use paper), and use a small amount of glue to stick it under the eyes. Glue the bunny ears behind the head.

12. If you would like to make some grass for the front of your egg holder, cut out a strip of green paper (or colour in some plain paper). It needs to wrap round half your tube and be about a cm or so higher that the pencil line at the front.
14. Cut zig-zags along the strip - keep them short and make them uneven.

15. Glue the grass below your chick or bunny, lining it up with the bottom of the tube - a glue stick is good for this, just rub a layer of glue on the back of the grass.
16. For the flowers, scrunch up small squares of coloured tissue paper, dot some glue on the grass, where you want them to go, and stick in place.

17. Glue the chick's head on and if you have two feathers, glue them either side. If you don't have feathers, you could cut some wings out of paper and colour in.
For the bunny, glue the head onto the body.


You could use a paper clip to keep things in place while the glue dries, or prop them on their sides.
And why not customise your egg holder with some blingy sequins before adding Easter treats.
(They're a perfect size for a creme egg.. )

Linking up with #bloggerclubuk
11.5.17
Tubescapes - TP roll craft for kids

This craft is all about making a scene with a cardboard tube!
Easy to do and there are a few different tubescape ideas here for you to try.
You will need:
Toilet paper or kitchen paper tube
Scissors
Ruler
Pencil
Paint
craft glue or glue stick
Coloured or plain paper
Fine black felt-tip or gel pen
Hole punch (optional)
metallic silver pen (optional)
metallic silver pen (optional)
1. For a daytime cityscape, flatten your cardboard tube with your hand (shorten to about 10cm/4in, if you're using a kitchen paper roll). Draw a pencil line across your tube, a few cms (about 1in.) up from the bottom edge. This will be the road. Use a ruler and pencil to draw skyscrapers - make them different sizes.

2. Cut down the creases, either side to the first rooftop. To make it easier to cut around the outline, cut down to the other side of the roof of the first building, bend this flap of card out and cut it off.


3. Paint the background blue, the road dark grey and the buildings a lighter grey.
4. Once that's dry, add short downward strokes, or dots with the black pen for the windows - this takes a bit of time, but it's worth it! Then add any detail you want with paint and a fine brush. We added a sun, trees and little cars on the road (just a dab of paint for the cars. When dry, draw on wheels with the black pen), but it's really up to you. Instead of painting the sun, you could cut out a yellow circle, as we did for the desert island scene.

5. For the night cityscape - follow the same instructions, but paint the whole of the front part with the skyscrapers yellow, and the background black.
6. Once the paint's dry, use a black pen (and a ruler if you want) to colour in the high-rise buildings leaving little rectangles of yellow. (again, time-consuming, but worth it). Colour some windows in though, so it doesn't look like all the lights are on...
On the road, for headlight beams, you could draw long triangles, then colour around them with the black pen. Cut a moon out of plain paper and if you have a metallic pen, dot on stars. If not, you could dot on yellow paint.

7. For the desert island, flatten the tube and draw a line across, about half way up. Draw your island above this. Cut down the creases to the pencil line and cut around the outline of your island. Draw and cut a small palm tree from the leftover card.


8. Paint the sky and sea blue and the island yellow. Paint the palm tree too. Once dry you could paint on the sun, but we cut ours out of yellow paper and drew an orange spiral on it with a felt tip pen. Add some painted white lines to your sea to make it look more wavy if you want. We also drew a shark's fin… and added birds. Glue or use sticky tape to attach the palm tree to the back of the island.

9. For a pretty meadow scene - paint your tube green. While it's drying, draw simple butterfly shapes and bugs on coloured paper and cut them out (or draw them on plain paper and colour-in or paint before cutting out). Add any detail with the black pen.
For the daisies - cut a thin strip of plain paper and cut four similar length pieces from it (all about 2cm/3/4in. long). Cross them over each other to make a daisy shape, and use a glue stick to glue them together in the middle. For the centre, either use a hole punch to punch circles from a piece of yellow paper and glue in place - or paint the centres with yellow paint.
10. When the tube is dry, cut zig-zaggy grass - make the strands different heights and widths and keep them lower on one side, so you can see through to the back. This is great scissor cutting practice!
Use a glue stick to attach your flowers and insects.

Love to hear your tubescape ideas!
22.6.16
Make a paper roll unicorn

I needed to come up with a project for a craft workshop at Puzzlewood, and unicorns just seemed like the obvious choice. If they were going to live anywhere, then this ancient woodland, with its twisted trees and walls of mossy rock, would have to be the place!
29.1.16
Easter egg carton birds in a tree

22.6.13
A Rhino and a Hippo roll up to the Zoo
Our homemade Zoo has been a bit neglected recently, so without further ado, let me introduce the latest arrivals...

They both started off with the same basic body shape as the elephant, which is here if you want a reminder - the only difference is we shortened the legs a little.

Thought I'd make the rhino's head a little longer by gluing on one of these knobbly bits from inside the top lid of an egg carton (cartons obviously vary, but some seem to have them).

We did end up snipping the tip off, (then stuck it back inside to block the hole) because it was too long and the rhino was starting to look like an Anteater...


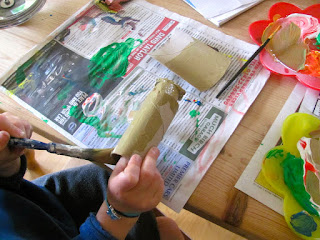
Or you could cut the top 3cm/1in. or so off an egg carton cone, then cut this piece in half (squeeze it flat and cut across) - the bottom half makes a good snout. Cover the end with a small square of newspaper using watered down PVA/craft glue. Brush plenty of glue over the top of the newspaper and round the edges too, to smooth the paper down. A bit like papier mache.

They both started off with the same basic body shape as the elephant, which is here if you want a reminder - the only difference is we shortened the legs a little.

Thought I'd make the rhino's head a little longer by gluing on one of these knobbly bits from inside the top lid of an egg carton (cartons obviously vary, but some seem to have them).

We did end up snipping the tip off, (then stuck it back inside to block the hole) because it was too long and the rhino was starting to look like an Anteater...


Or you could cut the top 3cm/1in. or so off an egg carton cone, then cut this piece in half (squeeze it flat and cut across) - the bottom half makes a good snout. Cover the end with a small square of newspaper using watered down PVA/craft glue. Brush plenty of glue over the top of the newspaper and round the edges too, to smooth the paper down. A bit like papier mache.
OR, for an easier version, scrunch up a small piece of newspaper, brush glue inside the snout and stuff with the scrunched paper.

For the hippo, we scrumpled up a small bit of newspaper until it was snout-sized, and wrapped and glued another small piece of newspaper tightly around it, before sticking the snout to the head. Again take the head out to do this, and use tacky glue.
Push a scrunched up ball of newspaper up the other end of the tube, to balance it, and stop the hippo tipping on its schnoz. Do the same for the rhino.


Next paint the bodies, and don't forget to paint some of the toilet paper tube card left over from making the legs. This will be for the ears, eyes and tails, so you don't need much card.
Handy tip: once the paint has soaked in a little, dry the bodies upside down or on their side, in an egg box lid - if you dry them upright when the card is wet the legs can end up a bit splayed, like they're doing the splits!
To finish the rhino, cut out two horns from a piece of unpainted toilet paper tube card - one big, one small, and pointy ears. Make all of them a little longer at the bottom so there's a tab to slot in. Then, with the head in place, mark where you want the ears and horns to be.
Take the head out again, and either fold the tabs at the bottom of the horns and ears and glue in place, OR, pierce a hole on each line (nail scissors are great for this - keep them closed, press down and twist slightly from side to side. To be done by an adult) and cut along the small slots. Wiggle the scissors in and out a bit so it's easier to thread the ears and horns through.
Next, draw on small eyes, nostrils and a mouth. Don't forget the tail. (Glue at the back, inside the tube and bend into place when dry).


For the Hippo, cut out a tail, small round ears - again make them long enough, with a tab to slot in,
and because hippo eyes are a bit boggly and stick out - cut two thin, strips of card and round them at one end. Then add a black dot with a felt tip pen (see pic)

Draw slots for the ears near the join with the body and for the eyes, in front, a little closer together. Like the rhino take the head out again now. Then, either fold the tabs behind, and glue the pieces in place, OR cut slots (keep the nail scissors closed, press and twist to make a hole. To be done by an adult).


Best to pop the head out when you're gluing the snout on, so it doesn't slip off. Use tacky glue if you can (make your own by leaving about a cm of PVA glue in an uncovered yogurt pot or jar. It should slowly start thickening up after a day or so - the longer you leave it the thicker it gets).
Push a scrunched up ball of newspaper up the other end of the tube, to balance it, and stop the hippo tipping on its schnoz. Do the same for the rhino.


Next paint the bodies, and don't forget to paint some of the toilet paper tube card left over from making the legs. This will be for the ears, eyes and tails, so you don't need much card.

Handy tip: once the paint has soaked in a little, dry the bodies upside down or on their side, in an egg box lid - if you dry them upright when the card is wet the legs can end up a bit splayed, like they're doing the splits!
To finish the rhino, cut out two horns from a piece of unpainted toilet paper tube card - one big, one small, and pointy ears. Make all of them a little longer at the bottom so there's a tab to slot in. Then, with the head in place, mark where you want the ears and horns to be.
Take the head out again, and either fold the tabs at the bottom of the horns and ears and glue in place, OR, pierce a hole on each line (nail scissors are great for this - keep them closed, press down and twist slightly from side to side. To be done by an adult) and cut along the small slots. Wiggle the scissors in and out a bit so it's easier to thread the ears and horns through.
Next, draw on small eyes, nostrils and a mouth. Don't forget the tail. (Glue at the back, inside the tube and bend into place when dry).


For the Hippo, cut out a tail, small round ears - again make them long enough, with a tab to slot in,
and because hippo eyes are a bit boggly and stick out - cut two thin, strips of card and round them at one end. Then add a black dot with a felt tip pen (see pic)

Draw slots for the ears near the join with the body and for the eyes, in front, a little closer together. Like the rhino take the head out again now. Then, either fold the tabs behind, and glue the pieces in place, OR cut slots (keep the nail scissors closed, press and twist to make a hole. To be done by an adult).
Carefully snip along the slots and wiggle the scissors in and out a bit to make it easier to push the ears and eyes into place.
Add the tail and draw on nostrils and a big smile.


Add the tail and draw on nostrils and a big smile.
Many more projects like this in my craft books, 'Make Your Own Zoo' and 'Make Your Own Farm Animals'


Subscribe to:
Posts (Atom)