Showing posts with label kids activities. Show all posts

19.4.17

Curly wurly snakes!


Wrap them wherever you like!


These spirally snakes are sssssssimple to make and they're really good for scissor practice too.

You'll need:
2 toilet paper tubes (or a kitchen paper tube cut in half)
Paint
Paper
Craft glue
Glue stick
Plain paper
Yellow felt-tip or highlighter

1.  Paint stripes up one tube using any colours you like. It looks good if you keep to a set pattern, so if you paint yellow, green then blue do the same around the rest of the tube. Try to keep the stripes a similar size.
On the second tube, paint the same colour pattern around the tube, leaving a space near one end. Make the stripes a little thinner this time. Paint the bit you've left black, or whatever colour you'd like for your snakes tongue! Paint the inside of this end black too.


2. When the paint's dry, carefully cut the tube to make a spiral. Take your time and make small snips with the tips of the scissors. Don't make the angle too steep at the beginning - just a gentle rise. When you've been round once, the important thing is to keep the width of the spiral (your snake's body) the same all the way up. Keep checking to see if it looks right. This can be tricky and needs concentration but it's great scissor practice. If it helps, you could try drawing a spiral on first with a pencil, or, for younger makers, start it off for them, as this is really the trickiest part. Let them have a go at cutting the rest of the spiral. It doesn't matter if it's a bit wiggly!


3. Snip the end off so you have a nice straight bit to stick the head to.


4. Use a pencil to draw a diamond shaped head on your other tube ( make sure it's not too small)


5. Use sticky tape to attach it to the twisty body.


6. Cut out an eye shape from the spare tube. We tried two different shapes. Draw around it twice on some plain paper and colour in with a yellow felt-tip pen or a highlighter. Add a black pen line down the middle. Cut them out and use a glue stick to glue them to the head.


7. Cut a thin strip from the black end of the tube for your snake's tongue. Straighten off both ends and cut a 'V' in one of them.


8. Use sticky tape or glue to stick the tongue to the back of the head. Add two black nostrils and any other detail you like. Now your snake is ready to explore!


31.3.17

Cork crafts with a twist for Easter

cork cat

cork chick

I'm not sure where this idea came from... but hey, why not a chick on an Easter bonnet or a cat on a hat?? Probably has something to do with the amount of time I've spent looking at corks! I wanted to come up with a quick project that involved simple painting and was possibly a bit quirky? The bottom part of the cork below the rounded top just made me think HAT.

You'll need:
Cork (from something fizzy)
Paint
Coloured paper
Craft glue
Glue stick
Pencil
Spice jar to draw around
3 feathers (for the chick)
Small stickers/sequins (optional)
Spare card (for the cat)
Black felt-tip or gel pen


1. First, paint the rounded top part of the cork yellow for the chick, then decide what colour hat you want, and paint the bottom part. You could paint it the same colour as the paper for the hat rim (like we did) or make it completely different.

2. For the rim of the hat, find a circle shape that's bigger than the bottom of the cork (we used a small spice jar), draw around it with a pencil and cut out. Cut a thin strip of paper for a hat band.


3. Put a thin layer of glue on the hat band strip (a glue stick is best for this) and wrap it around the bottom of the cork - don't worry if it doesn't go all the way around (like ours) - the gap can be covered by the rim of the hat. Glue the bottom of the cork to the paper circle - place it a little off centre, and then glue the wider part of the rim to the side of the cork to make a turn up. If you need to, lean a book on the hat turn up while it dries.


4. To decorate, we made little paper flowers, but if you have some pretty small stickers or shiny sequins these would be an easier option and would look so lovely too.

(To make the paper flowers, cut a very small square of paper, fold it in half then half again. It helps if you draw a petal shape on top, starting from the corner that's the middle of the square (centre of your flower). Do a few practice ones - sometimes they can end up looking more like butterflies, which is good too! Cut out a circle for the middle, or use a hole punch to make circles, or paint the centre)


5. Use a black felt tip or gel pen to draw eyes on your chick, near the top, and straight above the hat turn-up.

6. Cut a small orange triangle for the beak (if you don't have orange paper, colour in some plain paper or draw a beak straight onto your chick with an orange felt-tip). Dab the tiniest bit of glue just below the eyes (or use a glue stick), wet your finger to pick up the tiny beak and stick it in place.

7. Glue feathers either side, for the wings.


- and, if you want, add a head plume. Make a hole on top, near the front, just above the eyes, using a small screw (screw it in until the hole is deep enough) - put some glue on the bottom of the feather and push it into the hole.


8. For the Cat, follow the instructions above to Step 4, making sure you also paint a small piece of spare card (or paper) the same colour as your cat's body (for the tail and ears).


9. When the paint's dry, draw and cut out a tail and a small square (that will be the ears) - make sure it's no wider than the top of the cork.

10. Fold the small square in half and on one side of the fold line, draw pointy ears. Carefully cut around them, bending the piece between the ears back so it's easier to snip off.


11. Glue the bottom part of the folded ear piece to the top of the cork, straight above the hat turn-up.


12. Use a black felt-tip or gel pen to add the face detail and then paint a lighter shade on the cat's tummy.


Now's the time to paint on pen on more detail if you like. We added some stripes (don't forget to paint them on the tail too!), but leave your cat plain if you prefer.

13. Glue the tail in place so it wraps around the front.


Let me know if you have any other thoughts about what to put on the hat!!


24.11.16

Sparkly bird decorations - Christmas crafts


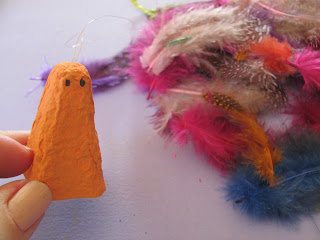
We've been trying out some new Christmas decoration ideas, and I thought I'd share a couple of our favourites over the next few weeks. We'll make glittery birds, Christmas trees and fairies to hang on the tree - and they all use the cone part from the middle of an egg box. As you've probably noticed these crop up quite a lot... they play a leading role in the Nativity we made last time, which is a really fun project because you can keep adding to the scene - does seem to help keep kids interested. Certainly worked with mine!

Glittery birds first, and this is very similar to a previous project - just a few tweaks here and there. It's also a slightly adapted version of the Love birds in Make Your Own Zoo.

You'll need:
egg box/carton
kids' craft scissors
pencil
paint
fine paintbrush
glue
feathers
glitter (optional!)
fine black felt-tip or gel pen
needle and thread
sticky tape
Nail scissors (to make holes - adult supervision needed)

1. Roughly cut a whole cone from the egg carton.


2. Decide how big you want your bird to be and draw a pencil line all the way around the sides of the cone.

3. Cut up two adjacent corners to the line, bend this flap back and cut it off. It's now easier to cut along the rest of the line. Neaten up the edges so the sides are even and the cone sits flat.


4. Paint the cone any colour you like. When it's dry, use the nail scissors to pierce a hole through the top (if there isn't one there already) - keep the scissors closed, press down and twist from side to side. Make another hole about a third of the way up one side (for the tail feathers).


5. Thread a needle with a good length of thread - we used gold, but use whatever you have - and push the needle up through the cone and through the hole, then back down through the hole, leaving a loop for hanging your bird. Use sticky tape to stick down the two strands of thread inside the cone (just make sure not to stick it to the side with the tail feather hole). Trim the thread ends.


6. On the side opposite the tail feather hole, use the fine black pen to draw eyes near the top of the cone. Keep them small and quite close together.


7. Brush some glue inside the cone behind the two holes and choose your feathers - big and showy for the the tail feathers, use several if you want - and short and fluffy for the head plume.


8 Brush a little glue on the sides and stick down two similar sized feathers for the wings. If your feathers are too big, trim them or cut the top off larger ones to get two pieces that look the same, before gluing them on.

9. For the beak, use a fine paintbrush to dab a small blob of yellow paint just below the eyes.


8 For some sparkle, brush glue on the front of your bird and sprinkle over some glitter. Shake off the excess. A good way to save glitter is to do the sprinkling over a paper plate, then bend the plate in the middle to catch the glitter in the fold, and funnel it back into a container.


Next time Christmas trees!

Joining in with the lovely Happiness is Homemade link party.