Showing posts with label Halloween craft. Show all posts

19.10.15

DIY glow-in-the-dark Halloween board game


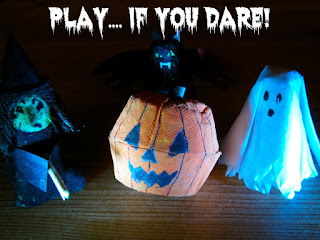
At last! A board game for the mini Halloween figures I made yonks ago. This was always the plan - it's just taken me a very long time to get round to it.  If you'd like to make the figures, the pumpkin and the witch are here and the ghost and vampire bat here.

To be fair, the glow-in-the-dark part is a bit of a novelty; I just really wanted to get some glow-in-the-dark paint. And it does glow, though not quite enough to read what's on the squares in the pitch black, and certainly not enough for me to get a decent picture. Sure anyway, it all adds to the fun, and the game works fine without too.

You'll need:
a cereal box (at least 28cm high)
glow-in-the-dark paint (optional)
good black felt tip (like a Sharpie)
ruler
scissors
toilet paper tube
paint
LED tea light (optional)
sweets (optional!)


1. Open up the cereal box - use the creased lines to help you draw a square 28cm x 28cm. Don't cut it out yet - easier to paint the whole square and draw lines when it's like this - less mess as well!


2. (Optional) Paint your square with a few coats of glow-in-the-dark paint.


3. Use the ruler to measure and mark points 3.5cm along all 4 lines. Then join them up with the black felt tip to make a grid. (3cm was too small and 4 was too big - 3.5 seemed just right)
Cut it out.


4. Now the bit that my kids really enjoyed - coming up with the good square/bad squares. Kind of like Snakes and Ladders, with an evil twist. We did a few miss-a-goes too. And my daughter came up with the idea of having some Trick or Treat squares. If you land on one you can have a sweet. I did try to point out no one was likely to want to do a trick with sweets on offer, but anyway!

Here are most of ours - I bet you could come up with even more gruesome ones.

Good squares: Halloween! +5, Jump on a broomstick +2, Drink witch's brew +1, find a black cat +3, Zombie party! +3, Full Moon! +4, Win a gruesome ghoul contest +4

Bad squares: Spell backfires -5, fall into a cauldron -3, Phantom flu -2, turn into a frog -3, lose your head! -4, and the worst of the lot, 'Zapped by a Ghostbuster! Back to the beginning'

Miss a go: get stuck in a web, catch Hog warts, fall in a slime pool

5. Write on your squares, (use different colours if you want) making sure you don't have for example, a +2 landing on a -2, sending your figure endlessly forward and back, like being trapped in limbo, FOREVER!!


6. Fill the numbers in around the good and bad squares (make sure you include them in your counting)


7. The winner is the first one to reach the haunted castle at the end of the game. It's made from a toilet paper tube. Cut out a door shape at the bottom, and make short, evenly spaced cuts around the top. Bend back every other flap to form battlements.


Use nail scissors to pierce a few holes in the tube and cut thin slits for windows. Then paint.

We popped a LED tea light (from IKEA) inside, to give it a ghoulish glow.


We've all played, even the grumpy teenager, and it's been great having a bit of time and a bit of fun together. Doesn't happen as much as I'd like these days.

Now looking for other things to do with the glow-in-the-dark paint.... Tempted to put 'tidy your room, or else...' on the 13 year old's wall, so it mysteriously appears at night.

Too mean? :)


Linking up with Trash 2 Treasure and Creative Mondays

30.10.13

Mini Halloween figures - Part 2

What to do with a bucketful of pumpkin pieces?
Not so keen on pumpkin pie; soup is fine (especially good with apple), but this year I was thinking something sweet like muffins, and then as if by spooky magic, Emma's recipe for spiced pumpkin muffins popped up on my blog list, so we'll be having a go at that later.


Back to the cardboard pumpkin, (ghost and bat are here) and you'll need to cut two egg cups from your box. Keep them shallow and as even as possible, so you can stick them together. But before getting the glue out, use your fingers and thumbs to press the egg cup bottoms, making them more dome shaped.


Splosh on some orange paint and when dry, use a felt tip for the face. Make a hole in the top, roll a small piece of green paper as tightly as you can for the stalk and push it in.


A little more work for the witch, but hopefully worth it.

You'll need a small cone from the middle of the box. Paint it black, leaving a space for the face.
Having a green egg box was a bonus, but if yours is another colour, just paint the face when the black's dry.


Cut a small triangle from spare egg box card for the witch's nose. Fold this little bit of card in half, make a hole with nail scissors (keep them closed, press down and twist from side to side) in the middle of the face and wedge the pointy nose in.


We stuck on some brown wool for hair, but coloured tissue paper would work well too.
Draw a witchy mouth and eyes with a felt-tip.

The hat is made from two small circles. We had no black paper so just coloured some in.


The smaller circle sits on her head, cut the the larger one in half. Twist and glue it into a cone shape. Use plenty of glue to stick the cone to the bottom of the hat.

Make her broomstick by wrapping and gluing a rectangle of tissue paper (or ordinary paper) around the end of cocktail stick. Snip the paper to make it more broom-like.


Make holes in the witch's body (with the nail scissors) - higher at the front than the back, so her broomstick sits at an angle.


Cut a strip for arms from your black paper, making it wider at both ends for the flared sleeves. then glue in place.


The plan was to come up with a game using these mini figures, but that's going to have to wait..


Happy Halloween!

Linking up with Kids Get Crafty

19.10.12

Going Batty

I thought we'd give our Owl and the Pussycat tube creations a spooky, Halloween twist. Very easy as it turns out, because they're a perfect shape for bats with those pointy little ears. So, time to gather up more toilet rolls...never imagined I'd be this happy to run out of loo paper...


They're made in exactly the same way as the owls and cats - gluing the top of the tube shut by brushing a good layer of craft glue inside the tube end, and using paper clips to hold it in place while the glue dries.

But this time paint them black, and when dry, cut a curve into the glued end and trim a few cms (1in) off the bottom (squeeze the sides together near the bottom and cut across the tube).

Draw and cut out eyes and fangs - I went for evil, grinning, vampire bats, but up to you how scary you want them to be!


I made half a bat wing using card, then folded some coloured paper, put the template on the crease and drew around it, before cutting and opening out the wings. Glue everything in place.


Next - time to get these bats up, and flying about.
Now due to the run on toilet rolls, we were just short for a bat-only mobile - so we made some ghosts to join them. They are very quick and easy. Cut a cup out of an egg box, brush glue all over the outside of the cup and stick the flat base in the middle of some white tissue paper (fold it double so it's not too thin). Hold it down with a loose elastic band while the glue's drying. Draw a haunted, ghostly face on one side. Cut the bottom in rough zig-zags, to make it look like a raggedy old sheet.


The mobile is just two wire coat hangers bound together at the top and bottom with some thin, pliable wire (or you could use string). I removed the top part of one hanger with wire cutters. Then cover it all with stretchy, creepy cobwebs and spiders - great stuff and easy to pick up in the supermarket around Halloween. I used some transparent thread to hang them up, but ordinary is fine too. Thread a needle and make a hole through the top of the ghosts, attach the thread underneath with sticky tape. Make a hole between the bat's ears with a threaded needle and tie a knot.