Showing posts with label Easter craft. Show all posts
Showing posts with label Easter craft. Show all posts
26.4.17
Easy flower posy - Mother's Day crafts for kids
There are plenty of lovely flower crafts about at this time of year and we've tried quite a few, but I really like this one. Maybe because it's new to us, and new is always good, and maybe because you can get a great result quickly, with very little fuss. Just a toilet paper tube and some coloured tissue and you're on your way to a sweet bouquet!
5.4.17
Easy bunny project from 'Make your own farm animals'
Looking for something crafty to do with the kids over the hols? What about making a farm? All the projects in this book are simple to follow, and they use easy to get hold of cardboard bits and bobs, like egg cartons, cereal packets and tubes - so you should have just about everything you need to get started..
None of the book projects have made an appearance on the blog yet, so, as it's a kind of bunny time of year, thought I'd share this one :)
You'll need:
Egg carton
Pencil
Ruler
Red, yellow, blue and white paint
Fine paintbrush
Kids' craft scissors
Craft glue
Black felt-tip or gel pen
Cotton wool ball
1 Roughly cut out a whole middle cone from the egg carton so it's easier to work with.
2. Use a pencil and ruler to measure and mark 2cm (3/4in.) from the top on one side of the cone, and draw a line across here. On the opposite side, measure and mark 3cm (11/4in.) from the top and draw another line.
Join them with sloping lines either side.
3. Cut out your bunny's body. A handy way to do this is to snip up two adjacent cone corners to the pencil line, then fold back the flap and cut it off - now it's easier to cut along the rest of the line.
4. For the ears, draw a petal shape on card from the egg carton lid. As a guide - make it no more than about 4cm (11/2in.) long and not too wide. Cut this out. If you want to make more bunnies, you could keep it to use as a template to draw around.
5. To form the ears, draw a long, slightly curvy 'V' in the middle of your petal shape - don't take it down as far as the pointy end. Snip out the card piece between the ears.
6. Brush glue on the bottom part of the ears and stick them just behind the top of the cone (on the longer cone side).
7. When the glue's dry, pinch hold of the cone where the ears are attached and bend the ears back. Paint the bunny whatever colour you like, remembering to paint both sides of the ears. This brown colour is made by mixing yellow with a little red and a dab of blue - lighten with some white.
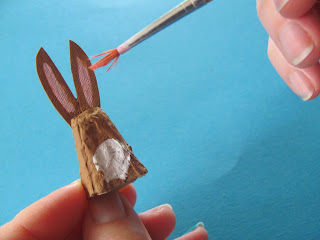
8. When it's touch dry, use a fine paint brush to add a white fluffy chest, then mix a touch of red with the white to make pink and paint a stripe inside each ear.
9. For the tail, pull off a small amount of cotton wool, roll it between into a little ball between your finger and thumb and glue to the back of your bunny near the base.Use a black felt-tip or gel pen to draw a face. Do the twitchy nose first, right on the edge of the cone top and add the eyes just above.
TIP: If your egg carton has cones with holes in the top, brush some glue inside them and push a little scrunched up ball of newspaper up, to fill the hole.
There are some good deals on Amazon, and noticed 'Make your own farm animals is only £3.99 on the UK Book People site at the moment. Free postage too if you spend over £25.
25.3.14
Egg carton flowers for Mother's Day
My little spring posy is based on the roses I made a couple of weeks ago. Egg cartons are great for flowers, and I was thinking this simple arrangement might come in handy with Mother's Day around the corner?
So, if you fancy making these flowers, you will need:
Egg cartons
Pipe cleaners (preferably yellow and green)
Coloured tissue paper
Paint
Glue
Lump of old modelling clay
Yogurt pot
Cut out a few egg cups from the carton for the daffodils, and keep the edges nice and wavy - makes it look more like petals.
Cut some middle cones out too for the crocus/bluebell shaped flower (seems to be a sort of cross between the two!) - use the corners for the petal tips and join by drawing a triangle on each side, like the picture above…
Paint them purple and the daffs a sunny yellow.
Pierce a hole through the bottom of the bells and the middle of the daffs (Best done by an adult - use nail scissors or similar - keep them closed, press down and twist carefully from side to side) Push a piece of pipe cleaner through (roughly 10cm/4in.) Bend it over to hold in place - try to keep the pipe cleaner nice and flat inside the daffs (so it's easier to stick the tissue paper centres here later).
With the bells, we used a longer piece of yellow pipe cleaner and pulled more of it through for the flower stamen, and then folded the pointy end over.
To finish off the daffs, fold a piece of orange or yellow tissue paper (about 10x10cm/4x4in.) until it's a 2cm/3/4in. wide strip - you don't want it sitting too high above the edge of the egg cup - then roll up tightly.
Let them unfurl a bit before gluing the end edge down. Brush plenty of glue inside the egg cups (and over the pipe cleaner middle) and stick the tissue paper centres in place.
For the daisies, cut a 1cm/1/2in. thin strip of white paper and snip into 6cm/21/2in. pieces. Fold them in half and round off the ends.
Open up and use the middle fold to arrange three evenly on top of each other, so it looks daisy-like.
Glue together and when dry, carefully make a hole (with nail scissors as before, but put a piece of modelling clay behind the flower centre, so you have something to push against). Make it big enough for a pipe cleaner.
Wind the pipe clearner around a few times for a fuller centre.
We cut some long leaves out of tissue paper and stuck them on too - the easiest way to do this is to wrap them around the stalks.
Arrange your blooms in a piece of old plasticine (modelling clay) - one of those mashed up, multi-coloured lumps…(make sure you warm it up a bit first, so the stalks go in)
Cut a strip of wrapping paper to decorate your pot - make sure it goes round with plenty to spare (about 1 and a half times), then cut into about 3 or 4 pieces - so much easier to glue on neatly like this! Overlap each piece.
You could tie a ribbon around instead.
Pop in your flowers.
Subscribe to:
Posts (Atom)


