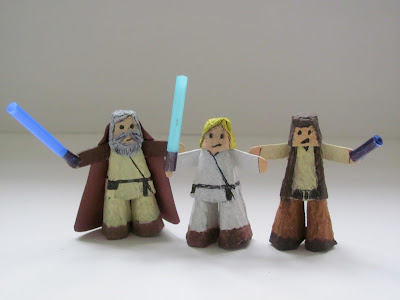
Obi Wan Kenobi joins the Star Wars gang! He's made in a very similar way to the other two.
You'll need:
Egg carton
Brown paper
Pencil
Pencil
Ruler
Craft scissors
Nail scissors or similar (optional) Adult supervision required
Paint
Craft glue
Black felt-tip or gel pen
Blue straw
Black marker pen (like a Sharpie)
1. Roughly cut out two middle cones from the egg box so they're easier to work with. On one, draw a pencil line around the cone, just above the bumpy joins at the bottom and cut out. This will be the body. Follow the step-by-step for Luke Skywalker and Han Solo to make the body, legs and arms.
2. For Obi Wan's head, take the other cone, and use a ruler and pencil to measure and mark about 2cm from the top of the cone on each side. Join the marks and cut out. (A handy way to do this is to cut up two adjacent corners to the pencil line, bend the card back and cut off the flap - it should be easier now to cut along the rest of the line.)
3. Lightly draw a line around this cone piece, about halfway up. It doesn't matter if it's a bit wobbly, it's only for guidance.
4. Cut up all four corners to the line, bend 3 of the small card flaps back and cut them off, leaving one remaining for a beard. Round off the bottom of the beard.
5. Make his cloak next. Place the body (without the arms) on it's SIDE on some brown paper. Use a pencil to draw a line where the side touches the paper and mark the top and bottom of the figure too. Roll onto its back and mark the bottom again, then roll carefully one more time onto the other side and mark where this touches the paper. Join the marks and gently round the top of the cloak before cutting it out.
6. Painting time. Keep the arms out and paint them a similar brown to the cloak (mix yellow and red then add a dab of blue until you're happy with the shade) - use this for his boots too. We mixed yellow and white to make a creamy colour for the body and legs, and made a flesh colour for the face and hands by mixing lots of white with a little yellow, red and tiny spot of blue. Paint his hair and beard grey.
TIP: Put the head on a spare egg carton cone while you're decorating it.
7. Push the arm strip in the slot (or if you're not doing slots, cut the strip in half and glue the arms either side), and glue on the head. Brush glue on the top part of the back of the body, including the back of the arms and stick the cloak in place (trim first if it looks a bit on the big side) Use paper clips if you need to.
8. While the paint's drying, make a lightsaber from a blue straw. Cut off about 4cm (11/2in.) and colour the bottom end with the black marker pen. Cut small slits in this end so you can slot the lightsaber onto Obi Wan's hand.
9. When the paint is dry, use the fine black pen to draw on a face and add detail to the clothes and hair.
TIP: If your egg cones have holes in the top, brush glue inside the cones and push a small piece of newspaper up to fill the hole.


