Showing posts with label egg box craft. Show all posts

24.11.16

Sparkly bird decorations - Christmas crafts


We've been trying out some new Christmas decoration ideas, and I thought I'd share a couple of our favourites over the next few weeks. We'll make glittery birds, Christmas trees and fairies to hang on the tree - and they all use the cone part from the middle of an egg box. As you've probably noticed these crop up quite a lot... they play a leading role in the Nativity we made last time, which is a really fun project because you can keep adding to the scene - does seem to help keep kids interested. Certainly worked with mine!

Glittery birds first, and this is very similar to a previous project - just a few tweaks here and there. It's also a slightly adapted version of the Love birds in Make Your Own Zoo.

You'll need:
egg box/carton
kids' craft scissors
pencil
paint
fine paintbrush
glue
feathers
glitter (optional!)
fine black felt-tip or gel pen
needle and thread
sticky tape
Nail scissors (to make holes - adult supervision needed)

1. Roughly cut a whole cone from the egg carton.


2. Decide how big you want your bird to be and draw a pencil line all the way around the sides of the cone.

3. Cut up two adjacent corners to the line, bend this flap back and cut it off. It's now easier to cut along the rest of the line. Neaten up the edges so the sides are even and the cone sits flat.


4. Paint the cone any colour you like. When it's dry, use the nail scissors to pierce a hole through the top (if there isn't one there already) - keep the scissors closed, press down and twist from side to side. Make another hole about a third of the way up one side (for the tail feathers).


5. Thread a needle with a good length of thread - we used gold, but use whatever you have - and push the needle up through the cone and through the hole, then back down through the hole, leaving a loop for hanging your bird. Use sticky tape to stick down the two strands of thread inside the cone (just make sure not to stick it to the side with the tail feather hole). Trim the thread ends.


6. On the side opposite the tail feather hole, use the fine black pen to draw eyes near the top of the cone. Keep them small and quite close together.


7. Brush some glue inside the cone behind the two holes and choose your feathers - big and showy for the the tail feathers, use several if you want - and short and fluffy for the head plume.


8 Brush a little glue on the sides and stick down two similar sized feathers for the wings. If your feathers are too big, trim them or cut the top off larger ones to get two pieces that look the same, before gluing them on.

9. For the beak, use a fine paintbrush to dab a small blob of yellow paint just below the eyes.


8 For some sparkle, brush glue on the front of your bird and sprinkle over some glitter. Shake off the excess. A good way to save glitter is to do the sprinkling over a paper plate, then bend the plate in the middle to catch the glitter in the fold, and funnel it back into a container.


Next time Christmas trees!


Joining in with the lovely Happiness is Homemade link party.


1.7.15

Egg Box Peppa Pig

Clangers craft

Who'd have thought the Clangers and Peppa Pig had something in common? Well it turns out you can make both in a very similar way from an egg carton!  Always good when one idea leads to another...

All you'll need is:
an egg carton
red and white paint
fine black felt tip or gel pen
red/pink felt tip pen or highlighter
general purpose scissors
Straight-edged nail scissors or similar (optional) Adult supervision needed

Peppa Pig craft

1. Roughly cut out as much of the two middle cones as you can from the egg box. This makes them easier to work with.


2. Take one, and just above any joins at the bottom, draw a line around the cone. Cut up and along the line. This will be the body.

3. For the legs, cut up the middle of one of the sides, about a third of the way. Then wiggle and turn your scissors to cut across to the corner and just beyond. Do the other side too, so you've cut a sort of 'T' shape. Now repeat this 'T' shape on the opposite side of the cone.


4. To form the legs, press the cut card edges in the middle towards each other and squeeze each side into a rounded leg shape. If they're too big, snip off a small piece of card. There's no need to use glue. The legs should hold and the body should be stable. (Snip the bottom of the legs if the body is a little wobbly)


5. For the head, take the other egg box cone and use a pencil and ruler to mark about 2cm (3/4in.) from the top on all sides. Join the marks with a line. Choose which side you'd like for the face and draw small round Peppa ears here. Keep them on top - don't draw past the corners.


6. To help cut the head out, cut up the two back corners to the pencil line, fold the flap of card back and cut it off. It should now be easier to cut along the rest of the line, cutting carefully around the ears. With the little fiddly bit of card between the ears, either bend it forward and snip off or simply fold it behind so it's inside the head.

7. On the underside of the head, cut up the two back corners, almost to the end, bend back this flap of card and cut it off. Glue the head onto the body - don't push it right down onto the top of the cone - there should be a small gap between the top of the cone and the top of Peppa's head.


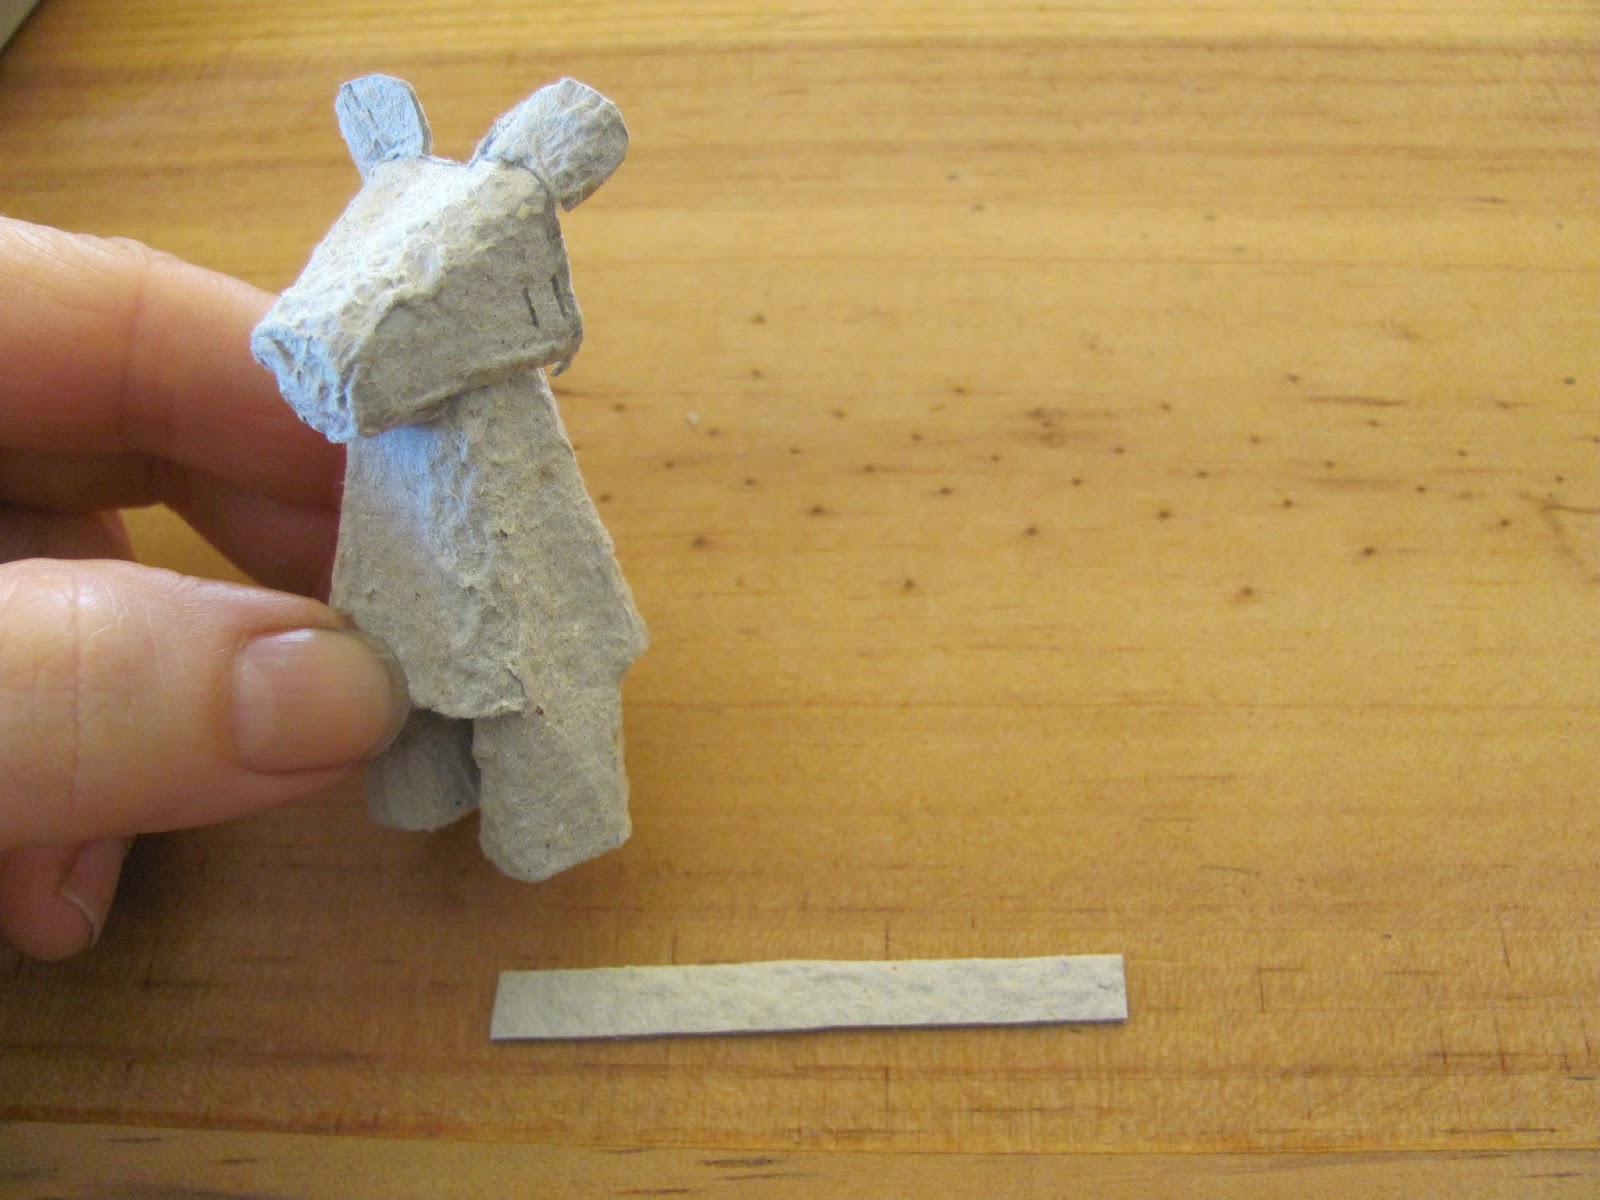
8. While that's drying cut a thin strip of card for the arms (about 5cm/2in. long) from the egg carton lid.

9. Painting time - paint the head, legs and arm strip pink (lots of white and a little red), and then the middle part of the body red for Peppa's dress. Don't forget to paint the top part of the cone pink at the back.

10. When dry, fold the arm strip in half and cut along the crease. Use small scissors to snip fingers in the ends if you like.

Then, either glue the arms on the sides, OR, use the nail scissors to make slots for arms either side (keep them closed, press down firmly and twist until the tip pierces through the card, then cut slots)

Wiggle the scissors in and out a few times so it's easier to push the arms in.


11. Use a pink felt tip or highlighter to draw circles for cheeks, the snout and nostrils, and a big smile. Dot two small white dots of paint for eyes on top, in front of the ears. When dry, finish the eyes with a spot of black felt tip or gel pen.


17.6.15

Little egg box Clangers

Lovely to see them back! Hopefully the Clangers will be just as popular this time round, so old timers like me can wallow in a bit of nostalgic childrens' telly....

Clangers craft

To celebrate their return, we've been making mini ones from egg boxes (of course!) Their noses aren't quite as narrow and pointy as the real thing, but think there's enough of a likeness?
If you want to have a go, you will need:

An egg carton
red and white paint
fine black felt tip or gel pen
brown wool
glue
glitter
sequins
general purpose scissors
Straight-edged nail scissors (optional - adult supervision needed)

1 Roughly cut out the two middle cones from the egg box. This makes them easier to work with.


2 Take one, and just above any joins at the bottom, draw a line around the cone. Cut up and along the line. This will be the body.

3.For the legs, cut up the middle of one of the cone sides, about a third of the way. Then wiggle and turn your scissors to cut across to the corner, and just a little beyond. Do the other side too, so you've cut a sort of 'T' shape. Now repeat this 'T' shape on the opposite side of the cone.


4. To form the legs, the cut edges in the middle towards each other and squeeze each side into a rounded leg shape. If they're too big, snip off a small piece of card. There's no need to use glue. The legs should hold and the body should be stable. (Snip the bottom of the legs if the body is a little wobbly)


5. For the head, take the other egg box cone and use a pencil and ruler to mark about 2cm from the top on all sides. Join the marks with a line. Choose which side you'd like for the face and draw round Clanger ears on the corners, so part of the ear is on the adjacent side.


6. To help cut the head out, cut up the two back corners to the pencil line, fold the flap of card back and cut it off. It should now be easier to cut along the rest of the line, cutting carefully around the ears. With the little fiddly bit of card between the ears, either bend it forward and snip off or simply fold it behind.


7. Because the egg box cardboard is prone to ripping, you may need to snip into the bottom of the ears, before gently pushing them forward. Round off the pointy corner if you want to.

8. On the underside of the head, cut up the two back corners, almost to the end, bend back this flap of card and cut it off. Glue the head onto the body. Don't push it right down onto the cone. There should be a little gap at the back, between the top of the cone and the top of your Clanger's head.


9. For the arms, cut a thin strip of card from the egg carton lid, about 5cm/2in. long.


10. Painting time - mix plenty of white and just a little red to get a nice pale pink colour and paint the whole of the body and head, as well as the arm strip.

11. When dry, fold the arm strip in half and cut along the crease. Use small scissors to snip long pointy fingers in the ends if you like.

Then, either glue the arms either side after you've finished decorating your Clanger, or, use the nail scissors to make slots either side (keep them closed, press down firmly and twist until the tip pierces through the card, then cut slots)

Wiggle the scissors in and out a few times so it's easier to push the arms in. Check they fit but then leave them out while you decorate your Clanger.

12. Two decorating options - either glue on sequins (we had some large ones which were perfect), or, cover the body with an even, thin layer of glue and sprinkle glitter! (Make sure you don't get glue on the head though!)


13. For the hair tuft, cut a little piece of wool, separate the strands and stick it down between the ears. Dot eyes on top near the ears with a fine black felt tip pen of gel pen and push the arms back in place or glue them on.


18. To add a bow, fold a small piece of paper over and draw half a small bow on the fold. Cut out, open up and glue in place.


For a star-gazing Clanger, don't cut the underside of the head and simply slip it over the top of the body instead.

Clangers craft


26.6.14

Flamingos flock to the Zoo

I haven't rolled up to the zoo for a while, so, time I think for a bit of pink! Bring on the flamingos!


As well as an egg box, you'll need:
ice-cream carton lid
orange pipe cleaner (20cm/8" long)
2 pink feathers
green, yellow and blue paper (or plain paper to paint)
PVA craft glue
glue stick
sticky tape
pink paint (red and white)
craft scissors
nail scissors
small ball of plasticine
black felt tip pen

We had a bit of a pipe cleaner quandary, because (as we found out) flamingos have pink legs - but the pink pipe cleaner didn't look quite right with the pink paint we used, so we opted for orange instead.


1. Cut out an egg cup for the body and push the bottom of the cup up with your thumbs to make it more dome-shaped. Paint pink, plus both sides of part of the egg box lid, for the head and neck (pull off any label - doesn't need to be a big piece)

2. Draw your flamingo's head and neck - sort of like an S shape - wider and straighter where it joins the body (but make sure this bit is no bigger than the height of your egg cup body) and long enough here so there's enough to push through a slot. (See picture below)

3. Make this vertical slot in the middle of one side. Draw a pencil line where you want it - put a ball of plasticine behind, so there's something to push against.
Use the nail scissors to make a hole on the line (keep them closed, press down and twist slightly from side to side). Once you've made the hole cut along the line, making sure it's the right size for the bottom of the neck. Wiggle the scissors in and out of the slot to make it easier to push the neck into place.
Leave out for now though, while you finish the body.


4. Fold the pipe cleaner in half and attach under the egg cup body with sticky tape.

5. Glue on two feathers either side of the body, and draw eyes and a beak with a fine black pen before slotting the head back in.


6. For the watery setting, take some blue paper, draw around the lid, cut out, then press this bit of paper into the edges of the lid top, before cutting along your creased line (see first pic) - this helps get a good fit.

7. For younger makers or if you'd like to simplify your watery scene, glue the blue paper to the lid now and jump to step 11, OR, if you want more detail, leave the blue piece to one side and cut a sandy yellow piece to fit the lid in the same way as you've just done for the blue water. Glue the yellow piece in place on the lid (a glue stick is great for this)

8. About two thirds of the way along your blue piece, cut a wavy line. We drew around this wavy line on some pale blue paper (see second pic -white paper would be great too). Make a few waves if you like, about a cm or so wide. Or you could paint waves on instead.


9. Before sticking the water down, cut a 4cm (11/2in.) strip of green paper, long enough to go around one end of the lid. Draw a pencil line along the strip, about a cm from the bottom edge and fold along the line. Cut a zigzag fringe of grass along the wider top part, up to the fold. It looks good if the grass is uneven and different heights. Add a few yellow rush grass tops if you want, with snips of yellow paper or yellow paint.

10. Make a few snips below the fold, this will make it easier to press the grass around one end of the lid, especially in the corners (pic 4). Glue the grass in place then  glue the water and waves on top. Add a few cut out circles where you want your flamingo to stand, giving a kind of ripple effect. (Or paint them on)

11. Poke a hole through the middle of the ripple circles with the nail scissors (best done by an adult as the plastic is tough). Keep the hole small or your flamingo will wobble.

Bend the pipe cleaner over when you're happy with the leg length and sellotape underneath. Cut the other leg so it's a similar length and fold the very end of the sharp tip over. Strike a flamingo pose!


Many more projects like this in my craft books, 'Make Your Own Zoo' and 'Make Your Own Farm Animals'