Showing posts with label The big ideas book. Show all posts

27.10.12

Yes or No? A box with answers

I did say I'd do something for the boys from The Big Ideas Book, but it's not just for them - making these little boxes is fun for anyone really.


The reason for the 'boy' tag is they're very, very quick. I don't know about you but that's certainly music to my ears when I'm doing anything crafty with mine. My boys are often keen, always impatient, and have the attention span of a gnat. So the faster they can see results the better! Yes-No boxes are perfect because they're pretty much instant. This is all you'll need - empty matchboxes and a pen or pencil.


Slide out a tray and draw a two-way face on both sides (there are two trays here to show this). Slide it back.


The kids decorated their boxes too, drawing on sticky address labels, but skip the colouring-in bit if you want.  Then the idea is to whisper a secret question needing a 'yes' or 'no' answer into your box..


..shut it, toss the box in the air and pick it up as it's fallen. Open slowly halfway, and the face gives you the answer.


There were squeals of delight and howls of despair - so much fun watching them.


I heard whispers of goals, Arsenal, Disneyland and daddy, the Red Arrows? and something about an iPad (I don't think so..)

and someone obviously thinks they're getting sparkly shoes for christmas..


12.10.12

The Owl and the Pussycat #kidscrafts


Mr Maker would be proud of my kitchen at the moment - it's crazy craft central here, thanks to The Big Ideas Book. I picked up this 70's classic by Susan Stranks in a charity shop - and happily, age hasn't dulled its creative sparkle. I'm very much hoping our crafty wave of enthusiasm will carry us through to Christmas, because there are some great pressie ideas.


Anyway I mentioned I'd make some things from the book, so this is the first of what I hope will be a regular slot...

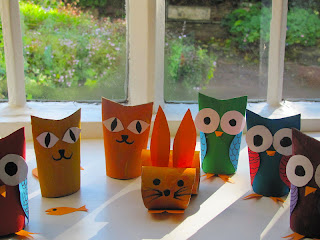
We decided to try paper roll animals first. Susan Stranks (one of the original Magpie presenters) makes her own paper rolls - rolling and glueing coloured paper - but for a stronger, longer lasting one, we used cardboard toilet paper rolls. The only bit of forward planning needed, is to glue the top end of the tube closed - use paper clips, and make sure the glue goes about a cm or two down the tube, because you'll be cutting into it.


Next, painting time, chose any colours you want - the tubes don't need to be painted right down to the bottom as this bit is going to be cut off. It also means the kids are less likely to paint their hands and half way up their arms....I was a little late with this tip for my makers...


With a pencil, mark a shallow curve at the glued end of the tube and cut it out - also take about 2cm off the bottom. This should neaten it up.


For the owl, from coloured paper, cut out circles for eyes (draw round a coin), pointy beaks (cut out a triangle on a paper fold so you end up with a diamond shape), wings and claws (longer than you want them to be so you can glue the extra bit inside the tube).

For the cat, petal shaped eyes (again draw half a petal shape on a paper fold and open it out) and a curly tail. Use coloured paper or painted plain paper.

The rabbit instructions are here.


The kids decorated the wings and eyes with a black felt tip pen, before sticking them on. 


..and cut out a little fish for the cats.


Simple to make and they turned out really well.


Next week - 'Something for the boys'