4.1.19

Christmas card puzzle pictures!


Hang on to some of those old Christmas cards! So worth it for all kinds of craft projects. I've a box of old cards and use them throughout the year for various things - the more colourful and sparkly the better.
This project helps with scissors skills and puzzles, and ends up as a lovely, bright collage. Sort of three for the price of one!

You will need:
Cereal box card
Pencil
Scissors
Selection of old Christmas cards
Black pen
Glue stick
White paper or card

1. Draw some simple shapes on cereal box card. Make them a decent size - ours are about 15cm/20cm wide (6/8in.) With the symmetrical shapes like the heart and fish, fold the card in half and draw half the shape on the fold, then cut out and open up.


2. Use these shapes as templates (if you want to make more than one), and draw around them on another piece of cereal box card.

With a pencil, divide your chosen shape into sections. This is completely up to you, you could go for uniform pieces, like the one below, or completely random. You could have lots of sections too, but with little makers, it's best to keep the puzzle and the cutting simple. Our fish have six pieces, and it helps to number them.


3. Choose the cards you want to use. We arranged our cards roughly into colour tones - blues and greens, orange and reds, and pale colours.

Place one of your pieces on the part of the card you like (go for glitter!), and carefully draw around it (you will probably find using a black pen works best, as a lot of cards are too shiny for pencil. You could copy the shapes on the back instead, but we found this made it harder to get the part of the picture we wanted)


We divided our bird into 5 sections - with a wing shape in the middle.


4. Label the back of the card pieces with the corresponding numbers too, to keep track of the shapes you've cut out.

5. Muddle them up and get puzzling!


6. When you're ready to make your collage, use a glue stick to glue the pieces to some paper or card. Leaving a small gap between the pieces looks great (and is forgiving!).

7. Use a black pen to dot on eyes, or hole punch a dark coloured Christmas card and glue on eyes. We added little hole punched air bubbles for our fish, and you could add lots more to your collage, like extra Christmas card sealife and maybe some wavy, tissue paper seaweed?

We added an orange triangle beak to our bird and you could cut out some legs, or maybe a branch and some leaves from green coloured cards? What about a Christmas card nest!

Lots of possibilities - see where your imagination takes you.

I'm keeping the heart puzzle picture for next month..


This one has a few more pieces, and we added fins.


11.12.18

Simple cork craft for Christmas!


...well, it is that time of year when there might be a few corks knocking about!

This is a very simple Santa craft, based on the gnomes from 'Brian the Lion goes into Space' - so if you'd like to make one, follow the step-by-step instructions for a gnome here.


The only changes are:

Paint the top part of your cork a pinky colour for the face (mix a little red with lots of white, a spot of yellow and tiny touch of blue).

Either paint the bottom part red, or use red paper. Instead of blue feet/shoes, use black paper (or colour-in some plain paper).


For a little extra detail, tease out a thin strip of cotton wool and glue it around the bottom of the cork. Use a black pen to draw a belt around his middle. Add a tiny ball of cotton wool to the top of Santa's red hat.


6.12.18

How to make the gnomes from Brian the Lion

It's the gnomes turn to take centre stage!


There's already a Brian the Lion tutorial here, and this project shows you how to make the little blue, beardy gnomes that Brian meets during his adventures in my book, 'Brian the Lion goes into Space.'
They're very simple to do - just corks and cotton wool!

You will need:
Cork (wine cork shape or cava/champagne shape)
Paint
Scissors
Blue paper (or plain paper coloured blue)
Cotton wool
Glue stick
PVA craft glue
Black felt-tip pen or gel pen

1. First, paint your cork light blue (mix a little blue with a lot of white) The champagne style corks have an obvious head shape.


2. Cut a strip of blue paper (or colour-in plain paper) Make it few cm's wide, so it's about half the length of the cork. Cut a piece that's long enough to wrap around the cork with a little overlap.


3. If you have a glue stick, rub this over your strip of paper and glue in place. With craft (pva) glue, it might be easier to brush a thin layer on the bottom half of the cork and wrap your paper piece around it, adding a tiny dab more glue where the paper overlaps.

4. Cut another thinner strip for the arms - it needs to go around the back of the cork with the arm length even on both sides. You can round off the strip ends for hands if you want, or leave them as they are. Glue in place.


5. For the gnome's shoes, place the cork on the paper and draw around it, but extend your circle shape out a bit at the front (see pic)


Cut out, and mark a 'V' shape in the middle of extra front bit that sticks out, to define the shoes. Snip out the 'V'. Glue the rest under the cork.

6. For the gnome's beard, take a small piece of cotton wool - we unwrapped a cotton ball and used one end of it. Decide how long you want your gnome's beard to be, then gently pull a hole in the cotton wool just above your chosen beard size.


7. Brush a layer of craft glue over the top and sides of the gnome's head and a little on his front, below his head, but leave a space for his face. Carefully press the cotton wool into place, around the face. Try not to get glue on your hands or his beard will stick to your fingers! Gently tease the cotton wool down at the back and sides, to cover the head, and cut any extra off. Press and trim the front too, until you're happy.


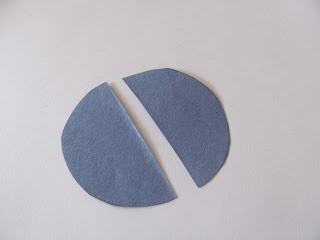
For the gnome's hat, draw around something like the base of a small glass, or jar or beaker, and cut the circle out. Fold it in half and cut along the crease. Rub or dab some glue along half the straight edge and carefully fold and bring the sides together to make a small cone shape. Press with your fingers until the glue holds.


You could glue the hat on, or leave it, so your gnome can take a nap.

Because of course, they sleep on their heads...


20.11.18

Leaf art using paper plates

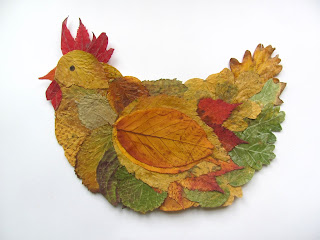
hen - leaf fall crafts

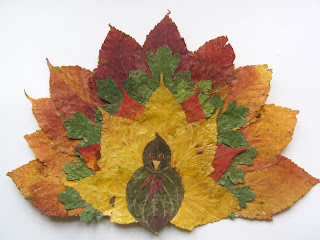
turkey craft thanksgiving leaf art

We have done a fair bit of leaf art over the years, but this is a little different because we've used paper plates as a base for the leaves, and this helps so much with the shape of the birds. A lot easier for little makers too.

We pressed our leaves so they're flat to work with and last longer. The downside is they lose some of their vibrant colour and can sometimes be brittle, but it is lovely to be able to keep your leaf art - we still have a butterfly I made with Daisy about 6 years ago!

There's lots of advice online about the best ways to press leaves - ours isn't very scientific! We just arranged them between some sheets of newspaper and put the newspaper under a rug in the kitchen for about a week. Seemed to work okay..
Just make sure you have plenty of leaves and they're different colours and shapes.

For the Thanksgiving Turkey, cut a small section off the bottom of a paper plate.


Then start with the top of the fantail, arranging your leaves along the outer edge of the paper plate so you can't see any white. Think about your colours, it is worth spending a few minutes arranging your leaves into colour piles. We started with reddish orange leaves, then a row of green and then red point leaves and finally yellow. So a darker turkey body would stand out.
Once you've decided on your rows of leaves - brush a good layer of PVA glue onto the paper plate and stick the leaves down - you will probably need to brush a little glue on the overlapping leaves too.


Find a big leave for the turkey body and a smaller one for the head - make sure they stand out against the fantail.

We used small red leaves for the turkey wattle and cut a small triangle for the beak. If your turkey body is light enough you could draw on eyes with a pen, but if it's dark like ours, then use a hole punch to cut two small circles out of a light coloured leaf and colour in the pupils with a black pen.

Rub a bit of glue stick or brush a very thin layer of glue on the Turkey's face, wet your finger to make it easier to pick up the little leaf pieces, and stick them in place.


Put your Turkey plate collage under a book or tray to press it down. Our turkey looks rather dwarfed by its enormous fantail!!

The hen  is based on our recent paper plate hen project. Remove about a third of the plate by cutting away a curved piece from the top, like so. This will give you your basic hen shape.


Brush your paper plate with a good layer of glue and cover the whole thing with overlapping yellow and greenish leaves. You may need to brush more glue on overlapping leaves.


We found oak leaves were great for the hen's fluffy plumage at the back. Let your leaves go over the edge of the plate to cover the line and to give a more fluffy, feathery look. If too much leaf goes over the edge, you can always give it a trim.

You can keep going, but we put our hen under a book to press for a while, before moving onto the wing and head stage.

Chose a nice big leaf for the wing - find some small colourful leaves and arrange and glue them under the edge of the big leaf, before adding to your hen.


Use some thin pointy red leaves for the hen's comb and arrange and glue them underneath the top of the head. Fine a yellow/orange leaf with a strong pointy end for the beak and stick this underneath too (cut away the part of the leaf you don't need).


Use small red leaves for the wattle, trim if you need to, and glue this just under the beak.

Use a black pen to draw on an eye.