9.3.18

Shoebox kitchen - table and chairs

toilet paper tube table and chairs

Sometimes a craft idea just makes me happy... and this is one of them.

They're often the simplest ideas, and though the chairs mightn't look that simple, honestly, they really are. Each one is made from a single toilet paper tube, and you won't even need any glue.

You will need:
Toilet paper tube (for each chair)
Toilet paper tube (for the table, narrow if possible)
Cereal box card (for table top)
Scissors
Ruler
Pencil
Paint
Craft glue

1. Flatten a tube with the palm of your hand and press firmly all the way down the two creases.


2. Squeeze the tube back into shape, carefully line up the two creases you've just made, and flatten again with the palm of your hand, pressing firmly along the new creases. You'll now have four evenly spaced creases.


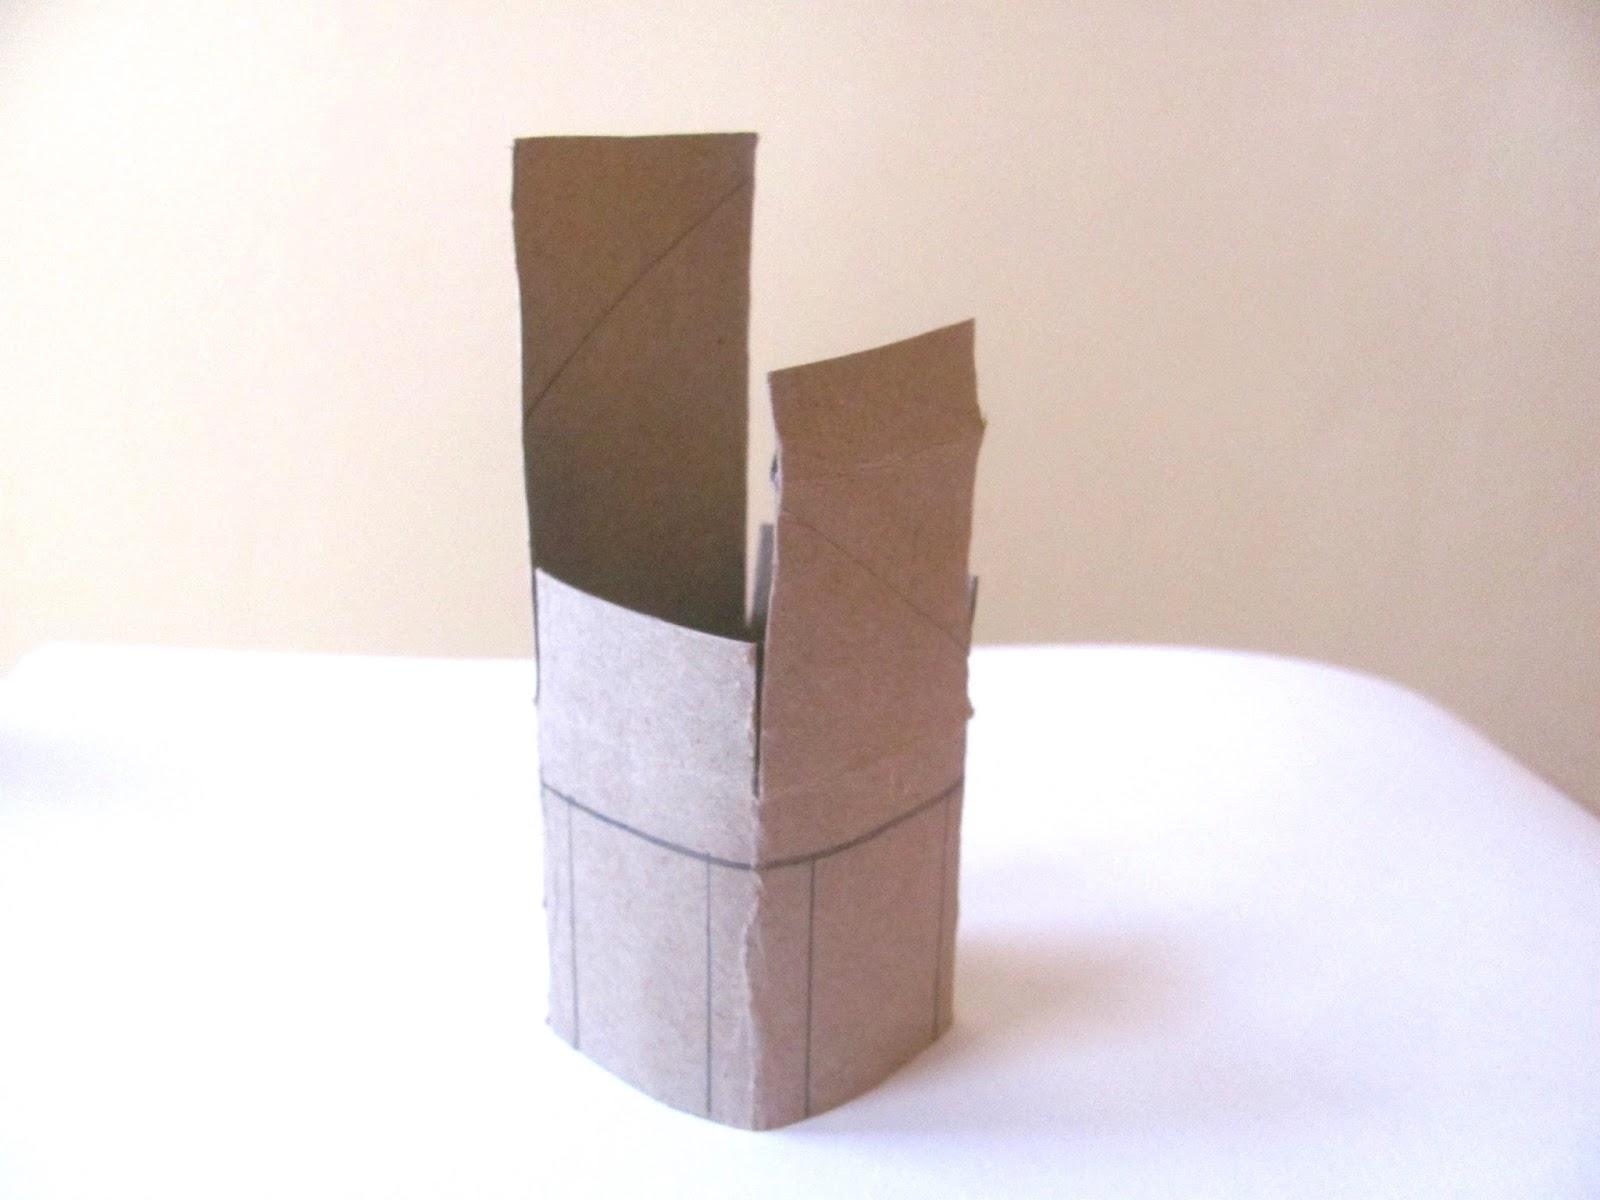
3. While the tube is still flat, draw a line across the tube, 4cm from one end. (This will be the height of the seat part of your chair. Check this in relation to your kitchen - you may want it to be higher)


4. Cut down all the creases to the line (from the longer end) and bend out THREE of the flaps, pressing firmly along the fold.


5. Shorten the two flaps either side of the one you didn't bend (the back of the chair). The flaps should be about a cm or so.


6. Bend the front flap inwards, creasing it where it meets the back of the chair, and then snip off the extra, leaving a cm or so (to tuck into the back of the chair). Press firmly along this crease.


7. You can stop here for younger makers - just bend the side flaps inwards, and tuck in the front flap (trim the sides of this flap a little if you need to, for a neat fit). Move to step 13.


8. OR, flatten the chair again and use a ruler to draw a line about a cm below the one you drew in step 3.


9. Then, draw chair legs either side of the creases - try to keep them even, and cut up to the line, OR, have a go at cutting up to the line without the pencil guidelines, keeping the cuts as even as you can. It's easier (and quicker) than you think!


10. Bend each flap of card between the legs outwards, fold on the line and cut off.


11. Squeeze the chair back into shape, press along all the creases one more time, and then fold in the flaps. You may need to trim the sides of the seat flap to get it to fit in neatly. You shouldn't need glue, but if the seat part is popping out, put some glue on the flap and use a paper clip to hold it in place while the glue dries.


12. (OPTIONAL) If you would like to add some detail to the back of the chair, you could draw some rectangles (or a different shape) here, and use some small, sharper scissors, like nail scissors to pierce a hole through the card (put a piece of plasticine/modelling clay behind the card, so there's something to push against). Then carefully cut out the shape.


13. For the table, use a narrow tube if you can, place it beside your chair and decide what height you'd like your table to be. Mark this on the tube, but cut the tube about a cm ABOVE the mark.

14. Make lots of small cuts down the tube to the line and firmly bend and fold back all the flaps.


15. Cut the top of your table from a piece of cereal box card. Ours is 10cm long by 7cm wide, and then we made about a cm fold along the length of the table on both sides (to make it look thicker), but leave this part out if you want to.


16. Glue the base to the middle of the table top and leave it upside down with something on top of the tube, to weigh it down while the glue dries. Then, paint your table and chairs any colour you want.

We went for a wood effect..

shoebox kitchen


4.3.18

Creme egg cockatoo


This is just a bit of fun - creme egg wrapper to cockatoo collage in four snips!

The hardest part is getting the foil off in one piece!


24.2.18

Shoebox kitchen - walls and floor


The units we made in the last kitchen project are ready to be fitted, so it's time to sort out the walls and the floor!  

You'll need:
Cereal box card
Wrapping paper or paint (optional)
Pencil
Ruler
Scissors
Craft glue
Glue stick
Plain paper
Felt-tip pens
Self-adhesive postage labels

1. We covered our kitchen walls with wrapping paper - this isn't the easiest job, but it does look great, even with a few bubbles and wrinkles here and there..  But you don't have to cover the walls at all, or you could simply paint them.

2. If you're wallpapering, you'll be covering the two short ends and the back. Start by carefully drawing around the base of the box with a pencil, on the back of your paper - then draw around the two ends. 

Cut the pieces out. They'll probably end up a little bigger than you need, but better too big than too small.

3. Stick the sides in first. You only need a thin layer of glue on the box. I find a glue stick rubbed over the cardboard is a good way to do this with kids, though you will get through a fair amount of it! Line each piece up with the edge of the box and the top (ceiling) corner, so any extra paper will go on the back wall and on the floor and can be covered later.

Try the back piece of wallpaper for size first before gluing. If it's far too wide, trim a little, but make sure it still covers the joins with the side walls. Don't worry too much about the height,  line it up with eh back edge of the ceiling, and smooth down, so any extra paper will be hidden under the kitchen floor. 


4. While that's drying you could make a splash back for your kitchen units, though again, leave this step out if you want.

Measure the length of your units on some spare cereal box card and use a ruler to draw a long strip, about 2cm wide. we measured and drew squares on ours, but there's no need to do this. Paint your strip and at the same time you could paint another corner of card for the shelves.


Cut out your splash back, mark where the top of the units touches the back wall, on both ends - then stick down the strip of card, so the bottom of the splash back is just below the marks you've made.

5. For the floor, cut a large piece of cereal box card that's the length of your shoebox, but make it wider than the sides, about 3cm wider, otherwise we're not going to have masses of room for the table and chairs (next time!). Again, you can leave the floor plain, or paint or colour it in. We measured out squares again, and coloured them in with a felt-tip pen.


(didn't bother drawing squares on the back line, as this will be covered up by the kitchen units)

Glue down the floor. Weigh it down with books will the glue dries.

6. What about a window? Ours is 8x7cm - measure it out on the corner of a plain piece of paper.

Use pens or paint to draw a scene you'd like to see out of your window! Once you're happy, cut it out. Sticky postage labels are really handy for the window frame. Use a ruler and pencil to draw thin strips and cut them out. Peel off and stick around your window. Trim the extra bits away.


Rub some glue stick on the back of the window and stick it just above the splash back, behind the sink.

7. For the shelves, cut out two strips from your painted (or plain) card. Ours are 2cm wide and 8cm long. Fold them in half lengthways, and press firmly along the fold. Then glue the shelves onto the wall. Leave your kitchen on its back while the glue dries.


Next time, a bit of furniture...

5.2.18

Pop Hearts - crafts for kids


These pop hearts make a lovely gift and they're really easy to make, all you need is a toilet paper roll or some other kind of cardboard tube. We've left ours plain, but you could personalise them with a short message below the heart.

You will need:
TP roll
Pencil
Ruler
Scissors
Paint
Craft glue (optional)
Glitter (optional)
Coloured foil (optional)

1. Flatten the cardboard tube with your hand - press down along the sides, so you can see the creases.


2. Squeeze the tube back into shape, then line up the two creases you've just made, in the middle, and flatten again, pressing down on the sides.


3. While the tube is flat, use a ruler and pencil to draw a line across the tube, about 2cm from the bottom.


4. Use the scissors to cut down the two side creases to the pencil line.


5. Squeeze the tube back into shape, then line up the cuts you've just made in the middle, and press the tube flat again.


6. Draw half a heart on one side of the tube and take it right down to the pencil line, but don't bring it into a point here (or your heart will fall off..), leave about a cm.

7. Cut around your heart (younger makers may need some help cutting through the double card). To make it easier to cut out the strip at the side of the heart, once you've cut to the pencil line, bend the card out and snip it off. Repeat on the other side. Then squeeze your tube back into shape.


8. Paint the inside of the tube and everywhere else too, except for the heart. When the paint's dry, use the pencil to draw in the bottom tip of the heart.


9. You could go with the norm, and paint your heart red, (or any colour) - or cover it in a thin layer of glue, and sprinkle glitter over it. Or do both!


9. We decorated one of our hearts with some colourful tin foil kept from Christmas chocolates.


Cover the heart in a thin layer of glue and line up a corner of the foil with the pointy tip of the heart. Then carefully smooth the foil over the card. Cut away most of the excess, leaving some to tuck around the back.


Put some glue on the edges at the back, and mould the tin foil around the heart. If you don't have a big enough piece of foil, it would look good with a patchwork of different coloured pieces too.
Maybe keep some aside this Easter, though care and patience may be needed to get the foil off in one piece!


1.2.18

Shoebox kitchen - kitchen units

I used to love making rooms for my toys. For a few years my bedroom was an ramshackle shanty-town of cardboard boxes. All thanks really to the kids' telly programme, Blue Peter, because their homemade rooms for Barbie/Sindy were just fabulous. 

Mine weren’t quite so fabulous, I struggled a bit with the sticky-back plastic and didn’t have a Barbie or a Sindy, but none of that was going to stop me.. 

Plenty of other toys looking for somewhere to live.

So this craft project is close to my heart. The plan is to make a house, but I’m using shoe boxes for the rooms, for smaller dolls or toys (and takes up less space), and we’re going to break down each room project into more manageable chunks. 


cereal box kitchen

Kitchen first, and we're going to start with the kitchen units, which are basically one side of an inside-out cereal box. 

Please feel free to use ours as a guide and come up with your own design - there'll also be a few tips on how to simplify things for younger makers.

You will need:  
Shoe box
Cereal box
Small matchbox (optional)
Scissors
Ruler
Pencil
Paint
Glue stick
Craft glue
Sticky tape
Paper clips
Silver metallic pen (optional)
Silver spray paint (optional)
Black felt-tip or gel pen

1. We'll be decorating the inside of the kitchen (walls and floor) next time, but for now, measure the length of the shoe box, for the length of your kitchen units.


2. Open up a cereal box by sliding something like a ruler up the seam and lay it out, plain side up. We are going to use the ready-made box creases to help us - one side crease (there are two running down the middle of the card in the picture below) will become the edge of the work surface.

3. Measure and mark 7cm below one of these creases for the height of the units. (If you have a large shoe box, your units may need to be taller). 


4. Measure the length you need for the units from a top crease, just below the flaps. Mark this measurement, but make sure to add about 3cm either side, so you have extra card, for folding. On one side this will be the original box flaps.  (Don't worry if the flaps are a bit tatty, they won't be seen.)

 Our cereal box was quite small and just happened to be about the right length for the shoe box, so we were able to use the flaps from both ends.

5. If you have a small matchbox, use this to work out the width of your work surface, above the crease (on the original side panel of the cereal box). We went for 4cm.  Remember the extra card at both ends for folding.


6. If you need to make your own flaps, draw a line where you've marked the length of the shoe box, and fold the card firmly on this line. Cut along the crease to the line. 


This is how it will stand once the units are decorated.


7. Work out how many units you want and how wide each one will be. Ours are all roughly 5cm wide. It's best to place the sink unit in the middle. (We will probably put a window here in the next project)

Either use a ruler and pencil or pen to mark these and start painting or colouring each one separately straight away, OR paint the work surface and units in one go, like we did.


8. We then worked out the number of units that would fit along the front, between the creases, and used a ruler and black pen to draw them in.  We then used the measurements to draw a cooker and fridge on some plain paper and coloured in with felt-tips. You could also add a washing machine or a dishwasher, or whatever you want.


9. Cut out and use a glue stick to glue them in place. Above the cooker, colour the hob black (a permanent marker like a Sharpie is good for this). We used a metallic silver pen for the hot plates.


10. Glue the flaps together, either side, and check the work surface and unit front are at a right angle, so the top is level. Use paper clips to hold in place while the glue dries.


11. If you have a small match box, first cut a small strip of cereal box card for the spout and two small thin triangles for taps. Stick them along one side of the box. 


When the glue is dry, bend the spout down and either paint the sink, or if you have some silver spray paint, you could spray it like we did. (Best done by an adult) 

If you don't have a matchbox, just paint or colour in the part of the work surface where you want your sink to go  - a metallic silver pen would be great for this - colour in the strip of card and triangles too, then glue them underneath the sink, with the tops sticking out over the edge. When the glue is dry, bend them up, into place. so you see them above the work surface.


12. If you have used a matchbox, place the sink where you want it to go on your work surface and very lightly mark either side. About a cm or so INSIDE each of these marks, cut almost but not quite up to the fold. Bend this piece of card back and cut it off.


13. Turn your units upside down and use sticky tape to attach the sink underneath. There should be plenty of work surface edge to attach it to. Once you've attached the sink sides to the work surface, use a piece of tape to anchor it to the units infront too. This should help make the units more sturdy.  Ours looks a bit of a mess, but it doesn't matter because no one will see it!


Next time, wallpaper, tiling and a spot of interior decorating..