8.5.20

Rose Bouquet fridge magnet - Mother's Day Craft


A simple and quick, and hopefully useful Mother's Day gift!

We made this two ways - rolling paper for the flowers and scrunching tissue paper - the second option is easier for littlies to do.

You will need:
Egg carton
Cereal box card (or similar)
Coloured paper (or painted plain paper)
Tissue paper (optional)
Craft glue
Paint
Scissors

1. First paint some cereal box card green and one of the egg cones blue or whatever colour you'd like your vase to be - paint some of the egg box lid too.

Putting the egg cone on a spare cone makes painting a lot easier (and a little less messy!)


2. Find something in the kitchen with a small round base to draw around. We used a spice pot. Cut out your circle.

We cut out two to show the different ways to make the flowers.


3. For the rolled roses, cut a strip of coloured paper (we chose red), about 16cm/6in. long and roughly 8cm/3in. wide. Put a little line of glue at the far end and start rolling, keeping it tight.


4. With good scissors, cut across your roll - this is best done by a grown-up - keep the pieces as thin/small as you can.


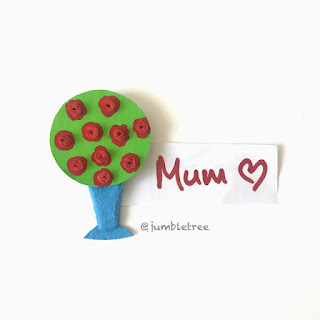
5. Paint some red splodges on your green circle, where you'd like the flowers to go.


6. Get on with making the vase while the paint dries, then dot some glue in the middle of each painted flower shape and add your little paper scrolls.


7. For an easier option, fold some tissue paper over a few times and cut out small squares (about 3cm/1in.) ). Then scrunch them up to make your blooms. Glue on the red paint marks, as before.


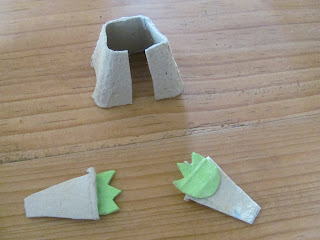
8. For the vase, cut the egg carton cone in half lengthways.


9. Then, trim away some of the side, so it's more even. Give it a press to push the sides out a little.


10. For the base of the vase, cut a triangle out of the spare egg carton card you've painted. Make the triangle quite flat and wide. Glue under the bottom of the vase. (The one on the right has tissue paper roses)

Glue the top of the vase to the back of your flowers.


11.  To make it into a fridge magnet, you'll probably need to glue some card to the top part of the vase first, so the magnet is at the right level. We used some strong clear glue (like UHU glue) to stick the magnet on. Or you could use a glue gun.



4.5.20

Cork Yoda fridge magnet - Star Wars craft


May the Fourth with you be! 

This little Yoda combines two of my favourite things to craft with - corks and egg cartons!

You will need:
Champagne/Sparkling wine cork
Egg carton
Paint
Black gel or marker pen
Craft glue
Strong glue, like UHU, or a glue gun
Brown paper or plain paper painted
Magnet (optional)

1. For his distinctive sticky out ears, cut out two long pointy triangle shapes from the egg carton lid. Glue them either side of the wider, top part of the cork, pointing forward. 

They will stick with PVA craft glue eventually, but easier and quicker to use a stronger clear glue or a glue gun if you have one. I don't have a glue gun and used UHU glue for bits like this.


2. When the glue has dried, bend the ears back into place.


3. Paint your Yoda's body green, plus some spare egg carton card for the hands and feet.

When dry, draw two hand shapes (see below) To cut out, cut around them roughly first, then snip out the zigzag bits, before cutting around the rest of the hand.


4. For the feet cut two short strips from the green card (place them under the cork body to make sure they're the right size and not too wide). Then, snip out a few zigzag triangles.

Glue the feet under the cork body.


5. His cloak is made from the middle part of an egg carton cone.  Once you've cut the cone out, cut the top off, just squeeze the cone flat and cut across the card. Press back into shape - the top will look uneven, so trim until you have a nice straight edge.


6. For the billowy sleeves,  use the edge of the carton as it often has a rather nice little turn up! It's also easy for cutting. Cut two of the shape below. 


7. See the little turn up? No worries though if your carton doesn't have this lip around the edge. For the cloak opening, cut a strip out of one side of the cone.

Check the cloak is the right size for your Yoda - shorten the top part if it's too big.


8. Glue the hands behind the ends of the sleeves, so you can see them. If you have a little turn up, make sure you glue on the other side. Craft glue will work for this, or you could use the stronger glue.


Glue the sleeves either side of the cloak.

Then, glue the bottom of the sleeves to the front part of the cloak, by the opening. You might need paper clips (or laundry pegs) to hold the arms in place while the glue dries.


9. While the glue is drying, cut out a short strip of brown paper (or paint some plain paper) that covers the thinner part of the cork, below the head and above the feet. It doesn't need to go around the back of the cork as this will be covered by the cloak.

Glue in place with a thin layer of craft glue or a glue stick.

10. Use a black pen to add some Yoda-ish features.


11. Glue the cloak onto the back and sides of the body.


12. If you want to make your Yoda into a fridge magnet, use the strong glue to stick a magnet on the back.


26.4.20

Egg Carton phone stand hack! - #stayhomeandcraft

egg carton craft

Proof that not only are egg cartons brilliant for crafting with, they're also super useful too!

I've been trying to think of something easy to make that might come in handy in this strange new lockdown world we're living in, and this does the trick I think.

We've been making a lot more video calls to friends and family and often had problems propping my phone up, until I popped it into the base of an egg carton! The groove in front of the cones is a perfect fit for a phone, and leaning against the cones tilts the phone at just the right angle.

So there's no need to do anything apart from take the lid off, but where's the fun in that?? So you can have all kinds of fun decorating your phone stand/holder anyway you like.

And when it's not being a phone stand, it could be a useful little desk organiser.. or treat holder?

Here are a few decorating ideas we had.

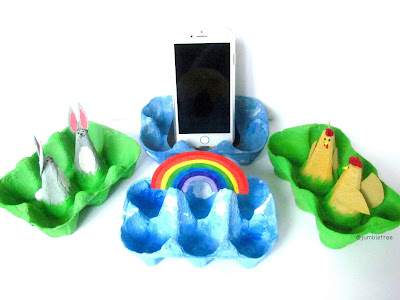
Rainbows are popping up everywhere, so this seems like a good choice at the moment. Just paint the egg carton base blue - we mixed in some white to get a softer blue, then splodged on some white for clouds.


For the rainbow, find something with a round base that is wider than the distance between the two egg carton cones. Draw around it and cut out the circle, then cut the circle in half.


Draw, paint or colour your rainbow.

Make slots in the top of the cones for your rainbow. Nail scissors are good for this (best done by a grown up though)


You could turn your cones into penguins..

The best order for painting is probably the blue sea, then white tummy (or leave if your egg carton is white-ish already) and finally black.

Paint or stick on a beak and feet. Original penguin craft tutorial is HERE.


Or what about hens? For someone who loves their chooks?

I used an orangy yellow egg carton, so no need to paint the cones, just the base which we painted green.


Cut out a tail feather shape (see pic below) and wing shapes (like a teardrop or petal). Glue the wings either side and make a slot in the back of the cone, long enough for the tail feather. Nail scissors are good for making the slot (needs to be done by a grown up) Keep the scissors closed, pressed down firmly, twisting the scissors to make a hole, then cut the slot.


The hen's comb is a small scrunched up piece of red tissue paper, glued on top, the eyes are drawn on with a black pen. We made a sticky out beak (like the penguins), but the easiest way to do the beak is to paint or draw one, or glue on a small triangle. Paint or colour in a red wattle under the beak.


The cones could be bunnies..

We painted the base green, but you could use a green carton - and then painted the cones grey. We painted some of the lid grey too, for the ears.


Cut out two petal shapes for the ears from the painted egg carton lid, and then snip out the middle part, to separate each ear.


Paint the tummy part white, a line of pink in the ears (or colour this in) and use a black pen to draw a face, right on top of the cone. Glue on a little piece of cotton wool at the back, for the tail. There's a more detailed tutorial HERE.