6.12.17

On the sixth day of Christmas...

my true love gave to me, six geese a laying,

6 geese a laying

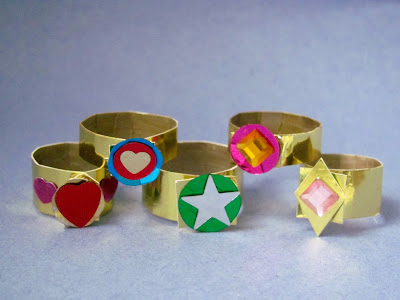
FIVE GO-OLD RINGS...


four calling birds,


three French hens,


two turtle doves,


and a partridge in a pear tree


(Instructions for the geese and nests can be found in 'Make Your Own Farm Animals'. Though to be fair, they're ducks in the book... think they pass as geese? All the projects are easy enough to adapt, which is handy!


5.12.17

On the fifth day of Christmas...

my true love gave to me,
FIVE GO-OLD RINGS..

5 gold rings

four calling birds,

4 calling birds

three French hens,


two turtle doves,

2 turtle doves

and a partridge in a pear tree.


4.12.17

On the fourth day of Christmas...


..my true love gave to me, four calling birds,


three French hens,


two turtle doves,


and a partridge in a pear tree.


3.12.17

On the third day of Christmas...

... my true love gave to me, three French hens,


two turtle doves,

2 turtle doves

and a partridge in a pear tree


(instructions for the hens are also in Make Your Own Farm Animals)

2.12.17

On the second day of Christmas...

...my true love gave to me, two turtle doves 


 and a partridge in a pear tree.


Instructions for the little doves and the dovecote can be found in Make Your Own Farm Animals.


1.12.17

On the first day of Christmas.....

Partridge in a pear tree


...my true love gave to me, a partridge in a pear tree

(attempting to make all 12 days out of the recycling....though could be setting myself up for a fall, as have no idea how I'm going to do 'maids a milking' or 'lords a leaping'..

The partridge in a pear tree is based on the Bird In The Tree project.


30.10.17

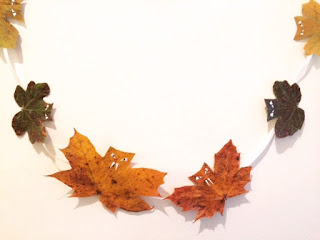
Spooky bat leaf decorations


bat leaf


This is a very quick and easy Halloween craft idea that makes use of colourful autumn leaves. We collected leaves that were a sort off maple-leaf shape (field maple, acer, sycamore even ivy leaves)  - definitely not hard to find once you start looking!

1. Then just one cut - to snip off the middle pointy part of the leaf, like so. Curve the cut a little, for bat ears.


2. Keep the stalks on for instant ‘flying’ bats (like the first photo), and glue on paper eyes and fangs (see step 4).

3. The leaves will quickly start to curl once they’re inside, so if you want them to last longer, press for a few days after you've cut them.

If you don’t have a flower press, put the leaves between the pages of an old book and then place a pile of books on top.

Once they’re pressed they’ll be flat, but more brittle, so need to be handled with some care.

4. For the eyes and fangs, we cut small, long triangles from some plain paper. Rub glue stick carefully over the head part, where you want the eyes and fangs to go, then wet your finger to pick up the little triangles and stick them in place. Use a black pen to finish off the eyes.


To make them last a bit longer you could varnish the leaves with a clear, water-based varnish.


5. To make bat bunting, we glued our bats onto some flat gift-wrap ribbon. Stick them on near their heads, so they don’t tip forward. (I forgot to do this...)


bat bunting


You could make a Halloween collage with them too.