22.10.15

Make Your Own Zoo, down on the farm!

I'm holding my first Make Your Own Zoo workshops next week! REALLY excited. A little apprehensive too, but mostly excited.


They're at Kate Humble's farm, Humble By Nature near Monmouth which is a pretty special venue.
Humble By Nature is the place to go to learn rural skills, like running a smallholding and animal husbandry, and there are cooking and craft courses too. Such a varied range of things to do, often with a bit of a twist! And the team are always open to new ideas; ones that share their values. Do have a read about how it all began, here. It's been quite a journey.

I'm doing three, hour long sessions on Monday, and they're all sold out which is brilliant. So, there'll be 10 children + parents coming along to each one, and my goal is to make it fun, and to send everyone home with as many animals as we can possibly squeeze into an hour!

I've done a bit of prep to keep things moving along, mainly painting pieces of cereal box card and cutting up egg boxes. Hopefully we'll manage a lion, giraffe or zebra, a penguin....


and, if there's time, a sheep! Definitely the right place to be making sheep. Might be a little ambitious though. I've been working on a few make your own farm ideas....


I'll let you know how it goes! Hopefully no hitches, because I've been asked to do a workshop at the Hay Festival Winter Weekend at the end of November which I'm so, so thrilled about. Can't believe it really. Another path that started here.

19.10.15

DIY glow-in-the-dark Halloween board game


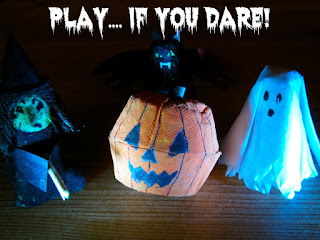
At last! A board game for the mini Halloween figures I made yonks ago. This was always the plan - it's just taken me a very long time to get round to it.  If you'd like to make the figures, the pumpkin and the witch are here and the ghost and vampire bat here.

To be fair, the glow-in-the-dark part is a bit of a novelty; I just really wanted to get some glow-in-the-dark paint. And it does glow, though not quite enough to read what's on the squares in the pitch black, and certainly not enough for me to get a decent picture. Sure anyway, it all adds to the fun, and the game works fine without too.

You'll need:
a cereal box (at least 28cm high)
glow-in-the-dark paint (optional)
good black felt tip (like a Sharpie)
ruler
scissors
toilet paper tube
paint
LED tea light (optional)
sweets (optional!)


1. Open up the cereal box - use the creased lines to help you draw a square 28cm x 28cm. Don't cut it out yet - easier to paint the whole square and draw lines when it's like this - less mess as well!


2. (Optional) Paint your square with a few coats of glow-in-the-dark paint.


3. Use the ruler to measure and mark points 3.5cm along all 4 lines. Then join them up with the black felt tip to make a grid. (3cm was too small and 4 was too big - 3.5 seemed just right)
Cut it out.


4. Now the bit that my kids really enjoyed - coming up with the good square/bad squares. Kind of like Snakes and Ladders, with an evil twist. We did a few miss-a-goes too. And my daughter came up with the idea of having some Trick or Treat squares. If you land on one you can have a sweet. I did try to point out no one was likely to want to do a trick with sweets on offer, but anyway!

Here are most of ours - I bet you could come up with even more gruesome ones.

Good squares: Halloween! +5, Jump on a broomstick +2, Drink witch's brew +1, find a black cat +3, Zombie party! +3, Full Moon! +4, Win a gruesome ghoul contest +4

Bad squares: Spell backfires -5, fall into a cauldron -3, Phantom flu -2, turn into a frog -3, lose your head! -4, and the worst of the lot, 'Zapped by a Ghostbuster! Back to the beginning'

Miss a go: get stuck in a web, catch Hog warts, fall in a slime pool

5. Write on your squares, (use different colours if you want) making sure you don't have for example, a +2 landing on a -2, sending your figure endlessly forward and back, like being trapped in limbo, FOREVER!!


6. Fill the numbers in around the good and bad squares (make sure you include them in your counting)


7. The winner is the first one to reach the haunted castle at the end of the game. It's made from a toilet paper tube. Cut out a door shape at the bottom, and make short, evenly spaced cuts around the top. Bend back every other flap to form battlements.


Use nail scissors to pierce a few holes in the tube and cut thin slits for windows. Then paint.

We popped a LED tea light (from IKEA) inside, to give it a ghoulish glow.


We've all played, even the grumpy teenager, and it's been great having a bit of time and a bit of fun together. Doesn't happen as much as I'd like these days.

Now looking for other things to do with the glow-in-the-dark paint.... Tempted to put 'tidy your room, or else...' on the 13 year old's wall, so it mysteriously appears at night.

Too mean? :)


Linking up with Trash 2 Treasure and Creative Mondays


14.10.15

Mushroom foraging in the Forest of Dean

Know your Shaggy Parasols from your Blushers? Not something I'd be staking my life on, but there's a glimmer of a chance now, because after banging on about it for years, I finally booked myself on a mushroom foraging course in the Forest of Dean.


So very glad I did, it was such a good day, and  full on - from 10 to 5 - searching for mushrooms in the woods, learning how to spot the good ones, and more importantly, the deadly avoid-at-all-costs ones.

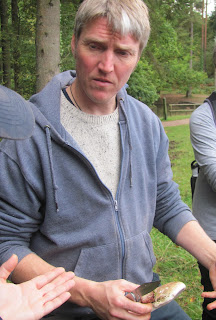
Our guide was Jesper Launder: top forager, Herbalist and a font of fungi knowledge, with an ever so slight Brian Cox thing going on.


No doubt whatsoever he loves his mushrooms, and I'd say his enthusiasm and passion rubbed off on the whole group. The best kind of teachers - especially when it's really important to pay attention...


There was such a lot to take in - in the first half hour we'd already found over half a dozen different types: Butter Caps, Fairy Bonnets, Honey Fungus, Puffballs, Shaggy Parasols, Blushers.... some edible, some not. I started taking notes - not stuff I wanted to get muddled about. Up to this point the only thing I knew about Honey Fungus was that it was responsible for the demise of several small trees and shrubs in our garden. I had no idea you could eat it.


Jesper explained some of the distinguishing characteristics of different mushroom families - colour (red, best steer clear), shape, stem rings, gills or not; just for starters.
But of course nothing's really that clear cut - some red ones are okay, some good ones have evil looky-likeys - Blusher (good)/Panther cap (baaaad) or Shaggy Parasol and The Vomiter...

Even some in the fungi family that includes the lethal Death Cap are apparently edible, though why you'd want to go anywhere near mushrooms that have relatives with Death in the title... or Web, as it turns out.

There were a few in our group of about 10 who already knew a fair amount, but most were beginners like me. The only wild mushroom I've ever felt happy foraging is a giant Puffball. Mainly because there's no chance of muddling it up with anything else really, and there's one that pops up most years in the church car park next door. We found this a few years ago.


Delicious fried in a little garlic butter with bacon, and the rest went in pasta and savoury rice. It lasted for the best part of a week.

So excited when I found a smaller, but perfectly round and firm one in the same place just before the foraging day, but didn't pick it straight away because I knew my daughter would enjoy that bit. Of course I promptly forgot all about it, and when we went back someone had flipping well driven over it!


Love the name of the one at the back - Amethyst Deceiver - mushrooms do have great names.

As well as looking pretty amazing, some smell unexpectedly amazing too. One of the more experienced foragers found a tiny Coconut Milkcap mushroom that really did smell of desiccated coconut.

We nibbled a few varieties of Brittlegills - very common in the UK, edible, but not all of them are pleasant - some tasted spicy hot, like you'd been hit by a wasabi express train. The most desirable one is the Charcoal Burner...which doesn't have brittle gills like the rest. I'm feeling the more you learn, the bigger the mushroom minefield gets.


Jesper took us foraging in three different places - the first was probably the best, but as he says, it can change so quickly - a spot that's good one time, can have little to offer on the next visit. The foraging window isn't often that wide either, and probably not helped by the growing numbers of wild boar in the Forest of Dean, digging up the soft ground. Some spots where just a mass of churned up earth and mud.


HUGE mushroom envy when someone found this large Porcini (Cep or Penny-bun) - from the popular, and mostly edible, Boletus family. They're an easier one to identify because the underside of the cap has spongy pores rather than gills. Still, some are toxic (of course) and we were warned to avoid red boletes and ones that turn a vivid blue when cut.

Jesper explained other helpful detection techniques, like the spore test, though feel that's getting into advanced foraging territory; and as he's a qualified Herbalist, he talked a bit too about the medicinal properties of some fungi, which was one of the most interesting parts for me.

I had no idea that some common Polypores (Bracket Fungi, usually grow on wood, often shelf-shaped), like the one called Turkey Tail, are used to treat cancer. Mainly in Asia, though there's more research going on here now apparently. Or that Birch Polypores can be used as firelighters, knife sharpeners or, rather brilliantly, strips cut from the underside make a neat natural plaster. Antisceptic, porous, anti-fungal and sticks to itself.


Did you know that the dusty spores in an old Puffball also act as a natural antiseptic and can be puffed out to help treat a cut? It's known by quite a few weird and wonderful names. Seeing a murky little cloud burst forth, 'Wolf's Fart' sort of makes more sense...

I was definitely not top student forager - there was a measly amount in my basket compared to the others, but as I'm the only one at home at the moment who eats them, that was fine.

I hadn't really appreciated all wild mushrooms should be cooked, and that some absolutely have to be cooked, to break down toxins. And on the whole chuck out the stalks.

We found quite a lot of Honey Fungus, which is a popular one, though apparently not everyone gets on with it. That's another thing - a tasty little mushroom treat for someone can be an indigestible nightmare for someone else. But I'm pleased to report no repeating problems with our Honeys. I cooked them with a little butter, thyme and seasoning, and though they disappeared to almost nothing in the pan, they were delicious.


Obviously a little mushroom knowledge could be a very dangerous thing, but actually, if anything I'd be more wary and cautious now. I'll be dashing out to get a seriously good guidebook before I dash out to do any foraging. It's more about the knowing and the searching for me, rather than the eating.

And if I ever did venture out, I'd stick to the most obvious ones that are easiest to spot, like Porcini, Funnel Yellow Chanterelles, Hedgehog Mushrooms (spines instead of gills) and of course my old favourite, the Puffball.. as long as they're not purple inside...


Jesper also offers a kind of after care service, so if you're brave enough to have a go yourself and are not absolutely 100% sure what you've got, you can email him a picture. He runs other courses in different parts of the country - and not just mushroom foraging. If you're interested, do have a look at his website to see if there are any near you. You won't be disappointed.


14.8.15

Best in Show: Pedigree knitting


...Well, not quite. It was all going swimmingly until I realised one of the hind legs was on back to front.

If it had been a sewing mistake that would have been a faff (though a manageable one), but it wasn't; for some reason I'd actually knitted the leg onto the body facing the wrong way.... so it stuck out at the back at a rather jaunty angle.

REALLY cross with myself, I'd spent such a long time on it by this stage. The patterns in 'Best in Show: 25 more dogs to knit' are fabulous but they're not for the faint hearted. If I hadn't been knitting the King Charles Spaniel for a friend, or had a bit of a deadline, it would have been slung into the lost world of half finished projects behind the sofa.


Luckily pipe cleaners came to the rescue... Most of the dogs in the book have pipe cleaners sewn into their legs to give them a bit of stability - mine were used to bend  the squiffy leg back into place. And it seemed to work - a critical eye would still spot the mistake, but I think it adds character!

It is a beautiful, clever and challenging book - frustrating at times, yes, for a make-do knitter like me, but well worth the effort. And I learnt how to do loopy stitch. My friend was really touched, it sort of looks a little like her dog... and was the best way I could think of to thank her for all her support and kindness. 

So, two down, just 23 to go...


8.8.15

Book ta-dah time! My Sunday Photo

....a little sooner than expected! I'd been gearing up for a 13th of August book release, but apparently if Amazon get them early, they send them out early. So a few people I know have theirs already, which is great and sort of strange as I've not seen one yet...but we are away!

I've had some lovely messages and pictures about Make Your Own Zoo - this is my 6 year old god-daughter and her flamingo.


Linking up with My Sunday Picture at onedad3girls


6.8.15

The trials and tribulations of a Tooth Fairy

We're away in France at the moment and my daughter is sleeping in a room with me.
The blue patchwork quilt at the front of the photo? That's me - she's on a mattress right next to the bed, and see that small colourful set of tiny drawers on top of the white box? Well that's where she put her tooth. To keep it safe for the Tooth Fairy.


And if that wasn't bad enough, as far as tricky TF obstacle courses go, she'd balanced two tiny Sylvanian puppies on top and carefully lent a plaster of Paris fairy brooch thing against the drawers.
I had to lean right over her to get anywhere near it. If I hadn't been so blinking tired it would almost have been funny - every time she shifted about or snuffled. I froze, musical-statue-like, in an awkward hovering pose. Took AGES.

When I eventually crept into bed it was after one. 

The next morning there was a fair deal of excitement about the money....not so much for the little TF letter and envelope I'd carefully crafted and penned in my teeniest, tiniest fairy writing.


But, you know, I'm glad I made the effort, because it feels like it might be the last time. My only TF believer is losing the faith, and I doubt I'll forget this one in a hurry...
Good to go out in style don't you think?

31.7.15

Shell Lady part 2 - The Pram

Sounds like a rather disappointing film sequel... but hopefully nothing disappointing about this little pram!


As with the Shell Lady, all you need is a good haul of shells, some all-purpose strong clear glue like UHU or Bostik, a fine black marker pen, like a Sharpie, and one extra thing - a paper clip for the pram handle.

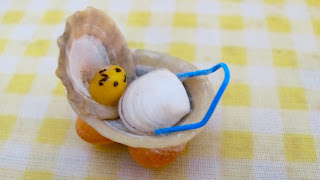
The main part of the pram is made from two small limpet shells - you want one to be a little smaller than the other, so it sits inside, upright, like a hood. Try a few different shells until you’re happy with the fit. Don’t glue in place just yet though.


Choose 4 similar-sized periwinkle shells for the wheels, and glue the open part to the limpet pram base. Turn over to check it sits steady and doesn’t wobble. Glue in the pram hood and leave to dry. If the hood slips a bit, use another shell to hold it in place.


Find a small winkle shell for the baby’s head, glue it in the hood part of the pram and draw a face with a fine black marker (one that won’t smudge, like a Sharpie). Look for a small cockle shaped shell for the baby’s blanket. Don’t glue it in yet - first, make the handle by cutting off a piece of the paper clip (best done by a grown up), and bending it into an even, curved shape. Ours is blue because that’s all I could find!


Glue inside the limpet shell, then stick the blanket over the top, to cover the wire ends...


...and the pram's ready to be pushed.