Showing posts with label toilet paper roll crafts. Show all posts

17.6.20

Sleepy Cat - made from toilet paper rolls!


Squashing toilet paper tubes to make different shapes opens up a whole new world of crafting possibilities! If you visit my blog regularly you'll know I'm forever flattening them to make a square shape..

These sleepy cats are no exception, and they're really not as tricky to make as you might think. It's all about the cutting and the folding. They are made in a similar way to our dog (called Scamp) and pig (called Oink!)

You will need

Toilet paper roll (ours was about 10cm long)
Small piece of spare card (from a cereal box or another TP roll)
Pencil
Ruler
Scissors
Craft glue
Paint
Sponge (optional)
Black pen.

1. Flatten the TP roll with your hand, then press firmly along the creases.


2.  Draw two lines across the flattened tube - each one should be about the same distance from the ends, and shorter than the section in the middle (which will be the cat's body)

(For our roll which was roughly 10cm long, we drew lines that were 3cm from each end and the middle part was 4cm. See the picture below).


3. Then lift the tube and line up the two creases, in the middle (see below), and once you're happy, flatten the tube again, pressing along the two new side creases. There should now be four, hopefully evenly spaced crease lines around the tube.


4. While it's still flat, continue the pencil lines across the tube - free-hand is fine, the lines are just there as a guide.


5. Cut down all the creases at both ends to the pencil line.  8 cuts altogether.


6. Fold and press back all the flaps, except for two at opposite ends. These flat pieces will be the bottom part of the cat (the outstretched legs).


7. At one end, cut the top flap off, carefully along the crease. This square-isn piece will be your cats head. Keep it somewhere safe.


8. To define the legs, cut a thin triangle shape in the middle of the flat, unfolded piece of card. Cut right up inside your cat's body. Do this at both ends and round off the paws if you want.


9. Now, at the head end (the one with no top flap), fold one of the side flaps right back against the side of the tube, press firmly along the crease again, then fold this flap in the middle (so, effectively in half) so the top edge of the flap lines up with the bottom part of the flap (the edge of the body), and press firmly along the folds.


10. Do the same on the other side, then push these folded flaps inwards, towards the tube.


11. They should come together well enough, like little doors, to seal off the front of your cat.


They will jut out a bit in the middle (see RHS of photo below), but this is what we want, because this is where the head will be attached later. No need to use any glue at this stage.


12. Do exactly the same to the flaps at the other end, but this time, before you push them inwards, into the tube, cut a slit up the middle of the top flap, right up to the fold (cut a sliver of card out, to make a slightly larger slot - this makes things easier)

As you can see ours isn't exactly in the middle! But it still works, it doesn't need to be perfect. Push this top flap down, to cover the hole, and then press the two side flaps into the slot.

Essentially it's like closing a little box! And it should hold together without glue.


13. Now for the tail - draw on some spare card (we used another tp roll, so both sides were easy to paint)

We made our tail quite curly and quite fiddly to cut out! So do go for a simpler shape if you prefer.

Make the tail extra long at the body end, so you can slot it into the back.

It should stay in position, but take it out again for painting.


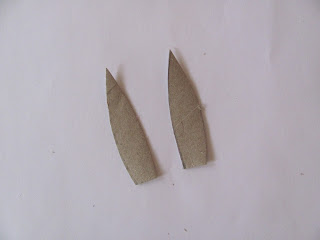
14. Take the square of card you cut off earlier for the head, and cut a gentle curve along one side, to form the cat's ears.

15. Time to paint, and we used a sponge, which was fun and really quick! For our marmalade cat we squirted some yellow and a little red poster paint onto a sheet of newspaper (with an extra sheet underneath) and used the sponge to mix the colours and press the paint onto the cardboard pieces.  Using the sponge gives a lovely mottled effect.

Sponge both sides of the tail.

(might notice the newspaper's been recycled from the forget-me-not printing project!)


16. When the paint's dry, slot the tail back in (dab some glue on the end, if you feel it's a bit loose) and use a black pen (gel or thin marker pen) to draw on a face, plus claws on the front paws.

We added some tabby stripes to the face on the left with an orange Sharpie. You could draw stripes on the body too if you wanted.

Put a good blob of glue on the back of the head and attach to the top of the protruding flaps at the front. You could glue it so the head is facing forward, or glue the head angled to one side, as we did.


toilet paper roll cats paper roll crafts for kids

toilet paper roll cat paper roll crafts for kids

And here's my real sleepy cat!!


5.4.20

Stay Home and Easter Craft!

kids easter crafts

These are such strange and uncertain times.  Life for everyone has changed beyond measure, but the one thing we do have is time. For many of us that means an abundance of time at home with kids. Now obviously this can be both a blessing and a major challenge.. keeping little ones busy and doing something worthwhile isn't always easy, and that's where craft comes in.

Cutting, gluing, creating, painting and getting messy can be such a fulfilling way to spend time together. And you don't need shop bought craft supplies - some of the best stuff to craft with you probably have at home already, like cardboard tubes, boxes and egg cartons. Transforming everyday objects is when the magic happens!

And it's not just the kids who're occupied and using their imaginations. Getting a little lost in a craft project can be a perfect distraction for us too. A bit of craft therapy is a good thing at the moment.

It also helps to have a theme and a focus, with days stuck at home stretching ahead of us - so with Easter racing up, I've put together a collection of Easter crafts you might want to try - birds, trees, bunnies, fish, butterflies and flowers! Just click on the title for the full project.

Egg Carton bluebirds in an Easter tree

The little egg carton birds are a big favourite here, and these blue birds are a really simple to make version. Change the colour and size if you want, it's totally up to you. The same goes for the tree top - why not try a different shape?


Well, it doesn't have to be an egg holder, but any opportunity to sneak in some chocolate! This would make a lovely table place setting for Easter day. Make one per child, pop their name on a piece of paper and prop it in front of the ears. Hide a little treat inside.


REMEMBER TO HOLD ONTO YOUR EASTER EGG FOIL!!  I know that's sometimes tricky with eager, impatient little chocolate egg hunters, but there's plenty you can do with it, even the small bits!! The great thing about using foil to cover cardboard shapes is you can easily wrap the bits that go over the edge, underneath. This gives a really neat finish.


This is a good way to use up those smaller pieces of foil. Great for a picture collage or a shiny mobile.


easter craft


Such a bright and cheery craft - egg cartons are brilliant for making flowers. They make lovely gifts too.


21.3.18

Bunny and Chick Easter egg holders


These make great table decorations for a Easter day spread. You could even write the children's (and adults..) names on them, before filling with treats like mini eggs.

You will need:
Toilet paper tube (or two)
Scissors
Pencil
Ruler
Paint
Glue
Glue stick
Black pen (gel or felt-tip)
Green paper (optional)
Coloured tissue paper
Feathers (optional)

1. Flatten the cardboard tube with your hand - press down along the sides, so you can see the creases.


2. Squeeze the tube back into shape, then line up the two creases you've just made, in the middle, and flatten again, pressing down on the sides.


3. While the tube is flat, use a ruler and pencil to draw a line across the tube, about 2cm from the bottom.


4. Use the scissors to cut down the (longer) two side creases to the pencil line.


5. Squeeze the tube back into shape, then line up the cuts you've just made in the middle, and press the tube flat again.


6. With a pencil, draw half an 'n' shape on the fold, so it goes about halfway up the tube. Leave a space between the pencil shape and the side cuts.


7. Cut around the shape to the pencil line (*mini makers might need help cutting through the double card). Snip through the crease at the top, above the shape (see pic below), so you can bend each side piece down, and fold on the line. Now they're easier to snip off.


When you squeeze the tube back into shape you will have the body for your chick or bunny.

8. For the head, draw around something like a coin or a bottle top on spare card and cut out (if there isn't enough card left, cut open another toilet paper tube and use that.)


9. (Bunny only) Fold some spare card and draw a rabbit ear on top. Cut through the double card * to get two identical ears. For an easier option, use paper instead.


10. Now you have all your pieces, it's painting time. Paint behind the body first - use a nice, bright colour. Then paint the body and the other pieces. Paint a small piece of spare card (or paper) orange, for the chick's beak.


You could paint the foreground, below your chick or bunny green, or make paper grass (in step 12) 

We also cut long zig-zags into the back of the tube, to make it look like the rabbit's hiding in some grass.

11. Use a black pen to draw on the faces. For the chick, cut out a small triangle from the piece of painted orange card (or use paper), and use a small amount of glue to stick it under the eyes. Glue the bunny ears behind the head.


12. If you would like to make some grass for the front of your egg holder, cut out a strip of green paper (or colour in some plain paper). It needs to wrap round half your tube and be about a cm or so higher that the pencil line at the front.

14. Cut zig-zags along the strip - keep them short and make them uneven.


15. Glue the grass below your chick or bunny, lining it up with the bottom of the tube - a glue stick is good for this, just rub a layer of glue on the back of the grass.

16. For the flowers, scrunch up small squares of coloured tissue paper, dot some glue on the grass, where you want them to go, and stick in place.


17. Glue the chick's head on and if you have two feathers, glue them either side. If you don't have feathers, you could cut some wings out of paper and colour in.

For the bunny, glue the head onto the body.


You could use a paper clip to keep things in place while the glue dries, or prop them on their sides.

And why not customise your egg holder with some blingy sequins before adding Easter treats.

(They're a perfect size for a creme egg.. )


Linking up with #bloggerclubuk