Showing posts with label egg carton craft. Show all posts

9.9.19

Fishy business - egg carton fish

egg carton fish kids craft

Fish made from egg cartons. Two of my favourite things! I have fish plates, tiles, pictures, crafts all over the house - a fish mobile I made from copper wire, beads and shells years ago is still doing the rounds on Pinterest, so there's obviously a lot of other people who like fish too. And I think if you've popped by here before, you'll know I'm pretty keen on egg cartons! 

egg carton fish

This craft is very similar to the stacking croc and lizard, except easier, because you don't need to hunt for quite so many egg cartons..

You will need:
At least 2 egg cartons
Scissors
Craft glue
Paint
Tin-foil (optional)
Black pen

1. For the smaller fish you will need four egg carton cones. Cut them out roughly first, then more neatly, above the bumpy cardboard join, so you end up with a nice even edge around the bottom.


2. Then shorten three of the cones by about 1 cm/1/2in. - do it by eye, as it really doesn't have to be exact - the important thing is that the three shorter ones are roughly the same height. 


3. Paint the cones whatever colour you'd like your fish to be. A good tip for painting cones is to slot one on top of a spare, roughly cut out cone, so you have something to hold onto while you paint, and hands hopefully get less messy! 


4. Brush glue inside the larger cone (fish head) and slot one of the smaller cones into it, facing the opposite way.


5. Brush some glue inside another cone and slot it over the top. You could push this right up to the front head cone, or leave a little of the one underneath showing.


6. For the tail, take the remaining cone and cut out triangles on each side, going from corner to corner. (You could paint the inside of this cone too, for a neater finish)


...so it has a kind of bluebell-shaped look...


7. Flatten the top part of the tail with your finger, and the end of the fish where the tail is going to go, and glue together. We found the best way to get the glue to set was to place our fish upright, on its tail, propped up against something, so it didn't fall over. Or you could use stronger glue like UHU, or a glue gun.


8. Use the triangles you've cut out for the fins. Shorten and trim if you need to, and glue just behind the head cone. Dot on eyes with a black pen.


9. For a larger fish, the process is the same but you'll need 6 egg carton cones. This time shorten four, and keep two the original size (for the head).


10. Stack and glue the larger cones together, so you can see a part of the underneath cone, then glue and slot one of the smaller cones inside, facing the other way.


11. Start stacking on the smaller cones - you can push the next one right up towards the head, or leave a little gap. Space the next cone, so you can see the one underneath. Try to keep the spacing even, but it really doesn't need to be perfect.


12. Cut triangles out of the sides of the remaining tail cone, flatten the top and the end of the fish and glue together. For fins, glue two spare triangles just under the front cones. Trim the triangles if you like.


13. For shiny scales, we covered a few of our egg cones with tin foil. Just wrap a piece tightly around the cone, tucking any bits hanging over the end inside.


egg carton fish


egg carton fish


 egg carton fish

29.8.19

A snail called Mel that hides in his shell


Sometimes I know how I'd like a project to look at the end, but am not quite sure how to get there... This was one of those! 
We had a few interesting attempts at getting Mel the snail back into his egg carton shell, and this, I think, is the best one. 


You will need:
Egg carton
Paint
Sticky tape
Kebab skewer or cocktail stick
Cereal box card (optional)
Green paper (optional)
Glue (optional)


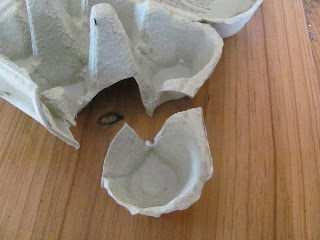
1. The thing about egg carton cups is that on the whole, it's impossible to cut them out neatly with  a nice even edge. Usually there will be two big gaps, where the cup joins onto the middle cone (yes, I spend way too much time looking at egg cartons!) 

On the LHS you'll see how most egg cups look when you've roughly cut them out, and on the RHS, a nice neat round one, the way you'd like them to look, but they aren't always so easy to find...and that's okay!


2. ...because I'm going to use the one on the left and make the most of its weird, gappy shape.

So, neaten around the top edge and simply cut out the messy joins, right down to the base of the cup. 


3. Then paint your shell whatever colour or colours you like. 

If you're using a kebab stick, cut or break it in half, snip off the pointy end and paint one end the colour of your snail shell.


4. For the snail's body, cut a strip of plain or coloured paper about 12cm long and roughly 1cm wide. Fold it in half, then place your stick in the crease, with about 1cm of the painted end sticking out. 

Get your little crafter to hold the stick steady while you cover the strip of paper with a piece of sticky tape (a bit longer than the paper strip). Start in the middle, so you get it nice and tight around the stick.


5. Snip the sticky tape either side of the stick/skewer, and on both sides of the paper strip (try not to cut through the paper), and carefully fold the sticky tape under the strip.


6. Cut off any extra bits of sticky tape at the ends and then make the tentacles by cutting down the strip (about 3cm), close to the edges on either side - fold the middle part back and snip it off.

The shiny sticky tape gives it a slippery, slidey look, which is perfect for a snail!


7. Now, fold the body in half, and tightly roll it around the stick a few times. When you let go it will unfurl a little.


8. Make a hole in the middle of your egg cup shell (use something like nails scissors - keep them closed to pierce the hole - place some modelling clay under the bottom of the cup, so you have something to push against).

Use a black pen to draw a shell swirl, starting from the hole.

9. Unfurl your snail body, feed it into the grooves, so the head and tentacles are pointing up, and push the end of the skewer stick into the hole.

The tail end needs to be snipped now, as it will be too long. When you're happy with the length, take the body out of the shell again and round off the end of the tail.


10. Make sure both ends are through the gaps, the stick is pushed in as far as it will go, and then twist the stick slowly, either way, and the snail will go back into his shell. 

You can simply hold the bottom part of the cup to do this, or blue tack the base of your snail to a table or other hard surface. You will need to take the stick out every time he's gone back into his shell, and thread the body through again, to repeat the action, but this is simple enough to do.

Occasionally wrap the body tightly around the stick again (step 7)

Optional:

11. We made a little cardboard scene for our snail out of a piece of cereal box card.

We painted the top part blue, with splodges of white for the sky. When dry, get some green paper and cut long, spiky zigzags for grass. No need to cut the paper to size at this stage, just make sure you've cut enough grass! Rub glue stick or brush a thin layer of glue on the bottom half of the card.


Line the bottom of the grass up with the bottom of the blue and smooth the rest of the green paper over the sticky card. When it's dry, cut away the excess paper.


Fold the card at the grass base, glue the egg carton shell in front of the strands of grass, and when the glue is dry, stick another skewer through the hole in the shell, keeping it level with the base, and mark where it hits card. Make a small hole here. (Place a piece of modelling clay behind the card while you make the hole, so there's something to push against)


Now the scene is set! We added a few paper flowers, but do add whatever you like.

Either hold the scene in one hand while turning the stick, or blue tack it to a table. You will need to take the stick out to reset your snail. Bend the card back, remove the stick from the shell, unfurl, feed through the gaps, push the stick back in the hole, and you're ready to go again.


7.5.19

Mr Croc - egg carton crocodile


This craft is very similar to the lizard we made last time, so it's all about cutting and stacking, the tricky part is finding enough egg cartons!!

You will need:
3 x Large (dozen) egg cartons or
6 Regular (half a dozen) egg cartons
Pencil
Scissors
Craft glue
Glue stick (optional)
Green paint
Sheet of plain paper
Black marker or gel pen

1. Mr Croc is made from twelve of the middle cones you find in egg cartons.

If you can get hold a few of the larger cartons, you'll get 5 cones per box, rather than the usual two. 

Of course you could always make a smaller crocodile with less, and spread the cones out more, or add in extra cones (if you have them) for a really long tail!

1. We painted our cones first, while they were still in the egg cartons, but you could assemble your croc and paint him at the end if you prefer. 

If you're painting at the start, remember to paint some of the egg box lid green too, for the feet.


2. Cut the cones out roughly, in a strip, then separate them by snipping a part. We cut out 12 altogether. 

LEAVE ONE OF THESE ROUGHLY CUT OUT CONES TO THE SIDE FOR LATER (FOR THE HEAD).


3. Then cut around the bottom of the 11 remaining cones, just above the cardboard joins - so the edges are nice and even. (I've used a pen to mark above the card join on this cone, to show where to cut).


4. Aim to make them look the same size (but don't worry if they're not exactly alike! And you can always tidy them up if you feel you need to, at the stacking stage)

Put one of these trimmed cones aside too (for the end of the tail) so you're now left with 10. 

Then chop about 1cm off the top of the 10 remaining cones, by squeezing the cone sides together and snipping across the top. The cut will look a bit wonky when you squeeze the cone back into shape, but that's fine as you won't see them when you stack your Croc together.


5. Now the fun part, the stacking! We stacked 5 cones together for the body.

Brush glue around the inside edges of the first cone, then push the next one in, but don't push it in too far, you want to have spaces between the ridges (and this stretches out the body too). Brush glue around the inside edge of the second cone and add the third, and so on. Keep the spacing looking even (keep trying different cones to get a good fit or trim a bit more if you need to).


6. The next cone is going to go in facing the opposite way (so you can attach the tail), but it's too big as it is, so you need to shorten it by cutting about 1cm off the bottom edge, (see photo above), then glue inside the body.

7. Cut about 1cm off the bottom of the remaining 4 cones too.

(You should still have 2 cones left aside, for the head and bottom of the tail)


8. Glue and stack these four pieces on top of the cone you've just attached to the body section, but make the gaps wider apart than those on the body - this will allow you to extend the tail and to curve it slightly, if you want to. Brush glue inside the pieces you're adding to the tail, concentrating on where the cones are most in contact with each other.

9. For the end of the tail, take the trimmed cone (from step 4) that you've been saving, and cut it in half lengthways, and glue one in place.


10. For the head, take the last remaining cone you cut out roughly at the very beginning, and hold it so you're looking at one of the flat sides. This will be the top of your croc's head. 

On the top of the head, close to the edge of the cone, use a pencil to draw two curved, sticky out eyes, starting from each corner. Join with a line in the middle. (See the photo) Roughly draw around the rest of the cone, from the bottom of one eye, around the back, to the bottom of the other. 


When cutting out, it might help to cut down each corner first, to the pencil line, fold all but the front flap out, and cut these three side and back flaps off.

On the front, cut between Mr Croc's eyes first, to the line, before snipping this little piece away (or tucking it inside the head). Then round off the eyes.

11. Paint them yellow.


12. While they're drying, draw a thin strip on some plain paper (for the teeth) - about 12cm long and roughly 0.5cm wide.

With a fine black pen, draw a zigzag line from the top to the bottom line, before cutting this strip out.

Use the pen to finish off the eyes and to add nostrils. We drew long, thin triangles for the pupils.


13. Snip one end into a tapered 'V', rub with glue stick, or brush on a thin layer of glue, and stick the start of the teeth in place. Wrap around his face, until it looks even on the other side and snip another 'V'.


Glue the head to the body.

14. For the feet, cut a 2-3cm strip and round it at one end. Use this as a template to draw around, and cut out four. Draw on claws and glue them on, angled forward, under the body.