Showing posts with label egg carton craft. Show all posts

28.5.20

Egg carton foxgloves


It's foxglove time of year again, and I love the way they self-seed and pop up randomly in the garden - in the weirdest places sometimes. They're biennials, so they don't flower their first year, but make up for it (with bells on!) the second year.

Egg carton cones are perfect for the shape of the bell-like flowers - add some paint, a few green pipe cleaners and paper leaves, and you have foxgloves to enjoy all year round!

You will need:

10 egg carton cones (2 x dozen cartons or 5 x half-a-dozen cartons)
Scissors
Paint
4 long Pipe cleaners (ours were about 30cm) + 1 for attaching the leaves
Sheet green paper (or plain painted)


1. Roughly cut the middle cones from the cartons.


2. You need to vary the size of the cones - so two big, two a little smaller, the next two smaller again and so on. So you have five sets of two. But honestly, each set of two doesn't have to be exactly the same! As long as all of them range from big to small that's fine.

(Easiest I think to cut them all out the same first - so cut around each cone, just above the bumpy cardboard join and then put two cones aside, and mark the others with a pencil in sets of two, getting a little closer to the cone top each time)


3. Next, you need to angle your foxglove bells, so you can see inside.

Draw a straight pencil line across one side of a cone, roughly a cm or so above the bottom edge, and then join the ends of this pencil line to the two back corners with a diagonal line.


Cut out. Do the same for all ten.


4. Painting time next, and we used a mix of purple, pink and white, to paint each cone, and then brushed white paint around the edge and dots of white inside. It helped to have a real foxglove bell to look at, but you could also use an online photo.


5. When the painted was dry, we added some green paint on the pointy end, but this is an optional step.


6. You will need four pipe-cleaners for this bit - ours were about 30cm long. Keep one aside and cut the other three into three roughly equal pieces (of about 10cm)

Wind one end of the uncut pipe-cleaner around itself to make a kind of knot (so it doesn't slip through the hole), and thread through one of the smallest cones.

(Our cones already had holes on top, you may have to make holes, nails scissors are good for this, or place the cone on a piece of old modelling clay, with the pointy end on the clay, and push a sharp pencil/pen or knitting needle through the inside of the cone, so it pierces through the top. Take care though, as the card can be thin here, and don't make the holes too big)


7. Do the same with all the other smaller pieces of pipe-cleaner.


8. Now, wind each bell onto the long pipe-cleaner, going from small to large.

First, hold the other smallest cone about 2cm or so below the top flower, and out to one side. When you're happy with the position, wind the short pipe-cleaner tightly around the stem. Then hold one of the next size cones JUST below the one you've done, facing to the other way, and wind the short pipe-cleaner tightly around the long stem again.


9. A few cms below, add the next two (in order of size) in the same way, and repeat, until you have three cones remaining.

You want to get these three to be close to each other.

So, do as you've done before, add the next size a few cms below the two above, and bend it so it's facing the opposite way from the last one you attached.

Then add the next one JUST below it, but make this one face forward. Add the last cone JUST below this one, facing the other other direction, winding the pipe-cleaners as you go.


Here you can see what it looks like underneath the bottom three.


And here, how it looks from behind - see the gaps between each set of cones.


10. You will need to move the cones around now - twist any that have moved, so you can see inside, and angle them downwards. Bend one of the bells just above the bottom row more into the middle, so it's more in line with the middle cone on the bottom row. This makes the foxglove look fuller.

11. It would help if you fold the bottom of the pipe-clear up to meet the ends of the pipe-cleaners attached to the bottom flowers. We didn't do this, but it should help make the stem sturdier.

If you don't want to add leaves, wrap a pipe-cleaner tightly around the stem from near the bottom of the flowers to the end, folding in and winding around the pointy tip. Cut off any pipe-cleaner left over.

12. If you do want leaves, don't add the last pipe-cleaner yet. Fold a piece of green paper in half. (Or a plain paper and paint green after)

Draw a long thin shaped leaf and cut out so you end up with two the same.

Wrap the last pipe-cleaner tightly around the stem, to cover the ends of the pipe-cleaners attached to the bottom flowers. (We didn't have another dark green one, but the different colour helps show up the winding!)


13. Once you're clear of the bottom of the flowers, wrap the very end of one leaf around the stem and then wrap the pipe-cleaner tightly around it, to hold it in place. Just below, do the same with the other leaf.


14. Keep winding until you get to the bottom of the stem.


26.4.20

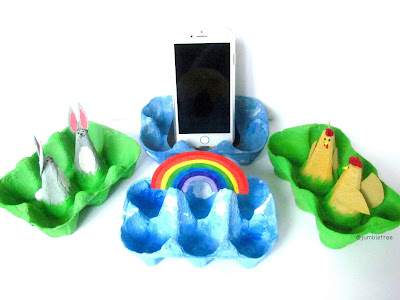
Egg Carton phone stand hack! - #stayhomeandcraft

egg carton craft

Proof that not only are egg cartons brilliant for crafting with, they're also super useful too!

I've been trying to think of something easy to make that might come in handy in this strange new lockdown world we're living in, and this does the trick I think.

We've been making a lot more video calls to friends and family and often had problems propping my phone up, until I popped it into the base of an egg carton! The groove in front of the cones is a perfect fit for a phone, and leaning against the cones tilts the phone at just the right angle.

So there's no need to do anything apart from take the lid off, but where's the fun in that?? So you can have all kinds of fun decorating your phone stand/holder anyway you like.

And when it's not being a phone stand, it could be a useful little desk organiser.. or treat holder?

Here are a few decorating ideas we had.

Rainbows are popping up everywhere, so this seems like a good choice at the moment. Just paint the egg carton base blue - we mixed in some white to get a softer blue, then splodged on some white for clouds.


For the rainbow, find something with a round base that is wider than the distance between the two egg carton cones. Draw around it and cut out the circle, then cut the circle in half.


Draw, paint or colour your rainbow.

Make slots in the top of the cones for your rainbow. Nail scissors are good for this (best done by a grown up though)


You could turn your cones into penguins..

The best order for painting is probably the blue sea, then white tummy (or leave if your egg carton is white-ish already) and finally black.

Paint or stick on a beak and feet. Original penguin craft tutorial is HERE.


Or what about hens? For someone who loves their chooks?

I used an orangy yellow egg carton, so no need to paint the cones, just the base which we painted green.


Cut out a tail feather shape (see pic below) and wing shapes (like a teardrop or petal). Glue the wings either side and make a slot in the back of the cone, long enough for the tail feather. Nail scissors are good for making the slot (needs to be done by a grown up) Keep the scissors closed, pressed down firmly, twisting the scissors to make a hole, then cut the slot.


The hen's comb is a small scrunched up piece of red tissue paper, glued on top, the eyes are drawn on with a black pen. We made a sticky out beak (like the penguins), but the easiest way to do the beak is to paint or draw one, or glue on a small triangle. Paint or colour in a red wattle under the beak.


The cones could be bunnies..

We painted the base green, but you could use a green carton - and then painted the cones grey. We painted some of the lid grey too, for the ears.


Cut out two petal shapes for the ears from the painted egg carton lid, and then snip out the middle part, to separate each ear.


Paint the tummy part white, a line of pink in the ears (or colour this in) and use a black pen to draw a face, right on top of the cone. Glue on a little piece of cotton wool at the back, for the tail. There's a more detailed tutorial HERE.


29.8.19

A snail called Mel that hides in his shell


Sometimes I know how I'd like a project to look at the end, but am not quite sure how to get there... This was one of those! 
We had a few interesting attempts at getting Mel the snail back into his egg carton shell, and this, I think, is the best one. 


You will need:
Egg carton
Paint
Sticky tape
Kebab skewer or cocktail stick
Cereal box card (optional)
Green paper (optional)
Glue (optional)


1. The thing about egg carton cups is that on the whole, it's impossible to cut them out neatly with  a nice even edge. Usually there will be two big gaps, where the cup joins onto the middle cone (yes, I spend way too much time looking at egg cartons!) 

On the LHS you'll see how most egg cups look when you've roughly cut them out, and on the RHS, a nice neat round one, the way you'd like them to look, but they aren't always so easy to find...and that's okay!


2. ...because I'm going to use the one on the left and make the most of its weird, gappy shape.

So, neaten around the top edge and simply cut out the messy joins, right down to the base of the cup. 


3. Then paint your shell whatever colour or colours you like. 

If you're using a kebab stick, cut or break it in half, snip off the pointy end and paint one end the colour of your snail shell.


4. For the snail's body, cut a strip of plain or coloured paper about 12cm long and roughly 1cm wide. Fold it in half, then place your stick in the crease, with about 1cm of the painted end sticking out. 

Get your little crafter to hold the stick steady while you cover the strip of paper with a piece of sticky tape (a bit longer than the paper strip). Start in the middle, so you get it nice and tight around the stick.


5. Snip the sticky tape either side of the stick/skewer, and on both sides of the paper strip (try not to cut through the paper), and carefully fold the sticky tape under the strip.


6. Cut off any extra bits of sticky tape at the ends and then make the tentacles by cutting down the strip (about 3cm), close to the edges on either side - fold the middle part back and snip it off.

The shiny sticky tape gives it a slippery, slidey look, which is perfect for a snail!


7. Now, fold the body in half, and tightly roll it around the stick a few times. When you let go it will unfurl a little.


8. Make a hole in the middle of your egg cup shell (use something like nails scissors - keep them closed to pierce the hole - place some modelling clay under the bottom of the cup, so you have something to push against).

Use a black pen to draw a shell swirl, starting from the hole.

9. Unfurl your snail body, feed it into the grooves, so the head and tentacles are pointing up, and push the end of the skewer stick into the hole.

The tail end needs to be snipped now, as it will be too long. When you're happy with the length, take the body out of the shell again and round off the end of the tail.


10. Make sure both ends are through the gaps, the stick is pushed in as far as it will go, and then twist the stick slowly, either way, and the snail will go back into his shell. 

You can simply hold the bottom part of the cup to do this, or blue tack the base of your snail to a table or other hard surface. You will need to take the stick out every time he's gone back into his shell, and thread the body through again, to repeat the action, but this is simple enough to do.

Occasionally wrap the body tightly around the stick again (step 7)

Optional:

11. We made a little cardboard scene for our snail out of a piece of cereal box card.

We painted the top part blue, with splodges of white for the sky. When dry, get some green paper and cut long, spiky zigzags for grass. No need to cut the paper to size at this stage, just make sure you've cut enough grass! Rub glue stick or brush a thin layer of glue on the bottom half of the card.


Line the bottom of the grass up with the bottom of the blue and smooth the rest of the green paper over the sticky card. When it's dry, cut away the excess paper.


Fold the card at the grass base, glue the egg carton shell in front of the strands of grass, and when the glue is dry, stick another skewer through the hole in the shell, keeping it level with the base, and mark where it hits card. Make a small hole here. (Place a piece of modelling clay behind the card while you make the hole, so there's something to push against)


Now the scene is set! We added a few paper flowers, but do add whatever you like.

Either hold the scene in one hand while turning the stick, or blue tack it to a table. You will need to take the stick out to reset your snail. Bend the card back, remove the stick from the shell, unfurl, feed through the gaps, push the stick back in the hole, and you're ready to go again.