Showing posts with label Make your own Zoo. Show all posts

28.3.18

Brian the Lion


What can I say about Brian? He was the first cardboard tube animal I made with my daughter, and I've always had a soft spot for him.  He really kicked off the whole Zoo and Farm craft journey, so I couldn't be happier he now has his very own picture book.

'Brian the Lion goes into Space' is a colourful, wacky space adventure, with some fun twists and turns along the way.. There are lots of little beardy blue gnomes, rainbow food, oh, and a friendly dragon called Norris.. 


Brian the Lion goes into Space
The gnomes want to read Brian's new book!

The book combines storytelling and craft, as Brian's world is made out of cardboard (of course).. 
All the picture scenes in the book are created from ordinary packaging like egg cartons, tubes and cereal boxes. Plenty of familiar things for kids to spot, and hopefully it'll inspire some making too! The book is available on Amazon.

I have shared a Brian project before, quite a long time ago now.. so, in honour of his first book, I've updated it here.

You will need:
Toilet paper tube (or kitchen paper roll)
Cereal box card
A cup/beaker and egg cup/spice jar or similar, to draw around
Craft glue
Scissors
Ruler
Pencil
Yellow and Brown paint (mix a little red with yellow and a dab of blue)
Black felt-tip or gel pen
Paper clips

1. Paint the tube and some cereal box card yellow (enough for the face, tail and paws) and paint another piece of card brown (enough for the mane). 

Painting first can speed up the making (if your mini maker doesn't mind a short wait at the start..), but in MYOZ we got stuck in straight away, cutting and gluing the body first, and then painting, which is fine too!


2. When the paint is dry, cut the tube so it's about 8cm high. An easy way to do this is to use a ruler to  mark 8cm on the side, then squeeze the tube flat, near the mark, and cut across, cutting through the mark (younger ones might need some help cutting through the double card).


3. Squeeze the top part of your tube together again, and give Brian some shoulders by snipping little triangles off the sides. Don't take too much off.


4. Brush some glue all along the inside edges of the end you've just cut. Don't overload with glue or it will ooze out everywhere when you squeeze the glued sides together.


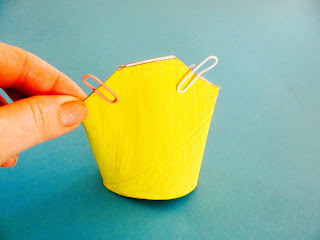
Use two paper clips to keep the sides together while the glue dries.


5. Time to make Brian's head. On the brown card, use a pencil to draw around a big circle, like the top of a cup or beaker - and draw around a small circle, like an egg cup or spice jar on the yellow card. Carefully cut these out. (slowly turn the card circle towards you as you cut, rather than moving or turning the scissors.)


6. Place the smaller yellow circle in the middle of the brown one, and when you're happy, lightly draw around it and put aside.


(*see tip below for younger makers) 

7. For his mane, the best and easiest way to keep it even, is to cut up to the pencil line and then make a cut opposite the one you've just made.
Halfway between them, make another cut on both sides. 


Keep cutting halfway between all your cuts until you feel his mane is full enough. (Don't worry if you cut over the pencil line, this will be covered up by the face in a moment)


8. Draw on Brian's face with a black pen. Brush a thin layer of glue on the back of the face and place it in the pencil circle on the mane. Make sure you don't use too much glue or it will squidge out the sides!


9. From the spare yellow card, cut a thin strip for a tail and cut out two paws. (You could make a paw template first, then draw around it to keep your paws the same size). 

We cut out a little brown piece to glue onto the end of the tail too, but leave it plain if you want, or colour in the end with a pen. Add some claws to the paws.

10. Glue the paws on, again, just use a little glue, and make sure they don't hang over the edge of the tube. Dab some glue on the plain end of the tail strip (painted side) and stick it at the back, inside the tube (you can bend it into place when the glue has dried).

Finally, remove the paper clips and glue on the head.


Leave Brian lying on his back while the glue dries. 


 When Brian's ready, bend the tail back, into place, and fluff up his mighty mane!


* TIP: For younger makers, leave out the mane cutting and draw on paws instead of cutting them out.

There's also a tutorial to make the little blue gnomes Brian meets on his adventure in space. Using corks and cotton wool! Full step-by-step instructions here.


26.1.17

Make Your Own Farm Animals - kids' craft book

kids craft book

A bit of a ta-dah! moment as this is the cover of my latest craft book! Hope you like it.  I was sent an advance copy the other day, and although I've been through the instructions and the pictures more times than I care to remember, my heart was beating like the clappers when I opened it. Felt a sort of mix of excitement and a touch of terror that maybe I'd missed something important. Hopefully not! Suddenly it all feels very real. Some days that's good, some days I just worry what people will think.

When I'm not whipping myself up into an anxious frenzy I do feel so pleased with how the book's turned out - it's colourful, fun and packed full of farm projects all made from stuff that's easy to get hold of - just like Make Your Own Zoo. All you need to do really, is hang onto some recycling, and build up a small collection of egg boxes, cardboard tubes and cereal packets. Nearly everything in the book can be made from these three very ordinary bits of packaging.

Obviously the book's themed again like the last one, and everything works together, so you can keep adding to your farm, and it can all be played with after.

Make your own farm animals


I am proud of it, especially as there was a pretty quick turn around. I came up with most of the projects over the summer, which wasn't always so easy as the kids were expecting to be entertained too. But actually they helped develop some of the ideas - I was a bit stuck on what to use for the bull's nose ring and my daughter cracked that one!

You'll find all the animals you'd expect on a farm, like cows, sheep, hens, pigs etc, and I made more buildings this time, as well as a tractor that took FOREVER, because I was absolutely determined to get it right.

My books are aimed at primary school aged children, to help keep that interest in craft and creating alive, especially now there are so many other distractions. And the projects really are great for grown ups and kids to make together. That precious time is hard to hold onto these days.

Make Your Own Farm Animals is available on Amazon 

There are a number of the projects from Make Your Own Farm Animals (and from the Zoo book too) on the blog - you'll find them on the Kids Craft Page.


17.11.16

My new Animal Fun! board books get chewed over....


My little nephew, road-testing one of my new Animal Fun! board books which have just come out. I'm chuffed to bit with them - a totally unexpected but very lovely spin-off from the craft books.


There are four in the set - the usual suspects - numbers, sounds, touch and feel and what's hiding under the flaps? They're packed full of animals from Make Your Own Zoo, but there's also a bunch of new ones from my next craft book that'll be published in the spring.

I spent many happy hours tootling around, making little settings for the animals - with trees, birds, rocks, lizards, snakes, butterflies, squirrels....totally in my element! Especially for the 'Where do I live' book, which has big flaps to reveal what's hiding behind things.


And had to make a right old party of penguins and piglets for the number book.


Sadly mine are passed this age and stage now, but think the books brought back fond memories for my daughter who took a shine to the 'touch and feel' one.

My nephew seems to be pretty keen on the noisy one - my sister, not so much!


And the most important test of all?


Yes, they taste pretty good too.


22.6.16

Make a paper roll unicorn

Unicorn craft for kids

I needed to come up with a project for a craft workshop at Puzzlewood, and unicorns just seemed like the obvious choice. If they were going to live anywhere, then this ancient woodland, with its twisted trees and walls of mossy rock, would have to be the place!

6.6.16

A day at Hay

Standing in front of patient parents and kids, holding my cardboard tube aloft, I did wonder, just for a moment, what the blazes I was doing there. Only lasted seconds thankfully before the adrenalin kicked in, and we were off - making lions, giraffes, penguins, icebergs, birds in trees - back on familiar ground. Comfortable ground. In my sort of happy cardboard zone.


The workshops were in the Make and Take tent at the Hay Festival - a lovely bright, open space for kids to get crafty, draw or read books. And it's free - so, as you can imagine it's chocca during the Half Term week. Terribly Tall Terry was a huge hit and almost lost his legs a few times. I have the sweetest video of a little girl hugging him.


My husband and two of the kids came along for moral support which was lovely, and such a help with the car unloading and setting up all the zoo scenes - my daughter's getting really good at that.

I'd done a fair bit of prep for the workshops, because if I've learnt anything, it's that it's much better to keep things shifting along at a steady pace - no waiting for paint/glue to dry unless there's something else going on at the same time. Keep boredom at bay at all costs! The workshops never go the way I think they're going to go in my head, but that's okay... for a start, even though MYOZ is really aimed at primary school age kids, at a busy event like Hay, you can't really go about saying no to younger kids who want to join in. So, I try to pick projects that can be adapted for little ones.


The weather was cool enough when we started, but by lunchtime the tent was heating up and I was feeling it. Wished I'd worn something a little more summery. On the plus side, no problem getting paint and glue to dry! I did 4 sessions altogether, and although it's tiring being on your feet all that time, it's invigorating too, seeing what the children make, all so different, adding their own little touches. Love it when they start doing their own thing. That's what it's about really, getting their imagination going, getting creative.

The other encouraging thing for me was talking to people about the book - I haven't done that for a while and it's good to feel a bit more connected again. I am not the best at self-promotion, but this time I did try not to mumble or twiddle my thumbs, and I did get some lovely feedback and a few good ideas about promoting the book that I really should follow up. The problem is, I come home and lose a bit of that drive. Still, I have another workshop next weekend, so maybe it'll help give me a sharp shove in the right direction...


29.5.16

There's a giraffe in my garden...


Many hours and many loo rolls later, Terribly Tall Terry is ready for the Hay Literary Festival!
Definitely a labour of love, but worth it I think.
He'll be watching over me during the Make Your Own Zoo workshops in the Make and Take tent this Thursday.
We'd love to see you!


Linking up with Photalife's My Sunday Photo 


19.5.16

Birds of a feather - easy egg carton craft


I'm really fond of these little birds, and they're easy to make.

You'll need:
1 egg box
Small feathers
PVA/craft glue
Nail scissors (to make holes)
paint
fine black felt tip pen

1. First, roughly cut a cone from the egg box - this makes it easier to work with. We measured 3cm from the top and marked each side (make it any size you want though). Join the marks and cut along the line. Measuring helps keep the cone base nice and even.


2.  Paint the cone any colour you like.
Putting it on your finger is a handy way to paint the bottom edges.


3. When dry, choose the side you want for the front and with a fine black felt-tip or gel pen draw eyes close to the top.


4. Use the nail scissors to make a small hole in the top and one at the back (about 1cm from the bottom). Keep the scissors closed, press down and twist carefully from side to side. If you're making the birds with kids, always supervise this part, or make the holes yourself.


5. Dab some glue behind the holes and push a suitable feather in each one - small and fluffy for the head plume and a little longer and showy for the tail feathers. We got these lovely colourful speckled ones from The Works, but you can buy them online too.


6. For the wings, you'll need 2 little fluffy feathers or if none are small enough, cut pieces from the top of a larger one. Brush a very thin layer of glue on the sides (so it doesn't stick through the features) and stick them down.


7. Just below the eyes dot a small but thick blob of yellow paint with a fine paintbrush, and leave to dry.


OR, if you'd like a sticky-out beak, cut a thin strip of cereal box card, colour it with a yellow felt tip, snip a V at one end and cut off about a cm.
Make a horizontal slot below the eyes with the nails scissors (keep closed, press and twist gently). Dab a little glue behind the slot and push the beak into place.


13.3.16

Photo shoot - Sunday photo


Just back from a busy two day photo shoot for the animal board books and next craft book. Not as glamorous as it might sound, but unquestionably more interesting than my usual Thursday/Friday routine! We were in a basement studio somewhere in east London; facing a small but significant cardboard mountain of stuff to do.

I spent all day on my feet, or leaning over a table, holding my breath while I moved animals and tiny flowers/butterflies/snakes into place. Knocked the trees over a few times and the whole lot went like dominos which wasn't at all funny... Heaps of patience required. And my back's in bits.

I've spent a daft number of hours over the last month, making all the teeny finishing touches, like squirrels, rabbits, daisies, patchwork hills.
Many, many things.
Hope they'll make a difference.

Walking and tubing it back to Paddington on a Friday evening with a collection of shoe boxes, and a large art folder was a nightmare. So, so relieved to get to the station; felt like punching the air. But that good feeling didn't last long. The train was heaving. Ended up standing all the way to Bristol Parkway because I hadn't reserved a ticket.
Won't be doing that again.

Linking up with My Sunday Photo at Photalife.

18.2.16

Exciting news!

I'm knee deep in egg boxes, tubes and cereal boxes again. Happily wallowing in cardboard, making animals and scenery for a few new book projects.

Still can't quite believe that my hobby has somehow turned into a job. I've been very lucky, I know - but there's more to it than that, because escaping into a world of cardboard has helped keep me sane over the past 8 months. And I really do mean it - I've struggled with my husband being away this time. Kind of knew it was going to be one Tour too many. He has spent almost 2 and a half of the last 6 years in Afghanistan. It's taken its toll on both of us - but that's a post for another day, when he's home; when he's never, ever going away again.

Better at the moment to focus on good, happy things - where the cardboard comes in! I'm working on another themed craft book which is massively exciting. Wouldn't take a huge leap of imagination to work out what the theme is, but here's a clue anyway...


And I'm also making new creatures and settings for a series of board books for little ones - counting, noises, that sort of thing. So pleased the animals are getting books of their own!


It is pretty time-consuming for sure, but I want the scenes to look as perfect as possible, with plenty going on. I've just finished making a cave out of a large yogurt pot and a fair amount of newspaper...

The plan is to get all the board book makes done, plus the start of the craft book, for a photo session early to mid March, so I need to get my skates on. This is all still pretty new to me, but I enjoyed the photography stage last time - it was intense, but most of the hard grind is behind you by then.
In theory.

I thought maybe I'd write a little about my experience of the whole book process. I've talked about the beginning and the end, but not really so much about the middle.
Possibly because for a while I think I blanked it from my mind...

From the contract being signed to the last proof check took about 5 months. The first scheduled thing I had to do was send in scripts for the step-by-steps by set dates. This started off okay, because some of the animals I'd made and written up ages ago. But there were 35 projects to send in - I'd worked on a few new ideas over the summer holidays - still, there was definitely a 'seat of my pants' feeling by the end of the second month.

The first photo session was for the front cover and two step-by-step projects. I remember feeling so nervous, because this was all my stuff; people were looking to me to check if things were set out right, angled right, clear enough for the instructions. I realised pretty quickly I had to somehow look and sound confident, even if I didn't really feel it inside. Way out of my comfort zone, but I came home buzzing. Such a great feeling.

Didn't last that long though, because it soon began to dawn on me just how much there was to do. We'd only shot two projects. There were another 33 to go. I had plenty of animals but no other steps made up. This was my biggest mistake. One never to be repeated. I spent weeks and weeks working all the hours possible, to make up the various steps for all the other animals and scenery. Don't think I fully appreciated how long this would take me. For each project I was essentially making whatever it happened to be, at least 3 times. Definitely sapped all the joy out of it. This time I'm making up the steps as I go along. Lesson learnt.

The other downside of my cramming approach was that I started changing some of the instructions as I found better or easier ways to make up the animals. This is what happens when you develop an idea and make it for the 100th blinking time. There were a few other changes during the photo sessions too - so by the time I saw the first draft it needed a lot of corrections.
I spent a very fraught week in Costa's in Monmouth.

Just going back to the final photo session quickly - it was a non-stop three day marathon. But all the extra work I'd done on the steps did help speed things up, and the photographer was so experienced at close-up shoots, cracking on at a racy pace. There was a hand model too, which was such a relief because my hands are horrible! She was absolutely lovely and a really talented artist, which helped with all the painting stages.


Brings back lots of memories thinking about it all again. If I'd been asked back then about doing another book, I'd have had to take a few deep breaths before answering. But time has turned down the volume on the more tricky stages, and now I'm really, positively looking forward to the next challenge. It's going to be different this time. Yes?

Meanwhile  I'm busy making, trying to stay ahead of the game. With the odd detour...

Star Wars meets the little Red Tractor...

29.11.15

Hey, Hey, HAY!


Kind of feel I'm getting into the swing of the kids' craft workshops now. Definitely learn something new every time I do one; like not to be ridiculously over ambitious with the making plans.... an hour disappears so quickly when you're crafting. No fun rushing and trying to cram too much in. With a bit of time and space kids start coming up with their own imaginative ideas, and that's what it's all about really.

Friday's workshop at the Hay Festival Winter Weekend was a lot of messy, sparkly fun. Such a lovely setting too, in Hay castle. The kids made little feathery lovebirds from 'Make Your Own Zoo' and to Christmas them up a bit, I attached a loop of thread so they could be tree decorations, and laid on the glitter and sparkles! The children also made homes for their birds - an egg box lid bank and a tissue paper streamer tree.... with a generous sprinkle of glitter and shiny stars of course.
Some splendiferous, creative making. Just lovely to see.

Afraid the pictures aren't great - it was quite dark inside, but at least I took some this time!


While I was packing up they were getting the room ready for a live band and dancing, and warming up the mulled wine. Wish I could have stayed!


15.11.15

Mobile Trouble

Not the kind you're probably thinking. The kind you hang from the ceiling. The kind that seem unfeasibly difficult to photograph. Any tips?

I tried this one in different places; different lights; up close; from a distance, and think probably the outside shots are the best. But it was a challenge and I took a ridiculous number of photos.


The close up ones aren't too bad either, but don't look so mobile-like.


More mobile-like, but a bit lost?


It's made from egg box parrots, which are easier to make than they might look.  Step-by-step here.

What's not so easy is tying them onto the blinking sticks and getting the whole thing to balance.... But very satisfying when it does. I found a dab of glue on the knots helps, to stop strings slipping about and un-doing all that hard work.


They'd look lovely hanging from a branch... and a lot less hassle.

Or maybe add a bit of glittery sparkle and hang them on the Christmas tree?


Linking up with My Sunday Photo at OneDad3Girls

31.10.15

Leaf Art and a gift idea


More often than not a little collection of things finds its way home in a pocket after a walk. And there are rich pickings at the moment - conkers, pine cones, acorns and stacks of colourful autumn leaves. 
Leaves are great for simple craft projects - just don't forget to press them quickly, before they start curling and crinkling up. 

This is when I miss the old telephone directories, because they were perfect for the job. Still, a large book works fine. Put a few leaves between pages and weigh down with some other heavy books for a couple of days, until you’re ready to use them.

But what to do with your leaves? A few years ago we made bookmarks which worked brilliantly - they were useful, looked pretty good and made perfect presents. 


The thing is, just about everyone we know in the whole wide world has been given one. 

Time for something new...


..so, this is the other idea - a leaf art/collage notebook.

Make sure you’ve got a good selection of leaves - colours, sizes, shapes.

I got the plain notepads from Asda. Only 45p. They’re spiral-bound ones, but any kind would do. If there’s some writing on the front, cover with a piece of white paper cut to size (glue down with a glue stick)


Arrange your leaf design first, and when you’re happy, start sticking. We found it was best to brush a thin layer of craft glue on the back of the leaves. Lots of inspiration online or try with your own pattern.

Then cut some clear sticky back plastic - you'll only need a piece to cover the front, with a cm or so extra to fold round the 3 edges.  


Start at the bound side, peeling a little of the backing paper off at a time, and smoothing out air bubbles and any wrinkles as you go. 


Then wrap the extra sticky back plastic neatly over the edges.


Quick workshop update - it was such a full on day, with 3 sessions fairly close together and more kids than expected! And even though I wished I'd brought something like a hair dryer because it was too cold for the paint to dry quickly, and what I planned to fit into the hour was massively overambitious, everyone seemed to enjoy it - lots of impressive making anyway! For me it was just lovely seeing the animals come to life and watching the kids come up with their own ideas about how their lions/penguins/giraffes should look. Sure that's what it's all about.

I'm kicking myself I didn't take more photos - there are a few here, on the MYOZ Facebook page - I'll definitely take more at the Hay workshop at the end of November. And now I've had a bit of practice and learnt a few lessons, I'm feeling much more confident about that one!