Showing posts with label Make your own Zoo. Show all posts

22.10.15

Make Your Own Zoo, down on the farm!

I'm holding my first Make Your Own Zoo workshops next week! REALLY excited. A little apprehensive too, but mostly excited.


They're at Kate Humble's farm, Humble By Nature near Monmouth which is a pretty special venue.
Humble By Nature is the place to go to learn rural skills, like running a smallholding and animal husbandry, and there are cooking and craft courses too. Such a varied range of things to do, often with a bit of a twist! And the team are always open to new ideas; ones that share their values. Do have a read about how it all began, here. It's been quite a journey.

I'm doing three, hour long sessions on Monday, and they're all sold out which is brilliant. So, there'll be 10 children + parents coming along to each one, and my goal is to make it fun, and to send everyone home with as many animals as we can possibly squeeze into an hour!

I've done a bit of prep to keep things moving along, mainly painting pieces of cereal box card and cutting up egg boxes. Hopefully we'll manage a lion, giraffe or zebra, a penguin....


and, if there's time, a sheep! Definitely the right place to be making sheep. Might be a little ambitious though. I've been working on a few make your own farm ideas....


I'll let you know how it goes! Hopefully no hitches, because I've been asked to do a workshop at the Hay Festival Winter Weekend at the end of November which I'm so, so thrilled about. Can't believe it really. Another path that started here.

27.8.15

Flying birds made from an egg carton

It's been a long time since I shared any new Make Your Own Zoo projects here, but now the book's out, I really wanted to show you these - simple, colourful flying parrots. 


egg carton birds

When you spend a silly amount of time looking at egg boxes, you start seeing things....  these birds are made from the piece between the egg cups - have a look: 


...there’s the moulded part in the middle for the body, and the curve of the egg cups either side for the wings.

And the best part is, if you turn it upside down, you have another flying bird shape - this time with wings down.


So, all you need is:
egg boxes
PVA craft glue
paint
general purpose scissors
straight-edged nail scissors
(all cutting should be supervised)
paper clip
needle
thread (about 50cm)
black felt tip pen

1. Start by drawing the bird shape in the box (see above), so you get the wings looking even, and make them as full as you can - draw right to the bottom of the egg cups. I’ve used a black marker to make the shape nice and clear - better though to use a pencil.

2. Cut out roughly first, then neaten up around the edges. Small scissors are great for this. 


wings up
wings down
Decide whether you want wings up or down.


wings up
wings down
3. We made two different tail feather shapes and cut them out of the egg box lid. 


The top of the tail feather piece needs to fill the groove, right up to the head, giving your bird a better body shape.


4. Before gluing in place, you might want to snip out some long zigzags, to make it look more feathery. You can do the same to the wings too.


5. Glue the tail feathers on top, if your bird has wings down, and underneath for wings up.
wings down
wings up
With the 'wings up' bird, push the tail feather piece into the groove where it joins the wings. If you need to, use a paper clip to hold in place while it dries. We couldn’t find a paper clip, so used a clothes peg... 


wings up
6. Painting time! Have fun with lots of bright colours.

Don’t forget to paint underneath too.


Paint the face a light colour so you will be able to see the eyes and beak.


7.  While the paint’s drying, make beaks. Cut a thin strip of cereal box card (about 5mm wide) and colour both sides black (a sharpie or something similar is good for this).


8. Round off one corner like so, for a hooked beak shape, and snip no more than 1cm from the strip. Make as many as you need.


9. When your parrots are dry, use the nail scissors to make a vertical slot for the beak (keep the scissors closed, press down and twist slightly from side to side - don’t push too hard!) 


Snip the slot to make it the right size for the beak. Brush a little glue on the end of the tab (or behind the head if there’s room) and push the beak into place. Dot on eyes with the black pen.


TIP: For a quicker, easier option, just draw on a beak with the black pen and dot eyes either side. 

10. Thread a needle, tie a good knot in the end and push it up through the middle of your bird, from underneath (probably best done by an adult). Don’t worry if it tilts up or down (it most likely will) as this adds to the flying effect! 
Put a dab of glue on the knot, to help it hold.

One tip to get a 'wings up' bird flying straight, is to find a mid-point where it balances on the end of the needle - easier than it sounds, honest! Press the needle in, just a little, underneath - try different spots until the bird balances. 


EXTRA STEP FOR WINGS DOWN BIRD
You may notice some of our wings down parrots have their claws showing, as if they’re coming into land. To do this, keep an extra bit of the join with the middle cone when you’re cutting out the basic shape, like so. Trim and paint.


In the book there’s an Aviary you can make for your flying birds, but they also look good as hanging decorations - or what about a string of flying parrots? 


Or maybe a mobile?

egg carton birds

egg carton birds


Many more projects like this in my craft books, 'Make Your Own Zoo' and 'Make Your Own Farm Animals'


8.8.15

Book ta-dah time! My Sunday Photo

....a little sooner than expected! I'd been gearing up for a 13th of August book release, but apparently if Amazon get them early, they send them out early. So a few people I know have theirs already, which is great and sort of strange as I've not seen one yet...but we are away!

I've had some lovely messages and pictures about Make Your Own Zoo - this is my 6 year old god-daughter and her flamingo.


Linking up with My Sunday Picture at onedad3girls


9.6.15

Make Your Own Zoo - My Book!

What a journey it's been! From those first few toilet paper tube lions, to now; an actual, real kids' craft book, packed full of cardboard creatures. Make Your Own Zoo is out on the 13th August.

kids craft book

Who'd have thought it.

Certainly not me 3 years ago, when I started plundering the recycling pile to make animals with the youngest. My husband had gone to Afghanistan for a year, I'd started blogging to give me a focus away from the endless routine; and making a menagerie of creatures to share online just sort of happened.


My daughter began putting in requests - for giraffes, elephants, hippos - then monkeys and flamingos, and it was a challenge, but I loved it. Slowly our zoo grew, and so did an idea.....

What about a book?

I've plenty of kids' craft books, there are hoards of brilliant ones out there, but not many, as far as I'm aware have a theme like a zoo. In my experience children like going with a theme and adding to a scene they can eventually play with. I've found it helps catch their imagination and their attention, which, quite frankly is key to crafting with kids because they get bored pretty quickly.

Well mine do, I've heard the sighs and seen the rolling of eyes when the cardboard and glue come out, but making the animals together was fun, it felt as if we were going somewhere. And because she was interested, my daughter came up with her own ideas, like making a turtle with a retractable head and putting the flamingo in an ice-cream lid pond.


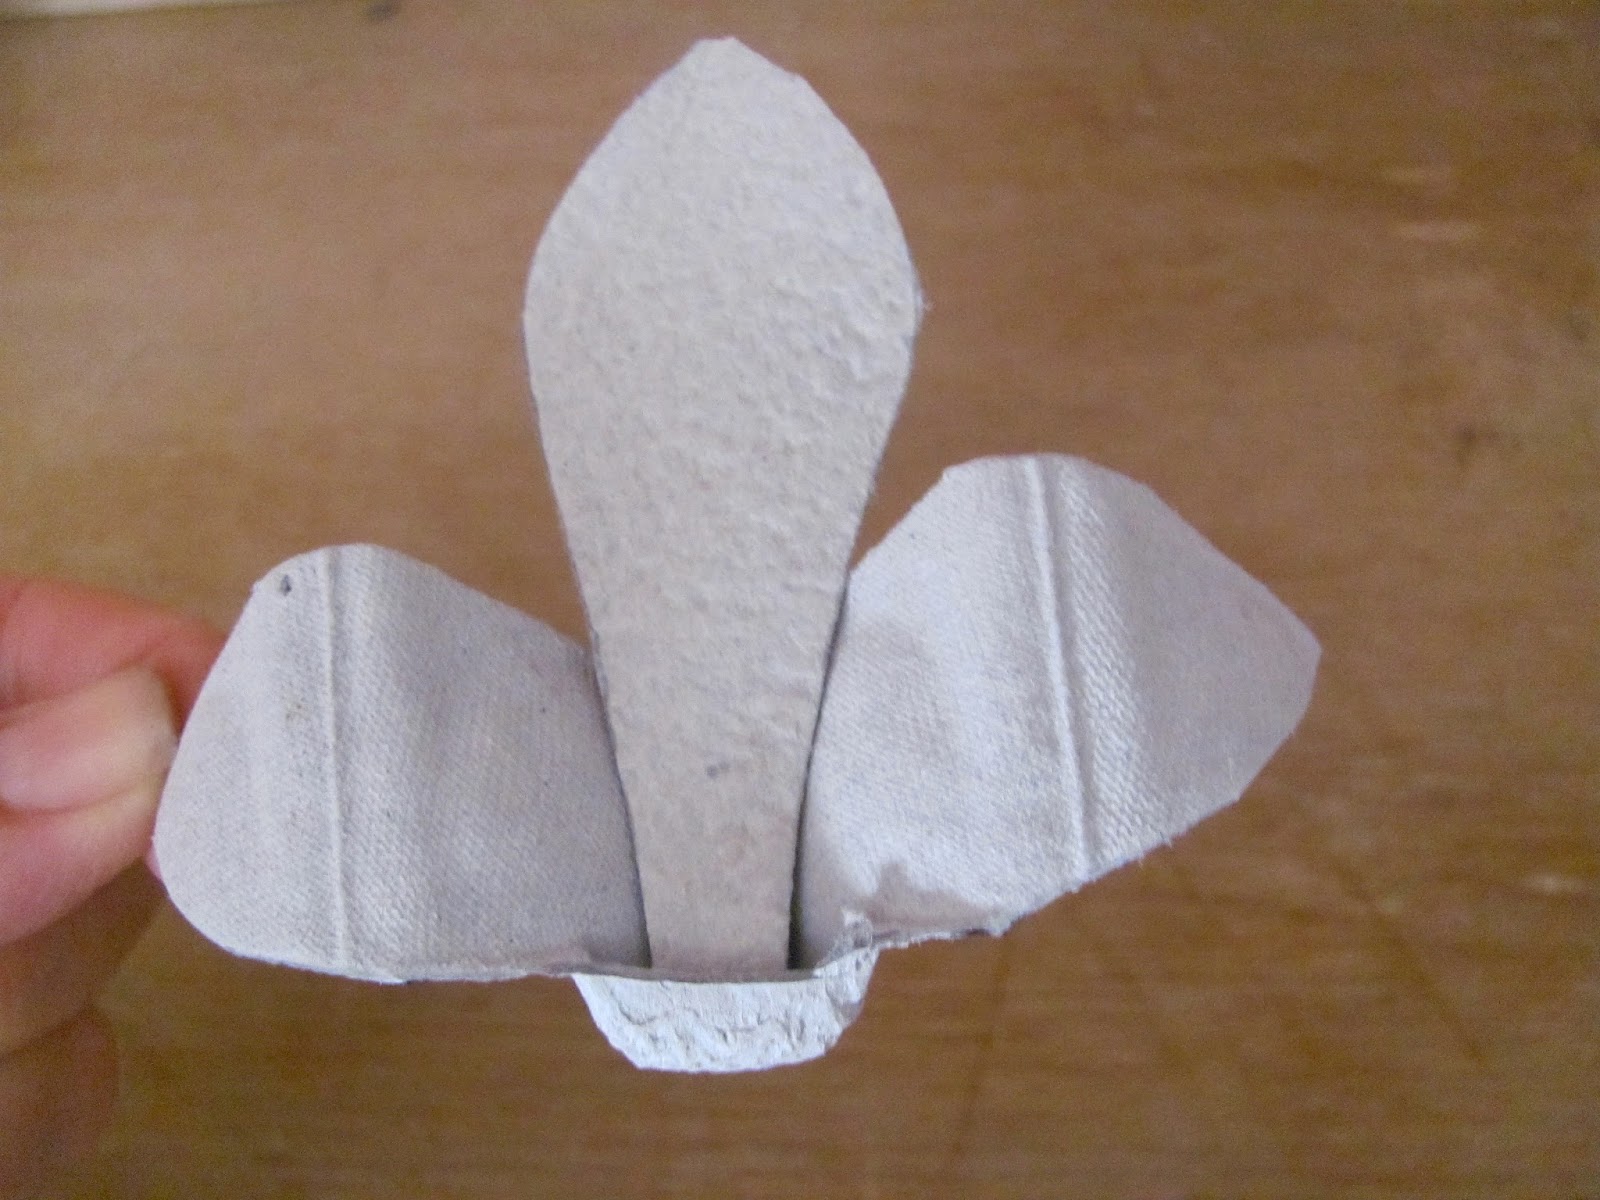
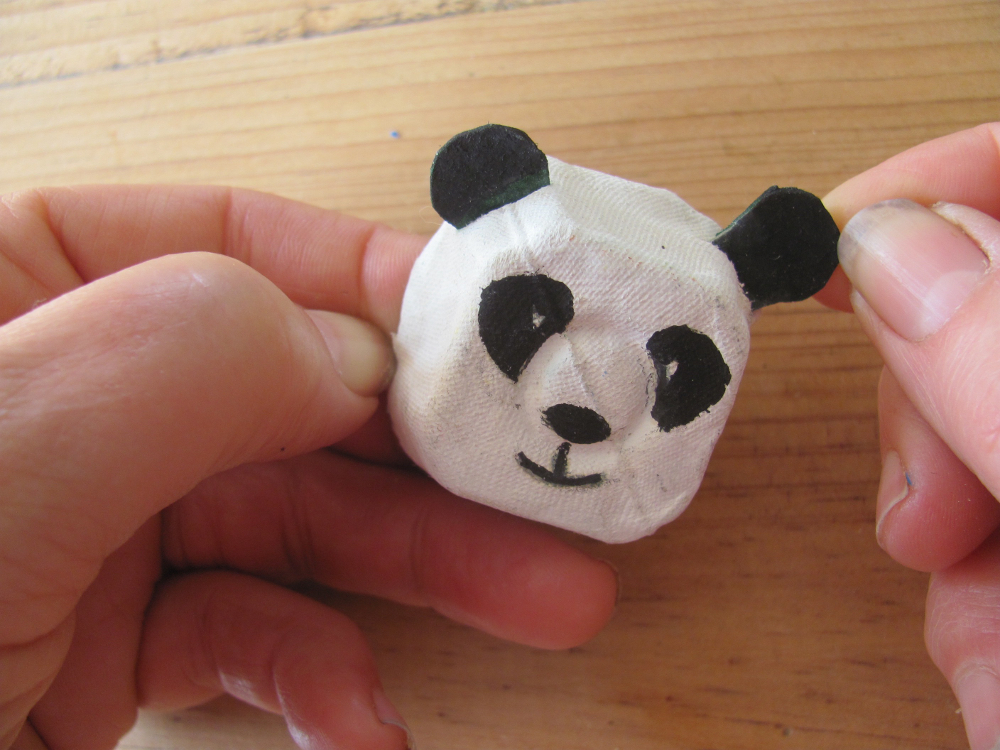
The zoo also shows the enormous potential of everyday cardboard packaging - tubes, egg boxes, cereal boxes - stuff we all have that usually ends up in the recycling bin.

The fact you can make a whole zoo from these ordinary things has got to be appealing?

And, thankfully, it was. The lovely team at CICO Books took me on, and I embarked on one of the steepest learning curves of my life. Apart from having kids.

Truthfully none of this would have happened without the blog. It helped give me the push I needed to try new things and, importantly, see them through. It also gave me the confidence to take the next step, because I could see people were picking up my animals on sites like Pinterest and Facebook.

I had about 14 projects on the blog before I got the deal with CICO - and there are over 35 in the book, plus short, silly poems for each animal. I've been busy! All the original step-by-steps have been updated, and I've added birds, sea life, enclosures, trees and scenery. Even an aviary and an aquarium. I'm so pleased with how they've turned out.


All the elements are there to make a scene, large or small, whether it's a big game zoo, or penguins and seals in a water park, or your own monkey world.
Wherever your imagination takes you.


The book is packed full of pictures and easy to follow step-by-steps. There's plenty of scissor practice, sometimes a little challenging, so it's best for school age kids with adult help. Parents are always going to be the best judge of how much or low little cutting to let their kids do, but I've found the more you let them loose, the better they get. Some of the bits I thought my daughter would find hard, like making holes and cutting slots, were actually her favourite, once she'd got the hang of them.

I think one important thing I'd like to get across is, whatever you make will be your own unique creation. Working with recycling cardboard is not an exact science - packaging varies; sometimes a little, sometimes a lot. Trust me, I know! So, this kind of crafting is about making the most of what you've got, adjusting and tinkering if you have to. Lots of room for artistic licence! Don't worry if they don't look exactly like the pictures; different is good - they are your animals with their own personalities.

And I'd love to see them! I've started a Facebook page called Make Your Own Zoo where I'll share ideas, and hope eventually people will post pictures of creatures they've made from the book or the blog.

That would be fantastic.


24.10.13

Egg carton Panda

My husband's favourite so far. Peter Panda is made from painted egg carton bits, and that's about it - apart from his little bamboo!

egg carton panda

You will need:

2 Egg cartons (with the cone shaped pieces down the middle - some don't have them. It's the same part used for the penguins and the monkeys.)
Scissors
Black and white paint
Tacky glue (Make your own by putting a small amount of PVA craft glue in a clean, uncovered jar or yogurt pot for at least a day. The longer you leave it the thicker and tackier it gets.)
Or use a glue gun
Nail scissors or similar to make slots (*to be done by an adult or with grown-up supervision)
Black felt-tip or gel pen
2 tooth picks
Green tissue paper

1. To make the body, roughly cut out two whole egg cup pieces from the egg carton, then measure and mark points around each cup, about 2cm up from the cardboard bottom. (More or less than 2cm is fine, as long as it's the same on both cups). 
Join the points with a pencil, to help with the cutting, and cut carefully along the line.

Spending a bit of time measuring and cutting can be a bit fiddly, but it does make it easier to fit the two pieces together.


2. Use plenty of tacky glue around the edges to stick the pieces on top of each other and to fill any gaps. (Or use a glue gun)

3. While the body is drying, cut out another egg cup, but leave one side a little higher, so it curves upwards making a kind of lip or tab. (See photo below)


4. Once the body is ready, draw a slightly curved pencil line (slot for the head), on top, and with nail scissors* pierce a hole in the line (keep them closed, press down and twist from side to side), then cut along the line and open up the slot a little.


Push the head tab in here to check it fits. If the head sticks out too much, make your slot bigger or the head tab smaller. Take the head out again.


5. Use two middle cones for the legs. Cut them out roughly first, then neaten up, so they're both about 4cm high. Again it doesn't matter if they're more or less than 4cm, as long as they're the same height. 
Halfway up one side, draw a line straight across, and then draw down the next side at a diagonal, to the bottom corner (do this on both sides). Cut out your leg pieces.


...you want them to fit fairly snuggly to the egg cup body. Keep snipping away until you're happy, but don't glue them yet. The left leg in the picture below still needs a little work! (apologies for colour change)


6. Next, paint the body and head white, and the legs and some spare card black. This is for the arms and ears. Paint both sides black (we used the egg carton lid).


7. When dry, glue the legs to the body using plenty of tacky glue (or a glue gun).

8. While that's drying, cut a piece for the arms from the black card. You want it long enough to wrap around the back of the egg cup body (roughly about 12cm). You can cut a straight strip (about 2cm wide), that's absolutely fine, but it looks good if you make the strip slightly curved, wider in the middle (about 2cm), and narrower at the ends. (like a wide smile!) Round off the ends for the paws.


9. Cut out ears too, and remember to make them long at the bottom, so there is a card tab to slot into holes on top of the panda's head.

10. Back to the arms, and make a small hole in each paw (put the card on top of a piece of plasticine/modelling clay and push the tip of the *nail scissors or a skewer through)  Glue the arm piece on - it should sit a little higher at the back - and push a cocktail stick through the holes to hold everything in place while the glue dries.


11. While that's drying, use a black felt-tip or gel pen to draw a face on your panda. For the eyes, start by drawing a small round ring, then colour in around it, leaving the centre white.


12. Mark slots where you want the ears to go on top of the panda's head (more to the sides looks best), making sure the slots are long enough.
Use *nail scissors to pierce through the card on the line (keep them closed, press down and twist from side to side). It is a good idea to place a big lump of modelling clay behind the ear slots, so you have something to push into. (the blue stuff in the photo below)

TIP: Instead of making slots for the ears, you could simply fold the ear tabs back, and glue them to the head. 


Once you've made a hole, carefully cut along the slot lines, and wiggle the scissors in and out a bit, so it's easier to push the ears into place.


Then glue the head into the body slot.

We gave our panda a bamboo to chew on. Cut the pointy bits off another cocktail stick and wrap and glue a few small rectangles of green tissue paper around one end. Snip when dry.

Replace the cocktail stick holding the arms in place with the bamboo shoot.


Panda

Peter spends a lot of time hanging out with the monkeys...


panda - make your own zoo

egg carton panda

You can also make a bear in exactly the same way - just change the paint colour - and try a lighter shade for the muzzle and tummy (and paws if you like). 
Use the cocktail stick to hold the arms to the body while the glue dries, and then remove it, or use a glue gun if you have one.

egg carton bear

Many more projects like this in my craft books, 'Make Your Own Zoo' and 'Make Your Own Farm Animals'