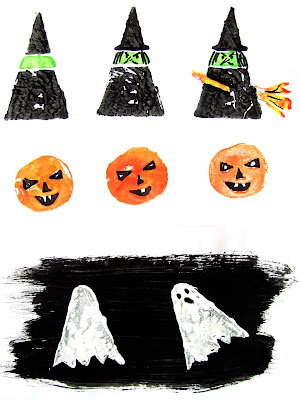
I'm LOVING potato printing! And there's so much you can do with simple shapes. Perfect for pictures, decorations and cards, and fun for all ages. The theme here is Halloween, but I'll definitely be trying out some other ideas in the run up to Christmas.
Triangles pop up a fair bit! For the witch, cut a potato in half. Slice a sliver off the bottom of your potato half, so it sits flat and is easier to work with.
Either use a ruler and pen and draw on a triangle, and then score using the ruler and a sharp pencil, or score straightaway.

Start with the base line of the triangle and take it right to the edges. Roughly mark the midpoint of the base line at the top of the potato, and score lines up to this mark.
Use a piece of kitchen roll to wipe away potato bits and moisture.
For the witch's face, score a line across the triangle, a few cms from the tip and another just below it.
We found the easiest thing to do next was to cut the triangle out on the score lines.
TIP: (To be done by an adult) Cut two wedges away, either side, at back, leaving a ridge of potato to hold onto. A sort of potato handle! Easier for little hands.
When the paint is dry use a black pen to add a wicked witchy face, hair and a brim for her hat.
We used the side of a piece of coffee stirrer and a mix of yellow and orange paint to print on a broomstick.
The ghost also starts off as a triangle too. Draw and score as before. This time I used a sharp knife to cut away slivers up to the score line, to define the triangle (to be done by an adult) - though you could completely cut away the sides again, like we did with the witch.
Once the triangle is defined, draw and score a line to round off the top of the triangle, then slice up to the score line. Draw and score a zigzag along the bottom and slice across the potato, up to the score line again.
As it's one colour printing, you could make your own stamp pad.
Soak a piece of thin, damp kitchen sponge in some white paint. We put ours in a small recycled clear plastic pot, (think it had been a humous pot!) then you can pop the lid back on to stop the paint drying out too fast. But when you've finished printing, let the sponge air dry (it could eventually get mouldy if it stays wet) and just wet with water and add more paint when you want to use again.
Or you could brush on a layer of paint.
Print on coloured paper or paint a black background first, and let it dry.
When your ghosts are dry, use a black pen to draw on a hauntingly spooky face.
For the pumpkin, the shape is there already! You can either carve a face or simply print the round shape and add a face when the paint is dry.
We cut out small triangles for eyes and a nose, and a semi circle for the mouth.
The bat is made from two small triangle shapes. First, draw and score a thin triangle, curve the base inwards to define the bat's ears, and slice slivers away around the sides, or cut out completely, like the witch.

The second triangle should be a similar size, but wider - use the curved edge of your potato for one of the sides.
Print the narrow triangle first, tip pointing down, this is your bat's body.
Use the other triangle for the wings - print two either side, overlapping them and make sure the curved edge is at the top.
Dot on some yellow paint for eyes and when dry, add a black centre with the pen.
Happy Halloween!


