It's been a while.. unfortunately my good blog intentions went out the window when another book project came along. I optimistically thought I'd keep this ticking along too, but of course something had to give.
Anyway, most of the book is finished now and it's not a craft one this time, but a story book, which has been challenging and hugely rewarding too.
It's about Brian the Lion going to Space.. Brian was the first animal I ever created and blogged about, so he is rather special. I've made all the scenes for the book, all the animals, backdrops, scenery and other things... but one of the best bits was writing the story. A lovely change from writing instructions. Not that I mind writing them, just nice to do something else.
So there is a sort of Space link here, as this little Stormtrooper is the latest addition to our Star Wars craft project. Quite a gaggle of figures now! And a Millennium Falcon too, if you're interested..
You'll need:
Egg carton
Pencil
Ruler
Craft scissors
Nail scissors or similar (optional) Adult supervision required
White paint
Craft glue
Fine black felt-tip or gel pen
Black permanent marker pen
Straw
1. Roughly cut out two egg carton cones. On one, draw a pencil line around the cone, just above the bumpy joins at the bottom. Cut along the line. This will be the body.
Straw
1. Roughly cut out two egg carton cones. On one, draw a pencil line around the cone, just above the bumpy joins at the bottom. Cut along the line. This will be the body.
(If your egg cones have holes in the top, brush glue inside the cone and push a small piece of newspaper up to fill the hole.)
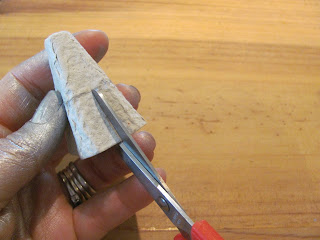
Cut up the middle of one cone side to this pencil line, then wiggle and turn your scissors, and cut along the pencil line to the corner and just a little beyond.
Do the same on the other side so you've cut a 'T' shape.
Repeat this 'T' shape on the opposite side of the cone.
Repeat this 'T' shape on the opposite side of the cone.
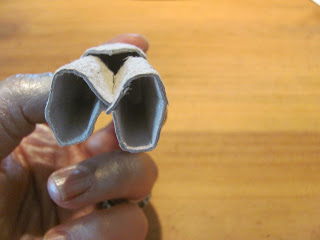
4. To form the legs, press the cut edges in the middle towards each other and squeeze each one into a more rounded shape. You should end up with what looks like an impressive pair of flares! Trim if you you'd like them a little less flary...
5. For the arms, cut a thin strip of card from the egg carton lid - about 5mm (1/4in.) wide and 5cm (2in.) long. Round it at the ends for the hands.
6. Either cut the arm strip in half and glue the pieces either side, or, with adult supervision, use the nail scissors to make a hole in the middle of one of the arm sides (keep the scissors closed, press down and twist from side to side.)
7. Once you've made the hole, snip up to the top of the cone and down the other side until the slot looks level. Cut an extra sliver out to widen the gap for the arms. Make sure the slot goes far enough down the body, so when you push the arm strip in, it sits below the top part of the cone, then glue the head on here.
7. Once you've made the hole, snip up to the top of the cone and down the other side until the slot looks level. Cut an extra sliver out to widen the gap for the arms. Make sure the slot goes far enough down the body, so when you push the arm strip in, it sits below the top part of the cone, then glue the head on here.
8. When that's set, paint the figure white. (Or if your egg carton is white, then move on to step 9.)


