30.10.13

Mini Halloween figures - Part 2

What to do with a bucketful of pumpkin pieces?
Not so keen on pumpkin pie; soup is fine (especially good with apple), but this year I was thinking something sweet like muffins, and then as if by spooky magic, Emma's recipe for spiced pumpkin muffins popped up on my blog list, so we'll be having a go at that later.


Back to the cardboard pumpkin, (ghost and bat are here) and you'll need to cut two egg cups from your box. Keep them shallow and as even as possible, so you can stick them together. But before getting the glue out, use your fingers and thumbs to press the egg cup bottoms, making them more dome shaped.


Splosh on some orange paint and when dry, use a felt tip for the face. Make a hole in the top, roll a small piece of green paper as tightly as you can for the stalk and push it in.


A little more work for the witch, but hopefully worth it.

You'll need a small cone from the middle of the box. Paint it black, leaving a space for the face.
Having a green egg box was a bonus, but if yours is another colour, just paint the face when the black's dry.


Cut a small triangle from spare egg box card for the witch's nose. Fold this little bit of card in half, make a hole with nail scissors (keep them closed, press down and twist from side to side) in the middle of the face and wedge the pointy nose in.


We stuck on some brown wool for hair, but coloured tissue paper would work well too.
Draw a witchy mouth and eyes with a felt-tip.

The hat is made from two small circles. We had no black paper so just coloured some in.


The smaller circle sits on her head, cut the the larger one in half. Twist and glue it into a cone shape. Use plenty of glue to stick the cone to the bottom of the hat.

Make her broomstick by wrapping and gluing a rectangle of tissue paper (or ordinary paper) around the end of cocktail stick. Snip the paper to make it more broom-like.


Make holes in the witch's body (with the nail scissors) - higher at the front than the back, so her broomstick sits at an angle.


Cut a strip for arms from your black paper, making it wider at both ends for the flared sleeves. then glue in place.


The plan was to come up with a game using these mini figures, but that's going to have to wait..


Happy Halloween!

Linking up with Kids Get Crafty

29.10.13

Disco downer and easy-make mini Halloween figures

The school Halloween disco..
My 8th school Halloween disco.
Not a favourite date in the diary by any stretch, but of course the kids love every mad moment of it. I've been especially bah-humbug about the whole thing this time, because they're at new schools, and I'd let myself believe we wouldn't have to go. No such luck. They've been on the phone to their old friends haven't they, and then the pleading and begging started. To be fair, I got some good bribery mileage out of it - homeworks have been done, rooms have been tidied, so can't complain really.

And I like Halloween, minus the crazy, sugar-fuelled, ear-splitting dancefest.
We usually do a family night of party games sometime during Half Term - all the old favourites, like dunking for apples, getting sweets out of a pile of flour with your teeth, and best of all, trying to bite doughnuts off dangly strings, which is hilarious. If you haven't had a go at this for a while I urge you to string up some buns..


Making the room look spooky is always fun. Love all that stuff. The Bat Mobile from last year is still swinging from the light in the toy room, though missing a ghost and a few bat wings. There have been plenty of other loo roll creations since then, and I've also gathered up an impressive hoard of egg boxes, so that's what we've used to make mini Halloweeen figures.


If you'd like to have a go, you'll need an egg box with the cone bits down the middle like this.


Cut one out for a bat and paint it.


Fold a piece of paper in half and draw a bat wing, using the fold so it opens up. Glue onto the back.
We used bits of white paper for the eyes and teeth.


Spread a decent layer of glue where you want the face to be (a glue stick is good for this). The eyes are little triangles coloured in with a green highlighter pen. The fangs are triangles too, joined together with a tiny rectangle. If this all sounds too fiddly I'd suggest going for a non-black bat, and using felt-tips, or a tipex pen if you have one.


For the ears, colour in a thin strip of spare card from something like a cereal box. Cut two longish pieces from it and snip them into points at one end. Make slots on top of the bat's head and push them in.


Take another egg box cone for the ghost, and glue down a few layers of white tissue, making sure to keep the tissue flat on one side, so you can draw a face.


Chop off all the bits hanging over the edge and snip what's left to make it look raggedy and ghoulish.


I'll post the witch and the pumpkin instructions v shortly. Hang on to that egg box!

Plenty more spooky pics over at The Gallery.


24.10.13

Egg carton Panda

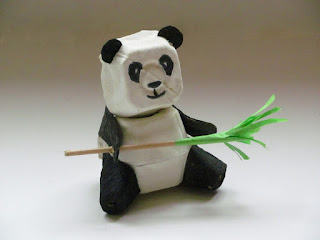
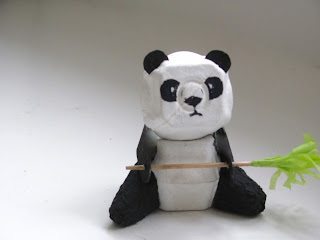
My husband's favourite so far. Peter Panda is made from painted egg carton bits, and that's about it - apart from his little bamboo!

egg carton panda

You will need:

2 Egg cartons (with the cone shaped pieces down the middle - some don't have them. It's the same part used for the penguins and the monkeys.)
Scissors
Black and white paint
Tacky glue (Make your own by putting a small amount of PVA craft glue in a clean, uncovered jar or yogurt pot for at least a day. The longer you leave it the thicker and tackier it gets.)
Or use a glue gun
Nail scissors or similar to make slots (*to be done by an adult or with grown-up supervision)
Black felt-tip or gel pen
2 tooth picks
Green tissue paper

1. To make the body, roughly cut out two whole egg cup pieces from the egg carton, then measure and mark points around each cup, about 2cm up from the cardboard bottom. (More or less than 2cm is fine, as long as it's the same on both cups). 
Join the points with a pencil, to help with the cutting, and cut carefully along the line.

Spending a bit of time measuring and cutting can be a bit fiddly, but it does make it easier to fit the two pieces together.


2. Use plenty of tacky glue around the edges to stick the pieces on top of each other and to fill any gaps. (Or use a glue gun)

3. While the body is drying, cut out another egg cup, but leave one side a little higher, so it curves upwards making a kind of lip or tab. (See photo below)


4. Once the body is ready, draw a slightly curved pencil line (slot for the head), on top, and with nail scissors* pierce a hole in the line (keep them closed, press down and twist from side to side), then cut along the line and open up the slot a little.


Push the head tab in here to check it fits. If the head sticks out too much, make your slot bigger or the head tab smaller. Take the head out again.


5. Use two middle cones for the legs. Cut them out roughly first, then neaten up, so they're both about 4cm high. Again it doesn't matter if they're more or less than 4cm, as long as they're the same height. 
Halfway up one side, draw a line straight across, and then draw down the next side at a diagonal, to the bottom corner (do this on both sides). Cut out your leg pieces.


...you want them to fit fairly snuggly to the egg cup body. Keep snipping away until you're happy, but don't glue them yet. The left leg in the picture below still needs a little work! (apologies for colour change)


6. Next, paint the body and head white, and the legs and some spare card black. This is for the arms and ears. Paint both sides black (we used the egg carton lid).


7. When dry, glue the legs to the body using plenty of tacky glue (or a glue gun).

8. While that's drying, cut a piece for the arms from the black card. You want it long enough to wrap around the back of the egg cup body (roughly about 12cm). You can cut a straight strip (about 2cm wide), that's absolutely fine, but it looks good if you make the strip slightly curved, wider in the middle (about 2cm), and narrower at the ends. (like a wide smile!) Round off the ends for the paws.


9. Cut out ears too, and remember to make them long at the bottom, so there is a card tab to slot into holes on top of the panda's head.

10. Back to the arms, and make a small hole in each paw (put the card on top of a piece of plasticine/modelling clay and push the tip of the *nail scissors or a skewer through)  Glue the arm piece on - it should sit a little higher at the back - and push a cocktail stick through the holes to hold everything in place while the glue dries.


11. While that's drying, use a black felt-tip or gel pen to draw a face on your panda. For the eyes, start by drawing a small round ring, then colour in around it, leaving the centre white.


12. Mark slots where you want the ears to go on top of the panda's head (more to the sides looks best), making sure the slots are long enough.
Use *nail scissors to pierce through the card on the line (keep them closed, press down and twist from side to side). It is a good idea to place a big lump of modelling clay behind the ear slots, so you have something to push into. (the blue stuff in the photo below)

TIP: Instead of making slots for the ears, you could simply fold the ear tabs back, and glue them to the head. 


Once you've made a hole, carefully cut along the slot lines, and wiggle the scissors in and out a bit, so it's easier to push the ears into place.


Then glue the head into the body slot.

We gave our panda a bamboo to chew on. Cut the pointy bits off another cocktail stick and wrap and glue a few small rectangles of green tissue paper around one end. Snip when dry.

Replace the cocktail stick holding the arms in place with the bamboo shoot.


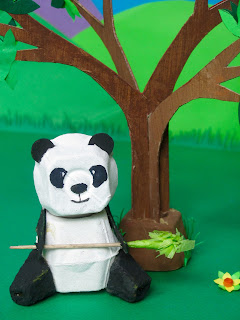
Panda

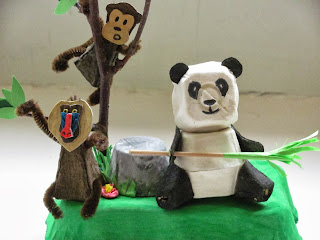
Peter spends a lot of time hanging out with the monkeys...


panda - make your own zoo

egg carton panda

You can also make a bear in exactly the same way - just change the paint colour - and try a lighter shade for the muzzle and tummy (and paws if you like). 
Use the cocktail stick to hold the arms to the body while the glue dries, and then remove it, or use a glue gun if you have one.

egg carton bear

Many more projects like this in my craft books, 'Make Your Own Zoo' and 'Make Your Own Farm Animals'


9.10.13

Nostalgic Knit


It fits!
Such a relief.
Almost 2 years since I cast on the first stitches, and quite honestly after all that time I wasn't holding out much hope. Mind you he's not allowed to grow for a while...apart from his arms, they can grow; for some reason I got a bit carried away with the sleeves...

I'm thinking it would make a perfect Christmas jumper, and bless him, he's promised he'll wear it because he knows how long it's taken me. Though sense there might eventually be some bribery involved.

I was given the pattern decades ago by a friend who was well aware of my love of all things Tintin. I had every single book of course, and couldn't for the life of me understand why my sister didn't like them - I mean what's not to like about a plus-four wearing mildly rascist reporter whose best friend is a suicidal alcoholic?
But none of that stuff, nor the lack of women, bothered me in the slightest when I first started reading the books - they were just cracking adventure stories as far as I was concerned. Adults do have a knack of ruining things sometimes.

I've passed my Tintin collection onto the kids, and the boys dip into them from time to time - and the 8 year old seems genuinely pleased with his jumper... though we all know who it's really for :)

3.10.13

What you don't know....

The other day my daughter pulled two grubby old jumpers out of the cat's outside bed and waved them at me, 'You could make bunnies out of these mummy!'
Now, there was a part of me thinking 'that's my girl', obviously my fiendish recycling is rubbing off on her; but the other part was wondering if this really was a step too far. Even for me. I mean there were minging beyond belief, and so thick with hair and dirt they could stand up on their own.
Best to leave them be?
But, you see, there was something else, something that stopped me putting these woollies straight back. They were cashmere. Oh yes, our cat is one spoilt missus. She's spent the last two years sleeping on an old cashmere cardy of mine (loved so much and worn till it fell apart), and an exceptionally holey jumper belonging to my husband. All his jumpers seem to have holes.
They were too far gone to mend, and there was no way I was just going to bin them, but couldn't think what else to do, apart from cosying up the cat's bed.
I've other ideas now though. I reckon a cashmere rabbit has got to be worth a bit more....and I'm trying to build up stock for my first Christmas Fair.

You know where this is going, don't you.

So I brushed them and bashed them and washed them on a hot wash. Twice. This felted the wool nicely; then I brushed them some more, before putting them in a bag in the freezer for a day. Just because really.
Finally I got the sewing machine out.

So there you have it. Cashmere rabbits that have lived a pretty full life already. But no one needs to know...do they...


and I don't think Humbug's bothered....or is she giving me a Look?