Peonies are a real head-turner at this time of year, with their showy blooms in all kinds of colours. I saw the most beautiful tree peony the other day with enormous pink flowers, which sort of got me thinking about this project. And of course peonies were centre stage at the royal wedding.
The great thing is, because of their naturally ruffled, billowy shape, they're really easy to make.
You will need:
Sheet of yellow tissue paper
3 sheets of coloured tissue paper for the flower
Scissors
Craft glue
Elastic band
Pipe cleaner (optional)
1. For the petals, we used a white sheet of tissue paper and two pink sheets.
Fold one sheet a few times, so you have a few layers and cut a square, about 16cm by 16cm (or bigger if you want).
The shape of our sheet meant it was easy to fold into a square shape that was roughly the size we wanted, so all we had to do was just cut along the creases.
Repeat with the other two coloured sheets, so you end up with lots of tissue squares.
2. Take one square and fold it in half, then fold it again, into a smaller square. With the pointy end (that's the middle of the square) nearest you, fold into a triangle and cut the other wider end into a curved shape, so it looks a bit like an ice-cream!
I've drawn it on so you can see more clearly. This might be a good thing to do for younger makers too. It doesn't matter if the shape you cut varies from piece to piece - having different petal shapes will add to the overall effect.
4. For the centre of the flower, fold the yellow tissue paper sheet over a few times and cut about a 6cm strip.
5. Hold the folded tissue firmly, and cut a fringe along an open side - cut about halfway down.
6. Roll the strip tightly at the bottom, and put a small blob of glue at the end. Finish rolling, and squeeze where the glue is, so it sticks the tissue paper layers together.
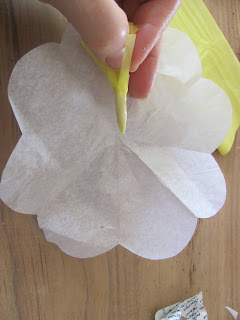
7. Brush some more glue all around the bottom part of your yellow centre, then put the gluey end in the middle of one of the petal pieces and simply gather up, and press around the yellow centre. Give it a good squeeze at the bottom.
You can either keep brushing glue around the bottom before each petal piece (can get quite sticky), or just keep gathering the petals around the centre without glue, keep a firm grip on the bottom, and then, with adult help, wrap a small elastic band around a few times, to hold the petals in place.
Give your finished flower a bit of a scrunch, before fluffing it out a bit with your fingers.
You could also wrap the end of a pipe cleaner around the bottom of the flower a few times, to secure it, so it's easier to display in a vase, or attach as a decoration.


