

They both started off with the same basic body shape as the elephant, which is here if you want a reminder - the only difference is we shortened the legs a little.

Thought I'd make the rhino's head a little longer by gluing on one of these knobbly bits from inside the top lid of an egg carton (cartons obviously vary, but some seem to have them).

We did end up snipping the tip off, (then stuck it back inside to block the hole) because it was too long and the rhino was starting to look like an Anteater...


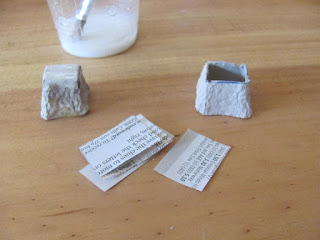
Or you could cut the top 3cm/1in. or so off an egg carton cone, then cut this piece in half (squeeze it flat and cut across) - the bottom half makes a good snout. Cover the end with a small square of newspaper using watered down PVA/craft glue. Brush plenty of glue over the top of the newspaper and round the edges too, to smooth the paper down. A bit like papier mache.
OR, for an easier version, scrunch up a small piece of newspaper, brush glue inside the snout and stuff with the scrunched paper.

For the hippo, we scrumpled up a small bit of newspaper until it was snout-sized, and wrapped and glued another small piece of newspaper tightly around it, before sticking the snout to the head. Again take the head out to do this, and use tacky glue.
Push a scrunched up ball of newspaper up the other end of the tube, to balance it, and stop the hippo tipping on its schnoz. Do the same for the rhino.


Next paint the bodies, and don't forget to paint some of the toilet paper tube card left over from making the legs. This will be for the ears, eyes and tails, so you don't need much card.
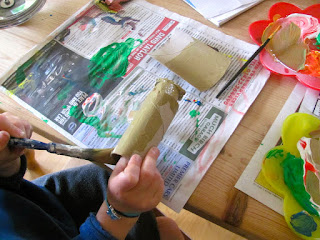
Handy tip: once the paint has soaked in a little, dry the bodies upside down or on their side, in an egg box lid - if you dry them upright when the card is wet the legs can end up a bit splayed, like they're doing the splits!
To finish the rhino, cut out two horns from a piece of unpainted toilet paper tube card - one big, one small, and pointy ears. Make all of them a little longer at the bottom so there's a tab to slot in. Then, with the head in place, mark where you want the ears and horns to be.
Take the head out again, and either fold the tabs at the bottom of the horns and ears and glue in place, OR, pierce a hole on each line (nail scissors are great for this - keep them closed, press down and twist slightly from side to side. To be done by an adult) and cut along the small slots. Wiggle the scissors in and out a bit so it's easier to thread the ears and horns through.
Next, draw on small eyes, nostrils and a mouth. Don't forget the tail. (Glue at the back, inside the tube and bend into place when dry).


For the Hippo, cut out a tail, small round ears - again make them long enough, with a tab to slot in,
and because hippo eyes are a bit boggly and stick out - cut two thin, strips of card and round them at one end. Then add a black dot with a felt tip pen (see pic)

Draw slots for the ears near the join with the body and for the eyes, in front, a little closer together. Like the rhino take the head out again now. Then, either fold the tabs behind, and glue the pieces in place, OR cut slots (keep the nail scissors closed, press and twist to make a hole. To be done by an adult).


Best to pop the head out when you're gluing the snout on, so it doesn't slip off. Use tacky glue if you can (make your own by leaving about a cm of PVA glue in an uncovered yogurt pot or jar. It should slowly start thickening up after a day or so - the longer you leave it the thicker it gets).
Push a scrunched up ball of newspaper up the other end of the tube, to balance it, and stop the hippo tipping on its schnoz. Do the same for the rhino.


Next paint the bodies, and don't forget to paint some of the toilet paper tube card left over from making the legs. This will be for the ears, eyes and tails, so you don't need much card.

Handy tip: once the paint has soaked in a little, dry the bodies upside down or on their side, in an egg box lid - if you dry them upright when the card is wet the legs can end up a bit splayed, like they're doing the splits!
To finish the rhino, cut out two horns from a piece of unpainted toilet paper tube card - one big, one small, and pointy ears. Make all of them a little longer at the bottom so there's a tab to slot in. Then, with the head in place, mark where you want the ears and horns to be.
Take the head out again, and either fold the tabs at the bottom of the horns and ears and glue in place, OR, pierce a hole on each line (nail scissors are great for this - keep them closed, press down and twist slightly from side to side. To be done by an adult) and cut along the small slots. Wiggle the scissors in and out a bit so it's easier to thread the ears and horns through.
Next, draw on small eyes, nostrils and a mouth. Don't forget the tail. (Glue at the back, inside the tube and bend into place when dry).


For the Hippo, cut out a tail, small round ears - again make them long enough, with a tab to slot in,
and because hippo eyes are a bit boggly and stick out - cut two thin, strips of card and round them at one end. Then add a black dot with a felt tip pen (see pic)

Draw slots for the ears near the join with the body and for the eyes, in front, a little closer together. Like the rhino take the head out again now. Then, either fold the tabs behind, and glue the pieces in place, OR cut slots (keep the nail scissors closed, press and twist to make a hole. To be done by an adult).
Carefully snip along the slots and wiggle the scissors in and out a bit to make it easier to push the ears and eyes into place.
Add the tail and draw on nostrils and a big smile.


Add the tail and draw on nostrils and a big smile.
Many more projects like this in my craft books, 'Make Your Own Zoo' and 'Make Your Own Farm Animals'

