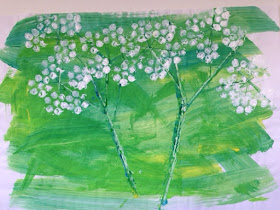
So first, we painted our background a mix of greens.
From early on I've encouraged the kids to use different shades of the same colour when they're painting or drawing - various greens for the grass and for trees, blues for the sky or sea and browns for wood. It's simple to do, looks really effective and helps them understand about colour mixing and light and shade.
Put your similar colours on the same plate or palette. We used green, blue and yellow poster paint, and mixed the yellow and blue together to make a different shade of green, leaving just a little of the blue and yellow unmixed.
Then dip an ordinary decorating paintbrush into some water (a big brush makes it easier to paint a large area quickly). Make sure it's not dripping wet, just keep it damp, and then have fun painting the different greens onto the paper, mixing them into each other, with the occasional streak of blue or yellow too. The key is to do it quickly and then leave it. Try not to over-work the background.

While that's drying, cut out a circle of bubble wrap dots like this ( 7 dots in total) - but make sure not to cut too close to the bubbles, so you don't deflate any of them! We then glued the unbubbly side to the bottom of a cork, to help with the printing.

While the glue's drying, squirt some more green paint onto your plate and mix in some blue on one side to make darker green. On the other side of the plate, mix in some white paint for a very pale green.

For the stems we used those thin wooden coffee stirrer sticks, but you could use lollypop or popsicle sticks or anything like that to print a thin, straight line. If you've a few spare sticks break one up, so you can print different length lines.
Press the stick into the dark green paint - make sure there's paint all along it, and print a stem onto the green background. If your stick is much wider than ours (and too wide for a stem), use the thin edge to print two or three lines next to each other. This should make the stem look the right thickness.
Press a clean stick edge into the pale green paint and print this thin line down one side of your stem, as if the light's catching it. This gives a more 3D effect, and helps lift the cow parsley out from the background.


It can get pretty messy, but sure that's half the fun!

It's worth having some freshly picked cow parsley to look at, so you can see the shapes of the stems and flowers (though be careful when you pick it as the sap can sometimes irritate your skin). Add more stems to your painting. At the top of each one, use the thin edge of a stick and the dark green paint to make spoke-like stalks, crossing the printed lines in the middle, like stars.

Get the flower stamp ready and either paint the bubble wrap with a good layer of white paint, or press into some white paint (make sure the paint isn't too thick though, or you'll end up with a big white splodge).
*You could cover a piece of thin kitchen sponge in white paint to make your own DIY stamp pad*

Carefully print your white flowers at the end of all the spoke-like stalks.


