29.11.15
Hey, Hey, HAY!
Kind of feel I'm getting into the swing of the kids' craft workshops now. Definitely learn something new every time I do one; like not to be ridiculously over ambitious with the making plans.... an hour disappears so quickly when you're crafting. No fun rushing and trying to cram too much in. With a bit of time and space kids start coming up with their own imaginative ideas, and that's what it's all about really.
Friday's workshop at the Hay Festival Winter Weekend was a lot of messy, sparkly fun. Such a lovely setting too, in Hay castle. The kids made little feathery lovebirds from 'Make Your Own Zoo' and to Christmas them up a bit, I attached a loop of thread so they could be tree decorations, and laid on the glitter and sparkles! The children also made homes for their birds - an egg box lid bank and a tissue paper streamer tree.... with a generous sprinkle of glitter and shiny stars of course.
Some splendiferous, creative making. Just lovely to see.
Afraid the pictures aren't great - it was quite dark inside, but at least I took some this time!
While I was packing up they were getting the room ready for a live band and dancing, and warming up the mulled wine. Wish I could have stayed!
15.11.15
Mobile Trouble
Not the kind you're probably thinking. The kind you hang from the ceiling. The kind that seem unfeasibly difficult to photograph. Any tips?
I tried this one in different places; different lights; up close; from a distance, and think probably the outside shots are the best. But it was a challenge and I took a ridiculous number of photos.
More mobile-like, but a bit lost?
It's made from egg box parrots, which are easier to make than they might look. Step-by-step here.
What's not so easy is tying them onto the blinking sticks and getting the whole thing to balance.... But very satisfying when it does. I found a dab of glue on the knots helps, to stop strings slipping about and un-doing all that hard work.
They'd look lovely hanging from a branch... and a lot less hassle.
Or maybe add a bit of glittery sparkle and hang them on the Christmas tree?
Linking up with My Sunday Photo at OneDad3Girls
I tried this one in different places; different lights; up close; from a distance, and think probably the outside shots are the best. But it was a challenge and I took a ridiculous number of photos.
The close up ones aren't too bad either, but don't look so mobile-like.
More mobile-like, but a bit lost?
It's made from egg box parrots, which are easier to make than they might look. Step-by-step here.
What's not so easy is tying them onto the blinking sticks and getting the whole thing to balance.... But very satisfying when it does. I found a dab of glue on the knots helps, to stop strings slipping about and un-doing all that hard work.
Or maybe add a bit of glittery sparkle and hang them on the Christmas tree?
Linking up with My Sunday Photo at OneDad3Girls
13.11.15
Easy DIY Nativity - #christmascrafts
We made this Nativity scene a few years ago, and it worked really well (it's here if you'd like to have a look).
Thing is it's made out of paper, so, didn't really stand the test of time... though we do still have the three Wise Men.
They live on top of my spice jars in the kitchen.
It's been on my mind to make another nativity scene - a cardboard one this time, that should hopefully last a little longer, and I've been eyeing up the cat food box for a while, thinking it would make a pretty good stable? So, over the next few weeks I'll be sharing some ideas here.
If you don't have a cat, or a friend with a cat, then look out for any other packaging that's a similar sort of shape. This teabag box has a nice arched opening too, but your stable really doesn't have to have one - it could be the bottom end of a large cereal box or a dishwasher tablets box. As long as it's high enough for the figures (about 10cm).
I've kept the cardboard flap on our box, and might add something to it later, but it'll work just as well without.
Painting the stable is the easiest option.
Rub the shiny outside of the box with some sandpaper to remove the sheen and to give the paint something to grip to. To make a good 'stable' brown, mix a little red with a lot of yellow to make orange, and then keep adding small amounts of blue, until you're happy with the colour.
Probably need 2 coats.
I went for the slightly harder option and covered our box with brown paper. Does take a bit more time, but think it's worth it.
Start with the sides of the stable and cut out two identical bits of paper that are a bit bigger than the area you're covering.
To do this, place the box on one side on the paper, and line the bottom of the stable with the edge of the paper.
Mark a few dots about a cm out from the other 3 sides. This is so you have extra paper to fold over the edge of the box.
Use a ruler to join the dots. You need two pieces the same size (you could fold the whole sheet of paper in half and then cut them both out at the same time).
Brush craft glue evenly over one side, making sure you get into the corners, then line the piece of paper up with the bottom of the stable, making sure you have a similar size overlap on the edges. Press along the edges to crease the paper.
At each corner, snip a small triangle out of the brown paper to make it easier to fold - brush a line of glue along the edge of the box and stick the overlap down. Do the same on the other side. This will give you a much neater join when the rest of the stable is covered.
Cut a piece of paper that's the width of the stable - line the box up with the bottom corner of a sheet of brown paper, mark the width of the box, and use a ruler to draw a line along the whole length of the sheet. Cut out, following the inside of the line - you don't want this piece of paper to hang over the edges of your stable.
You might find, (as we did) that one piece of paper is not long enough to cover the front, top and back, so, cut another piece the same width as the stable, and make it a little bigger than the gap you need to cover, so there's an overlap.
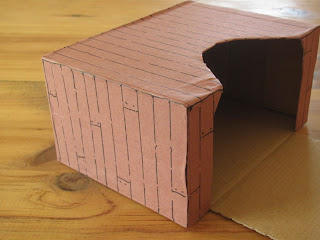
Cover the front, top and back of the box with an even coat of glue, then, starting at the front, line up the paper with the bottom edge and carefully stick it down, a little at a time, pressing and smoothing as you go. If you're working with a box like mine you will be covering the arched opening too, like this.
If you're using the bottom end of a large cereal box, or something like a dish washer tablets box, then you'll only have to cover the top and back. To get a neat finish, leave a cm or so of paper hanging over the front edge, so you can fold and glue it underneath.
If you have an arched opening, cut the hole out, but don't go right up to the edge - leave a paper border of about 1cm around the arch.
Snip into this extra paper, up to the edge and crease it back, before gluing.
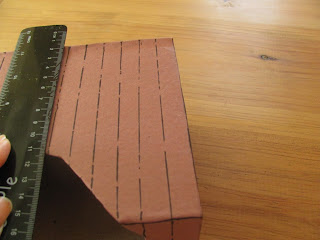
Once the glue's dried, (or paint if you've gone that route), then use a ruler and a black felt tip pen to add lines for a wooden tongue and groove effect. I found drawing a broken line like this worked well, giving it a more rustic look.
Don't worry if they're a little uneven - a bit of variety is good.
Randomly draw a few short lines going across some of the planks, to look like joins, and add two dots for nails.
For the straw, loosely fold a yellow and orange sheet of tissue paper together, and snip across to make really thin strips.
Unfurl your strands, then - the really fun bit - cut or tear and scrunch them up, until you're happy with your tissue paper straw. Place in the stable.
Figures next time!
31.10.15
Leaf Art and a gift idea
Leaves are great for simple craft projects - just don't forget to press them quickly, before they start curling and crinkling up.
This is when I miss the old telephone directories, because they were perfect for the job. Still, a large book works fine. Put a few leaves between pages and weigh down with some other heavy books for a couple of days, until you’re ready to use them.
But what to do with your leaves? A few years ago we made bookmarks which worked brilliantly - they were useful, looked pretty good and made perfect presents.
The thing is, just about everyone we know in the whole wide world has been given one.
Time for something new...
The thing is, just about everyone we know in the whole wide world has been given one.
Time for something new...
..so, this is the other idea - a leaf art/collage notebook.
Make sure you’ve got a good selection of leaves - colours, sizes, shapes.
I got the plain notepads from Asda. Only 45p. They’re spiral-bound ones, but any kind would do. If there’s some writing on the front, cover with a piece of white paper cut to size (glue down with a glue stick)
Arrange your leaf design first, and when you’re happy, start sticking. We found it was best to brush a thin layer of craft glue on the back of the leaves. Lots of inspiration online or try with your own pattern.
Then cut some clear sticky back plastic - you'll only need a piece to cover the front, with a cm or so extra to fold round the 3 edges.
Start at the bound side, peeling a little of the backing paper off at a time, and smoothing out air bubbles and any wrinkles as you go.
Then cut some clear sticky back plastic - you'll only need a piece to cover the front, with a cm or so extra to fold round the 3 edges.
Start at the bound side, peeling a little of the backing paper off at a time, and smoothing out air bubbles and any wrinkles as you go.
Then wrap the extra sticky back plastic neatly over the edges.
Quick workshop update - it was such a full on day, with 3 sessions fairly close together and more kids than expected! And even though I wished I'd brought something like a hair dryer because it was too cold for the paint to dry quickly, and what I planned to fit into the hour was massively overambitious, everyone seemed to enjoy it - lots of impressive making anyway! For me it was just lovely seeing the animals come to life and watching the kids come up with their own ideas about how their lions/penguins/giraffes should look. Sure that's what it's all about.
I'm kicking myself I didn't take more photos - there are a few here, on the MYOZ Facebook page - I'll definitely take more at the Hay workshop at the end of November. And now I've had a bit of practice and learnt a few lessons, I'm feeling much more confident about that one!
22.10.15
Make Your Own Zoo, down on the farm!
I'm holding my first Make Your Own Zoo workshops next week! REALLY excited. A little apprehensive too, but mostly excited.
They're at Kate Humble's farm, Humble By Nature near Monmouth which is a pretty special venue.
Humble By Nature is the place to go to learn rural skills, like running a smallholding and animal husbandry, and there are cooking and craft courses too. Such a varied range of things to do, often with a bit of a twist! And the team are always open to new ideas; ones that share their values. Do have a read about how it all began, here. It's been quite a journey.
I'm doing three, hour long sessions on Monday, and they're all sold out which is brilliant. So, there'll be 10 children + parents coming along to each one, and my goal is to make it fun, and to send everyone home with as many animals as we can possibly squeeze into an hour!
I've done a bit of prep to keep things moving along, mainly painting pieces of cereal box card and cutting up egg boxes. Hopefully we'll manage a lion, giraffe or zebra, a penguin....
and, if there's time, a sheep! Definitely the right place to be making sheep. Might be a little ambitious though. I've been working on a few make your own farm ideas....
I'll let you know how it goes! Hopefully no hitches, because I've been asked to do a workshop at the Hay Festival Winter Weekend at the end of November which I'm so, so thrilled about. Can't believe it really. Another path that started here.
They're at Kate Humble's farm, Humble By Nature near Monmouth which is a pretty special venue.
Humble By Nature is the place to go to learn rural skills, like running a smallholding and animal husbandry, and there are cooking and craft courses too. Such a varied range of things to do, often with a bit of a twist! And the team are always open to new ideas; ones that share their values. Do have a read about how it all began, here. It's been quite a journey.
I've done a bit of prep to keep things moving along, mainly painting pieces of cereal box card and cutting up egg boxes. Hopefully we'll manage a lion, giraffe or zebra, a penguin....
and, if there's time, a sheep! Definitely the right place to be making sheep. Might be a little ambitious though. I've been working on a few make your own farm ideas....
I'll let you know how it goes! Hopefully no hitches, because I've been asked to do a workshop at the Hay Festival Winter Weekend at the end of November which I'm so, so thrilled about. Can't believe it really. Another path that started here.
19.10.15
DIY glow-in-the-dark Halloween board game
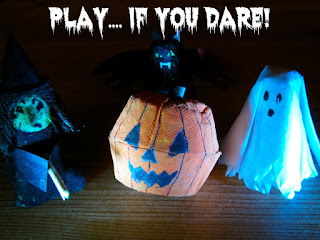
At last! A board game for the mini Halloween figures I made yonks ago. This was always the plan - it's just taken me a very long time to get round to it. If you'd like to make the figures, the pumpkin and the witch are here and the ghost and vampire bat here.
You'll need:
a cereal box (at least 28cm high)
glow-in-the-dark paint (optional)
good black felt tip (like a Sharpie)
ruler
scissors
toilet paper tube
paint
LED tea light (optional)
sweets (optional!)
1. Open up the cereal box - use the creased lines to help you draw a square 28cm x 28cm. Don't cut it out yet - easier to paint the whole square and draw lines when it's like this - less mess as well!
2. (Optional) Paint your square with a few coats of glow-in-the-dark paint.
3. Use the ruler to measure and mark points 3.5cm along all 4 lines. Then join them up with the black felt tip to make a grid. (3cm was too small and 4 was too big - 3.5 seemed just right)
Cut it out.
4. Now the bit that my kids really enjoyed - coming up with the good square/bad squares. Kind of like Snakes and Ladders, with an evil twist. We did a few miss-a-goes too. And my daughter came up with the idea of having some Trick or Treat squares. If you land on one you can have a sweet. I did try to point out no one was likely to want to do a trick with sweets on offer, but anyway!
Here are most of ours - I bet you could come up with even more gruesome ones.
Good squares: Halloween! +5, Jump on a broomstick +2, Drink witch's brew +1, find a black cat +3, Zombie party! +3, Full Moon! +4, Win a gruesome ghoul contest +4
Bad squares: Spell backfires -5, fall into a cauldron -3, Phantom flu -2, turn into a frog -3, lose your head! -4, and the worst of the lot, 'Zapped by a Ghostbuster! Back to the beginning'
Miss a go: get stuck in a web, catch Hog warts, fall in a slime pool
5. Write on your squares, (use different colours if you want) making sure you don't have for example, a +2 landing on a -2, sending your figure endlessly forward and back, like being trapped in limbo, FOREVER!!
6. Fill the numbers in around the good and bad squares (make sure you include them in your counting)
7. The winner is the first one to reach the haunted castle at the end of the game. It's made from a toilet paper tube. Cut out a door shape at the bottom, and make short, evenly spaced cuts around the top. Bend back every other flap to form battlements.
Use nail scissors to pierce a few holes in the tube and cut thin slits for windows. Then paint.
We popped a LED tea light (from IKEA) inside, to give it a ghoulish glow.
We've all played, even the grumpy teenager, and it's been great having a bit of time and a bit of fun together. Doesn't happen as much as I'd like these days.
Now looking for other things to do with the glow-in-the-dark paint.... Tempted to put 'tidy your room, or else...' on the 13 year old's wall, so it mysteriously appears at night.
Too mean? :)
Linking up with Trash 2 Treasure and Creative Mondays
Subscribe to:
Posts (Atom)


