Showing posts with label paper roll crafts. Show all posts

23.5.20

Pretty toilet paper roll butterflies!


I love butterfly crafts, and this is a very straightforward one. A great excuse to use lots of bright colours too!

You will need:
Toilet paper rolls
Paints (we used bottles of poster paints)
Scissors
Pencil
Pipe cleaner

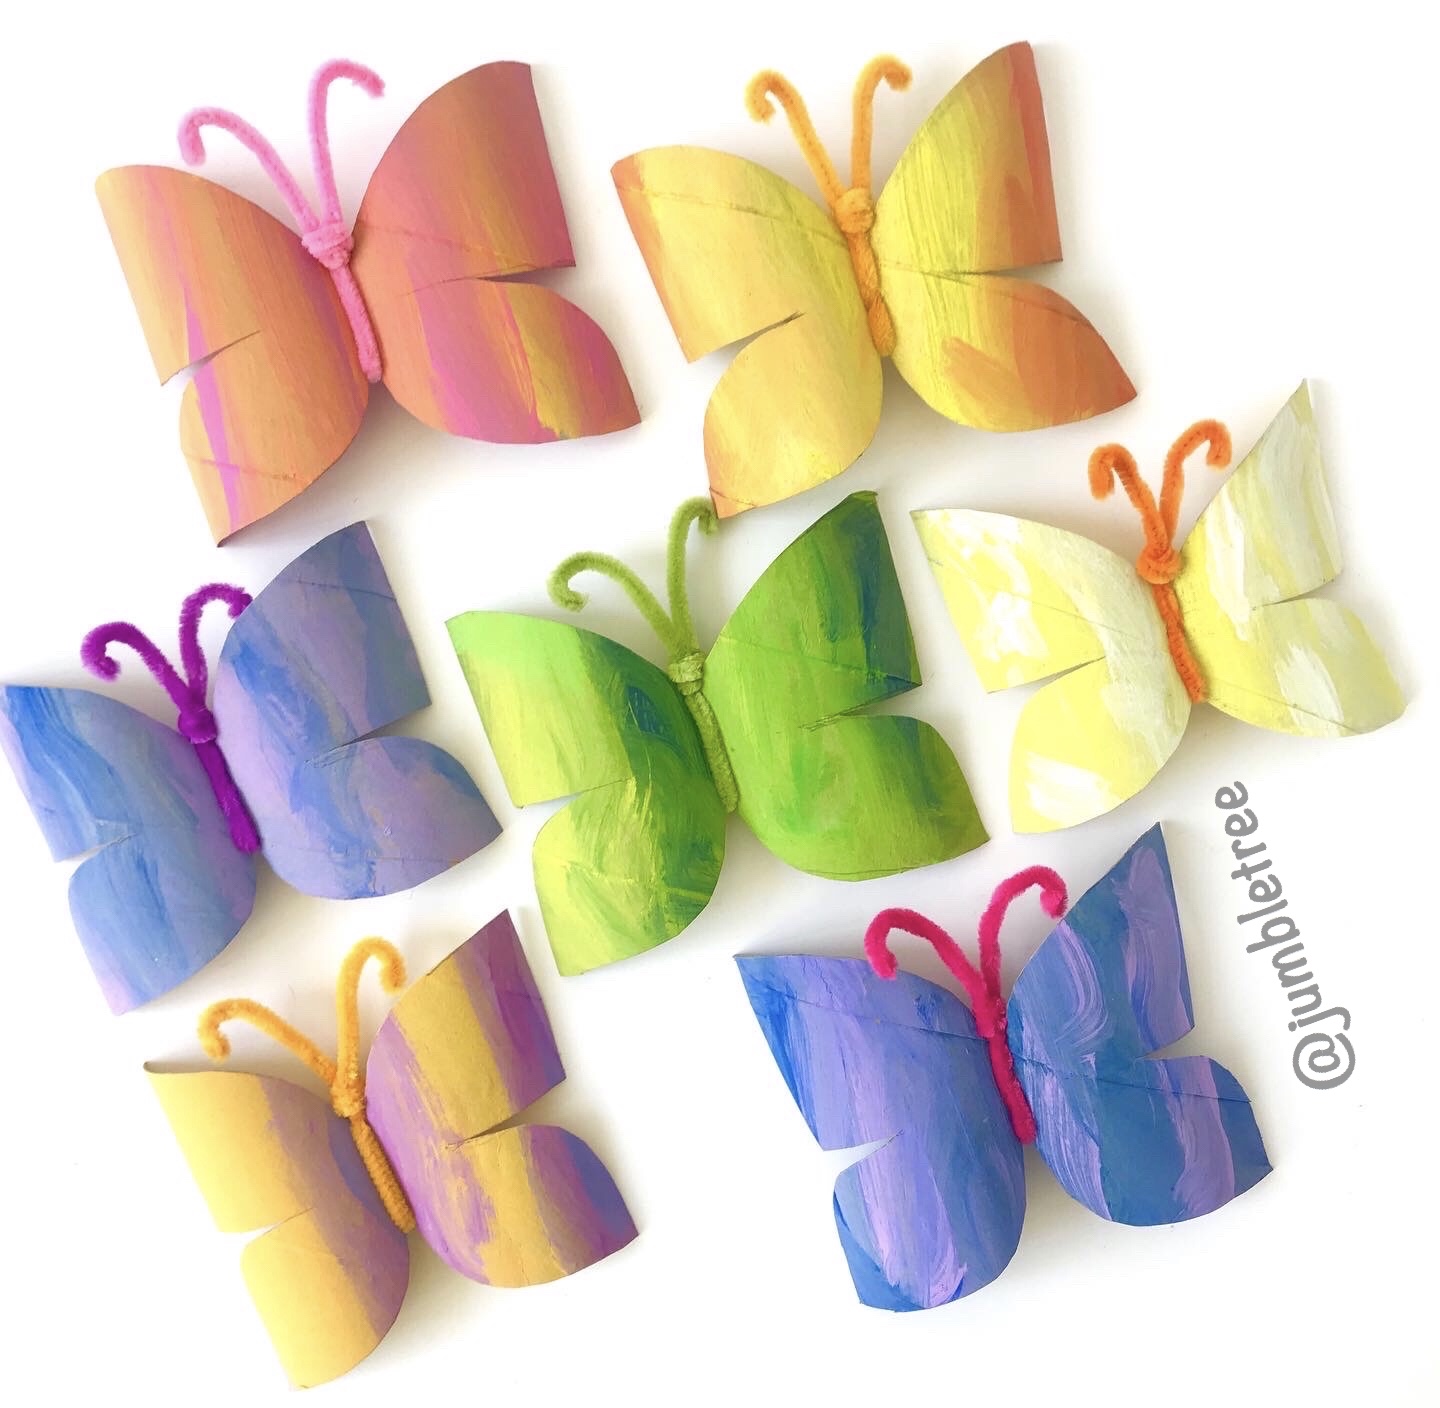
1. Paint your tubes first. To get a really nice mix of bright colours, put two or three blobs of colours that work well together on different plates (ones that don't make sludgy brown when mixed!). 

Like yellow and red, blue and white, or blue and yellow, green and yellow, yellow and pink, or blue, pink and white. White added to any of these colour combos looks great. We had some ready mixed purple too, which looked lovely with the pink and the blue.

This is a great way for kids to experiment with colour mixing, using a simple palette of complementary colours. Give them a big brush to paint with (we often use a pastry brush) - this helps with the mixing and with speed.. and then let them loose!

We painted the inside of the tubes as well, but you really don't need to. Works just as well without.


Mixing up the complementary colours gives a lovely marbly or sort of tie-dye effect. But if you wanted to do stripes of colours instead, or add some dots, that's totally up to you!


2. When the paint is dry, flatten a tube with your hand and press along the creases, so it's easier to draw on.

3. Use a pencil to mark the outline of your butterfly - for the butterfly body, mark about 3cm/1in along the crease, on the left-hand-side. To get the proportions of the top and bottom wings right, we drew this body line a little closer to the bottom of the tube than the top.

(As a guide, our TP roll was about 10cm, the body line starts 4cm from the top of the tube, and finishes roughly 3cm from the bottom of the tube.

Draw a curved line from the top of the body line to the top right-hand corner.

Make a pencil mark halfway down the body line on the LHS.

Draw a straight line from the right-hand edge towards this mark, but leave a gap (of about 2cm).

From the end of this line in the centre of the tube, draw a big curve down to the bottom right-hand corner.

Then, from the bottom of the body line on the LHS, draw another sweeping curve towards the same corner, but for fuller bottom wings, don't take this line right to the corner, stop a little before. See photo below.


4. Cut out your butterfly, cutting through the doubled-over card.  With the middle section, it's easier if you cut along the straight line first, then cut along the curve below, starting at the bottom right-hand corner.


5. Cut away a little sliver of the top wing crease. Cut it at a slight angle. See below.

Don't cut off too much!


6. Open up your butterfly. The natural curve of the tube makes a lovely shape.


7. Bend a pipe-cleaner in half and hook it around the middle of your butterfly.

Twist the two pieces together to fasten, then wrap one tightly around the other, to make a head.


When you're happy, decide how long you want the antennae to be and trim the pipe-cleaners, allowing a little extra if you want to bend over the pointy tips so they're not so sharp. Bend into shape.


8. We made so many butterflies we needed somewhere to put them! So we painted some old cardboard packaging brown (you could leave it its natural colour) and cut out a tree trunk and some branches.

We glued them all onto some brown wrapping paper with pva craft glue. But didn't stick down the very ends of the branches, so they stuck out a bit.

Then attach a paper clip to the pipe-cleaner on the underside of a butterfly and clip this onto the end of a branch.

If you don't want to be able to remove them, you could of course glue the butterflies onto the tree.


29.9.18

Clarissa the Cow - from 'Make Your Own Farm Animals'


I haven't shared many projects from 'Make Your Own Farm Animals' and thought it was about time I did! I'm really fond of this one, because the head shape is already there, in the shape of an egg carton, all you need to do is cut it out. 
The body is made the same way as many other animals you'll find in 'Make Your Own Farm Animals' and 'Make Your Own Zoo'. 

You will need:
Two toilet paper rolls
Egg carton
Sheet of newspaper
Scissors
Pencil
Ruler
Craft glue
Paint
Nail scissors or similar (with adult supervision)
Black pen

1. To make the legs, flatten one of the toilet paper rolls with your hand, press down firmly, then cut along the creases so you end up with two pieces of card. Keep one piece for later.


2. Take the other piece and fold it in half lengthways, again pressing down firmly, before cutting along the crease.


3. Fold each of these card strips in half lengthways again, pressing firmly along the fold. You will now have two folded strips for the legs.


4. Shorten the other toilet paper tube to about 8cm/3in. for the body (either estimate roughly or use the ruler the measure and mark 8cm on the tube, squeeze the sides together near the mark and then cut across the tube on the mark).


5. Hold a ruler along the length of the body tube and draw two lines about 1cm (1/4in.) in from each end. Make each line about 2cm (3/4in.) long.

6. Repeat this about 3cm (1in.) further round the tube, so you have four marks for the leg slots.
Then make a hole in one of the pencil lines with the nail scissors* (keep them closed, press down firmly, twisting from side to side). Once the scissor have pierced through, cut along the line. Repeat for the others.

*This should be done by an adult, or under careful supervision)


7. Wiggle the closed scissors in the slots to open them up a bit, before threading a leg strip in a slot and out the opposite one. Repeat with the second leg piece. Once they look level, hold the tube tightly near a slot and firmly fold the the legs down.  


8. Trim the legs so they're not too long and your cow body doesn't wobble!


9. The head is simply cut out of the end of an egg carton - the moulded cardboard shape is perfect for a cow's muzzle. Use the picture below as a guide and draw either side of the moulded part that separates the eggs, draw ears in the egg cup sections either side of the muzzle and take the top of the head up as far as you can go, so it's right on the join with a middle cone.


10. Roughly cut out the head shape first and then cut carefully along the line - keep some of the cardboard join at the top of the head if you can, as it makes a good fluffy forelock of hair. (Apologies for carton colour change!)

11. Cut a piece of newspaper (roughly 20x20cm/8x8in.) and scrunch it up so it just fits in the end of the tube. Take it out and brush glue inside the end of the tube, before pressing the ball of newspaper back in, making sure it protrudes slightly. Glue the head onto the newspaper.


12. Cut a strip of card for the tail, from the spare piece of toilet paper roll from earlier, and glue it under the top end of your cow. Leave to dry.


13. Once dry, paint your cow. If you would like to do a black and white one, like ours, then paint the whole thing white first, before adding the black markings. 
(The wet paint will make the legs go floppy - don't worry, when dry just bend them back into place.)


14. For the head, you could draw circles where you want the eyes to be and then paint around them. Paint the snout pink and when dry use a black pen to add nostrils. Bend the tail down, into place. 
(if your cow is a little head heavy and tipping forward, scrunch up another piece of newspaper and stick it in the tail end).


If you enjoyed this project, there are many, many more in 'Make Your Own Farm Animals'